How to work with duty
Scope of this guide
This guide is focused on working with duties using the SAFE web application. If you want to learn about API interactions see FRMSc API documentation or Apps.
You can create a new duty using the Create Duty form. You can access this form from the Schedules screen after you have created a schedule. You can also access it from the fatigue chart of the schedule. The control bar for duties in the fatigue chart, however, allows you to do more than just create a duty.

In this guide, we will learn how to manage duties using the web application.
Add a duty
There are two ways to add duty to a schedule. See below for instructions on both.
First duty in a schedule
The workflow
Creating duty is only a step in a larger workflow. The steps below isolate creating duty from that workflow. The following steps demonstrate duty creation process for users returning to create a duty in a roster.
To learn how to create a new duty as part of the entire workflow, see the Individual entry method in the How to load data into SAFE guide.
Adding duty to an blank schedule?
If you are returning to add first duty to a schedule, simply click on the schedule's card and follow the steps below.
- Create a schedule.
- The Create Duty form will appear. Enter the values in the properties. See Duty properties for more information on each property.
- Click Create. The schedule analysis screen and the schedule card will refresh and update. You can also continue further by adding activities and sleep period to the duty.
Additional duties
To add additional duties to a schedule:
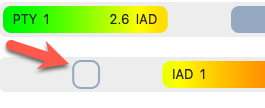
- Right click on a blank area of the fatigue chart and select Create Duty. A blank area is any region in the chart with the lightest shade of grey.

- The Create Duty form will appear. Enter the values in the properties. See Duty properties for more information on each property.
- Click Create. The schedule analysis screen and the schedule card will will refresh and update. You can also continue further by adding activities and sleep period to the duty.
Edit a duty
See duty control bar.
How to edit duty?
Optimise rest
Until the recent past, long-haul duties were exclusively single sector flight. However, it has become common to fly 2 sectors with augmented crew which creates a requirement to place the automatically generated sleep periods using the sleep count, sleep order and sleep class properties within a chosen flight sector. The administrator can decide the default sector to add the sleep - either the longest sector or the shortest sector, or the first or the last sector. The optimise rest function lets you override the administrator default for the duty. To optimise rest, just click the Optimise Rest icon when it appears on the duty control bar.
Manage sleep period
You can easily identify a sleep period in the fatigue-chart. A sleep period is any region in the chart with the darkest shade of grey or the brightest shade of blue.
The darkest shade of grey indicates the sleep period calculated by the models. The models' automatic calculation is based on the sleep assumptions set up by the administrators. See the following video to learn how to add model-generated sleep.
How to add model-defined sleep to a duty?
Users can also define sleep periods for duties. Such sleep periods appear in the brightest shade of blue to indicate the sleep is user-defined.
Add user-defined sleep period
How to add user-defined sleep to a duty?
To add user-defined sleep period:
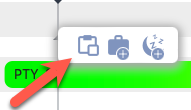
- Right-click a duty and select Create Sleep.
- The Create Sleep form appears. Enter appropriate values to the properties in this form. See Sleep properties for more information.
- Click Create. The fatigue chart reloads and sleep is added to the duty. For the ease of visualisation, the region will be coloured in blue.
Edit sleep period
How to edit sleep?
To edit a sleep period:
- Right-click the sleep period and select Edit Sleep.
- The Edit Sleep form appears. Enter appropriate values to the properties in this form. See Sleep properties for more information.
- Click Save to keep the changes made to the sleep. The fatigue chart reloads, showing the changes.
Delete sleep period
To delete a sleep period:
- Right-click the sleep period and select Delete Sleep. A sleep period is any region in the chart with the darkest shade of grey.
- A confirmation box appears, asking you to confirm your action. Click Delete to continue deleting the sleep period.
- The fatigue chart reloads and the sleep period is removed from the duty. However, an outline (the same shade of colour, which it originally was in) appears over the removed sleep period.
If you right-click over the outline, you will see the Restore Sleep icon. Click on the icon to restore the deleted sleep period.
Copy and paste duty
Limitations
- You can paste a duty once. After you click paste, the icon disappears from the control bar on the next right-click.
- You can't paste a duty over an existing duty. Such action shows an error and the Paste Duty icon disappears.
The Copy Duty icon lets you copy the information in a duty to the clipboard. You can then paste that information in a blank area within the fatigue chart. See below for step-by-step instructions.
- Right-click a duty and select Copy Duty.
- Move your cursor over to a blank area in the fatigue chart.
- Right-click over the blank area and select Paste Duty. The schedule analysis screen will reload and the duty information will appear over the blank area.
Delete a duty
See duty control bar.
Access the duty control bar
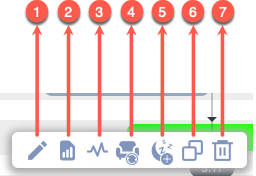
The schedule control bar appears when you right-click on the fatigue chart over a duty entry. This control bar also features a rich set of icons that control various functionalities related to the duty.
-
The Edit icon lets you edit the duty properties. Click on this icon to open the Edit Duty form. See Duty properties for a list of properties that you can edit. After you have made your changes, click Save at the bottom of the form to keep your changes.
How to edit duty?
-
The View Summary icon lets you see the key statistical analysis of the duty. If you click on this icon, a pop-up screen will open showing the key statistics. See below for an image of the pop-up along with the description of each label (alphabetical).
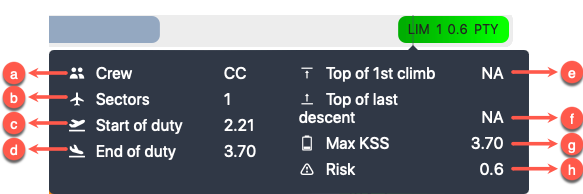
- The number of crew members in this duty
- The total number of sectors flown
- The fatigue score at the start of the duty
- The fatigue score at the end of the duty
- The fatigue score at the top of the first climb
- The fatigue score at the top of the last descent
- The maximum fatigue score during this duty. This score is based on the scale the company administrator has set.
- The total risk score for this duty.
-
The Activities icon lets you view the Activities form. You can use this form to add or remove any activity from the duty. See How to work with activities for more information.
- The Optimise Rest icon only appears if a duty has an activity that lasted more than 3 hours. A click on this icon automatically generates sleep periods for the duty. See Optimise rest to learn more.
- The Create Sleep icon lets you view the Create Sleep form and add a user-defined sleep period to a duty. See Add sleep to learn more.
-
The Copy Duty icon lets you copy the information in this duty to the clipboard. See Copy and paste duty to learn more.
How to copy duty?
-
The Delete Duty icon lets you remove the duty from the schedule and the fatigue chart. If you click on this icon, you will be prompted to confirm your action. If you confirm the delete action, the duty will be deleted from your instance and the fatigue chart will reload.
Table of properties
Duty properties
Cabin crew properties
Some of the properties shown below are exclusive to cabin crew i.e., the Create Duty form will not show some of the following properties for Pilots. Such properties will have the symbol -  - next to the property name.
| Section | Property (* required) |
Description |
|---|---|---|
| General | Duty type* | Choose the type of duty from the dropdown. |
| Crew composition | Select the number of pilots in the flight from the dropdown or select 9 for cabin crew. | |
| On duty date and time* | The duty start date. Use the date time controls to set the date and time. | |
| Off duty date and time* | The duty end date. Use the date time controls to set the date and time. | |
| Time zone selector check boxes* | The time zone which the duty times are based on. Check the box that indicates the timezone. | |
| Time zone lock check boxes | Select this property if you want the web application to automatically convert your entered dates and times to match your time zone selection when swapping between UTC and local time zones. | |
| Start Airport* | The airport where the duty started. Default is the base airport. To change the airport, click on the airport name to view a text box. Then, type ICAO, IATA, or FAA airport codes and choose the airport from the drop down. | |
| End Airport* | The airport where the duty ended. Default is the base airport. To change the airport, click on the airport name to view a text box. Then, type ICAO, IATA, or FAA airport codes and choose the airport from the drop down. | |
| Commute Time | Select the time taken to commute to the duty. Default value is 1 hour. | |
| Fleet | A label you can use to indicate the aircraft being used. | |
| Sector Count | Select the number of flights in the duty. Default value is 1. | |
| Cabin Crew Sleep Pattern |
Select one of the following sleep patterns for the cabin crew.
See Cabin Crew Sleep Pattern to learn more. |
|
| Workload | Move the seeker bar horizontally to increase or decrease the workload in percentage increments (decrement) from the normal workload (workload=0) for the duty. Workload can be increased up to 100% of the normal workload (100= twice the normal workload level) or decreased by 50% of normal workload (-50 = half the normal workload) | |
| Rest Definition |
Select the method SAFE and CARE must use to calculate sleep periods. Depending on your selection additional properties will appear on this form.
|
|
| Sleep Details | Sleep Count |
The number of sleeps a cabin crew had during their duty. |
| Sleep Class |
The class where the cabin crew slept. Select:
|
|
| Sleep Order |
The rank, which the crew member slept in. | |
| Augmented Duty | On Duty Date Time |
The date and time the cabin crew started their augmented duty. See Partial Augmentation for more information on augmented duty. |
| Off Duty Date Time |
The date and time the cabin crew ended their augmented duty. See Partial Augmentation for more information on augmented duty. | |
| Time zone selector check boxes |
Select the time zones for the sleep start and end date times. You will see a separate set of time zone selector check boxes below Sleep Start Date Time and Sleep End Date Time. Selecting time zone for Sleep Start Date Time or Sleep End Date Time doesn't automatically select the time zone for corresponding Sleep End Date Time or Sleep Start Date Time.
|
|
| Time zone lock check boxes |
Select this property if you want the web application to automatically convert your entered dates and times to match your time zone selection when swapping between UTC and local time zones. | |
| Rest Period | Sleep Class |
The place where the cabin crew slept. |
| First rest start date time |
The date and time the cabin crew started their first rest. See In-duty rest for more information on rest period. | |
| First rest end date time |
The date and time the cabin crew ended their first rest. See In-duty rest for more information on rest period. | |
| Time zone selector check boxes |
Select the time zones for the duty start and end date times. You will see a separate set of time zone selector check boxes below On Duty Date Time and Off Duty Date Time. Selecting time zone for Sleep Start Date Time or Sleep End Date Time doesn't automatically select the time zone for corresponding Sleep End Date Time or Sleep Start Date Time.
|
|
| Time zone lock check boxes |
Select this property if you want the web application to automatically convert your entered dates and times to match your time zone selection when swapping between UTC and local time zones. | |
| Add second rest |
Click on this link if you want to add second rest date and times. A click on this link will produce additional properties for second rest. These properties and their selections are very similar to the first rest. See above for details. |
Sleep properties

| Property | Description |
|---|---|
| Sleep Start Date Time | The date and time the schedule started their sleep opportunity. |
| Sleep End Date Time | The date and time the schedule ended their sleep opportunity. |
| Time zone selector check boxes | Select the time zones for the sleep start and end date times. You will see a separate set of time zone selector check boxes below Sleep Start Date Time and Sleep End Date Time. Selecting time zone for Sleep Start Date Time or Sleep End Date Time doesn't automatically select the time zone for corresponding Sleep End Date Time or Sleep Start Date Time.
|
| Time zone lock check boxes | Select this property if you want the web application to automatically convert your entered dates and times to match your time zone selection when swapping between UTC and local time zones. |
| Nearest Airport | The start or end airport that is nearest to this sleep opportunity. You cannot change this property. The nearest airport is determined by the position of your cursor on the fatigue chart when you add a new sleep.
|