FRMSc Help Centre
FRMSc Limited does not accept any liability for any decisions made from using the model.
Concepts ↵
Getting started with the SAFE web application
Welcome to your Getting Started Guide, crafted to facilitate a swift and seamless introduction to our web application. With the SAFE web application’s user-friendly interface and the strategic visual cues, you’ll find yourself adept at navigating the application and managing rosters effortlessly.
Learn more
Our application encompasses a wide array of advanced functionalities, each contributing to a robust and comprehensive user experience. To learn more about these capabilities, we invite you to explore the dedicated pages within this documentation portal, where you will find detailed insights and guidance for each function.
The features highlighted on this page represent the foundational elements of our platform, designed for immediate use and easy understanding. To jumpstart your experience, we’ve outlined four simple steps that will swiftly set you on the path to roster processing.
Step 1: Login to the SAFE web application
First, you need to login to the SAFE web application using your login details. You can create your own login details after the SAFE web application administrators have forwarded an invite to your email.
Step 2: Ensure the instance is set up
You can't submit and process the rosters in an empty instance. Your administrators must set up the following in your instance before you can start submitting and processing rosters.
- Airports
- Apps, if you plan to import rosters from a web location
- API Keys, if you plan to submit rosters using SAFE API.
- Data formats
Step 3: Submit your first roster to the SAFE application
SAFE web application offers multiple methods to upload a roster that needs to be processed. We have prepared in-depth guides to cover each of these methods. Click the link to your preferred method.
- Individually enter roster details
- Bulk upload roster details
- Get rosters from a web location
- Use SAFE API to submit roster details
Step 4: Get the roster analyses
After a roster is successfully submitted to the SAFE web application, you can instantly view the analyses. The analyses are also presented in an interactive chart. Click the links below to learn more about these analyses.
Model Data
Daylight savings
Daylight savings means that for some airports, 02:00 is instantaneously advanced to 03:00 OR when reaching 02:00 the time instantaneously becomes 01:00. This usually occurs in March and October of each year. However, there are times when the change does not take place, or the time change is only 30 minutes. Some airports are affected by it, some are not.
This makes estimating sleep periods and fatigue even more difficult as duties can be extended by an hour or reduced by an hour in clock hours from their length of elapsed time. Consequently, a 10- hour duty may be reduced to a 9-hour duty in clock hours despite being 10 hours long or extended by an hour in the same manner.
SAFE takes the hours provided as input and adjusts the length of the duty in its algorithms, knowing the adjustment to be made.
The model accepts multiple types of data. However for ease of understanding, we can divide them into two types
Mandatory data
As the data incorporated into the SAFE and CARE models is significantly large and comprehensive, the models will automatically insert the appropriate sleep pattern of the average pilot or cabin crew around the duties defined at the input.
However, you will have to be mindful of the required fields. The required fields are relatively few. You can find the description of the data along with the mandatory fields in our help centre. You can either see the Table of Properties tab or the page corresponding to the action you desire to take to learn more.
When connected using one of the API options, the data structure will already be pre-programmed for transmission.
Optional data
Providing data for the mandatory fields is sufficient for normal operations. However, there are other features in SAFE and CARE that can be used to improve granularity of the consequent analysis when populating the models. Here is a brief overview of those features.
Partial augmentation
Partial Augmentation feature allows you to send data for duties that have part of them augmented e.g. a pilot flying 2-crew domestic feeder flight who had a follow up duty of a long- haul 3 or 4 crew flight. The purpose of this feature is to place the in-flight sleep periods in the augmented part of the duty.
Accordingly, SAFE recognises the times and dates (in case of overnight flights) of the augmented part of the duty and puts the appropriate sleep period there. It assumes the times outside of these specified to be 2-crew operations.
The following fields are associated with this feature. You can also read about them in the Table of Properties tab or the page corresponding to the action you desire to take.
- On Partial Augmentation date: The date of the duty where augmentation starts.
- On Partial Augmentation time: The time within the duty where augmentation starts.
- Off Partial Augmentation date: The date of the duty where augmentation finishes.
- Off Partial Augmentation time: The time within the duty where augmentation finishes.
In-duty rest
With at most two sectors, SAFE and CARE will distribute the in-flight sleep period for augmented crew and cabin crew automatically using the Sleep Count feature. The models understand that each pilot will have a defined rest period allocated to them during either the single flight or a specified sector. But, when the crew is flying more than two sectors flown with augmented crew, there was a risk that the model's automatic sleep-period distribution could overlap with any mid-duty landing and take-off.
To avoid the risk, from version 6.2, we introduced a new feature to allow the user to define up to two in-duty rest periods in any duty period. Choosing this feature will override any automatically calculated in-flight sleep periods for augmented crew and position the in-flight rest period within the start and end time you have defined for an appropriate sector.
How is the In-Duty Rest feature different from the Add Sleep feature?
The Add Sleep feature permits you to add a sleep period of any length on any part of the display, both, on duty and outside duty. However, once you have added a sleep period, you can't choose another. When you choose this action, SAFE will automatically assume that the sleep class permitted good quality sleep i.e., a home/hotel bed or Class 1 bunk.
On the contary, the In-Duty Rest feature, is only available for in-duty rest. However, you can choose any of the Class 1 to Class 4 sleep accommodation options.
The purpose of this feature is to support operations that require augmented crew to complete duties flying through more than one sectors. It can also be used to calculate possible sleep periods for 2 pilot operations where split shifts with waiting times of say, around 3 hours or longer between flights, exists. Pilots can use this waiting time for sleep if suitable accommodation is provided.
Rest but not sleep
This feature defines the REST period: not the SLEEP period. SAFE will calculate the SLEEP when given the start and finish of the REST period.
This feature allows you to:
- define the periods where the crew are likely to be able to take their rest (the start and end times). SAFE will calculate the timing and amount of sleep likely within that REST period automatically.
- define any IN-DUTY REST period, which is useful for operations that contain split shifts or for multisector augmented duties where careful positioning of any in-flight rest is required. SAFE/CARE will take these defined periods and calculate the likely sleep obtained within these limits.
To activate this feature using a spread sheet, the appropriate columns defining the start and end time of each rest period must be completed and a signal given to SAFE to use these by completing the in-flight sleep fields - Sleep Count, Sleep Order, and Sleep Class. You must either leave the Sleep Order field blank or set it to 1. If the duty is a split shift for two pilots, Split Shift field must also be set to 1.
The following fields are associated with this feature. You can also read about them in the Table of Properties tab or the page corresponding to the action you desire to take.
- First rest start date: The date within the duty where the first rest period starts.
- First rest start time: The time within the duty where the first rest period starts.
- First rest finish date: The date within the duty where the first rest period finishes.
- First rest finish time: The time within the duty where the first rest period finishes.
- Second rest start date: The date within the duty where the second rest period starts.
- Second rest start time: The time within the duty where the second rest period starts.
- Second rest finish date: The date within the duty where the second rest period finishes.
- Second rest finish time: The time within the duty where the second rest period finishes.
Duty type
The Duty type feature has only one function at present, and that is to identify standby duties. All other duties will be set as Active Duties by default.
Standby duties are not operational duties. If the aircrew are tired, they will sleep over the start or end of any standby duty. Aircrew are likely to start or continue their normal sleep habits and timing despite being on standby duty.
If the duty was an operational duty, not a standby duty, the aircrew would awaken at least (normally) 2 hours or so before the start of duty to allow 1 hour of personal preparation time (shower, dress etc) and 1 hour for commuting to the airport. Our current version of the models allow you to configure the personal preparation time and commute times for each duty.
To identify the standby duty, assign crew complement to 2; sectors to 0; start and end airport codes to the same code as the nearest/normal airport on the same time zone and enter ‘3’ into the Duty type field.
Duty types 1 and 2 are reserved for future enhancements.
Fleet and Rank
The Fleet and Rank fields are provided to add labels to each duty. Fleet is used to identify the aircraft type such as A350 whereas Rank is used to identify the rank of the aircrew – Captain, First Officer, Flight attendant. These are labels only and the user can enter any string of characters to define these fields.
The purpose of this field is to allow a way of sorting the data sets in HARVEST to pull out all Captains or all Flight attendants for analysis by rank and fleet. If you are not using HARVEST, you can ignore these columns.
Want to know more about Harvest?
For information on HARVEST, please go to www.frmsc.com or email info@frmsc.com.
Variable workload
Normal workload is calculated for both cabin crew and plots using a proxy which is the number of sectors flown. The workload for cabin crew is mostly during the cruise phase whilst the main workload of the cockpit crew is on take-off and landing. If the more sectors are flown in any duty, the more workload is increased for both occupations.
However, this increase is not the same for both occupations and the amount of additional workload for each additional sector flown is not linear. While the pilot may find bad weather, Category C airports and aircraft malfunctions challenging, cabin crew will find the service provided to unruly passengers even more challenging. Consequently, when challenges increase, the workload increases.
Workload:Sector curve is not linear
Please note that the workload for 4 sectors is not double that of 2 sectors – the workload/sector curve is not linear.
The Workload field in the upload spreadsheet can be used to alter to calculated workload caused by some environmental factor like bad weather or passive passengers. The range is -50% to +100%. The calculated workload can be reduced by up to half the calculated value or increased by 100% of the calculated value.
Personal preparation time and commute time
Previously, SAFE and CARE assumed that the aircrew will awaken a minimum of 2 hours before start of duty to allow 1 hour for preparation time (shower, dress etc) and 1 hour for commuting to check- in at the airport. Currently, this is a fixed rule which is ignored if the duty is a standby duty.
From version 10, these two time periods have become user-defined although the default is set to one hour for each activity. The administrator may set the default to any other default they wish in the appropriate place in the ADMIN screen.
The preparation time and commute timings can be changed for any duty in SAFE and CARE. The two columns can be individually set for a minimum of 15 minutes with the maximum time constrained by the total of the preparation time PLUS the commute time.
This maximum for the sum of both events is 5 hours, which allows one event to be set for say, 15 minutes whilst the other can be as high as 4 hours 45 minutes. Similarly, both can be set for 2hours and 30 minutes each to equal the maximum of 5 hours in total.
Cabin Crew Sleep Pattern
The CARE model offers 4 different sleep patterns for cabin crew. These sleep patterns instruct the models to automatically generate sleep for the cabin crew duty. Each pattern generates a different output from our sleep algorithm. Follow the links below to learn more about each pattern. For an overview of the sleep pattern settings, see Reference chart.
- Pattern 0 - Normal Long-Haul Pattern 1 or 2 sleep periods
- Pattern 1 - ULR Pattern 1 or 2 sleep periods, short service
- Pattern 2 - ULR Pattern 1 sleep period, 50% cruise phase
- Pattern 3 - ULR Pattern Main Crew 1 or 2 sleep periods
Pattern 0 - Normal Long Haul Pattern 1 or 2 sleep periods
Use this pattern for flights where cabin crew operate in a long-haul duty comprising one or two sectors. This pattern assumes the cabin crew delivers service together and rests in turn between duty.
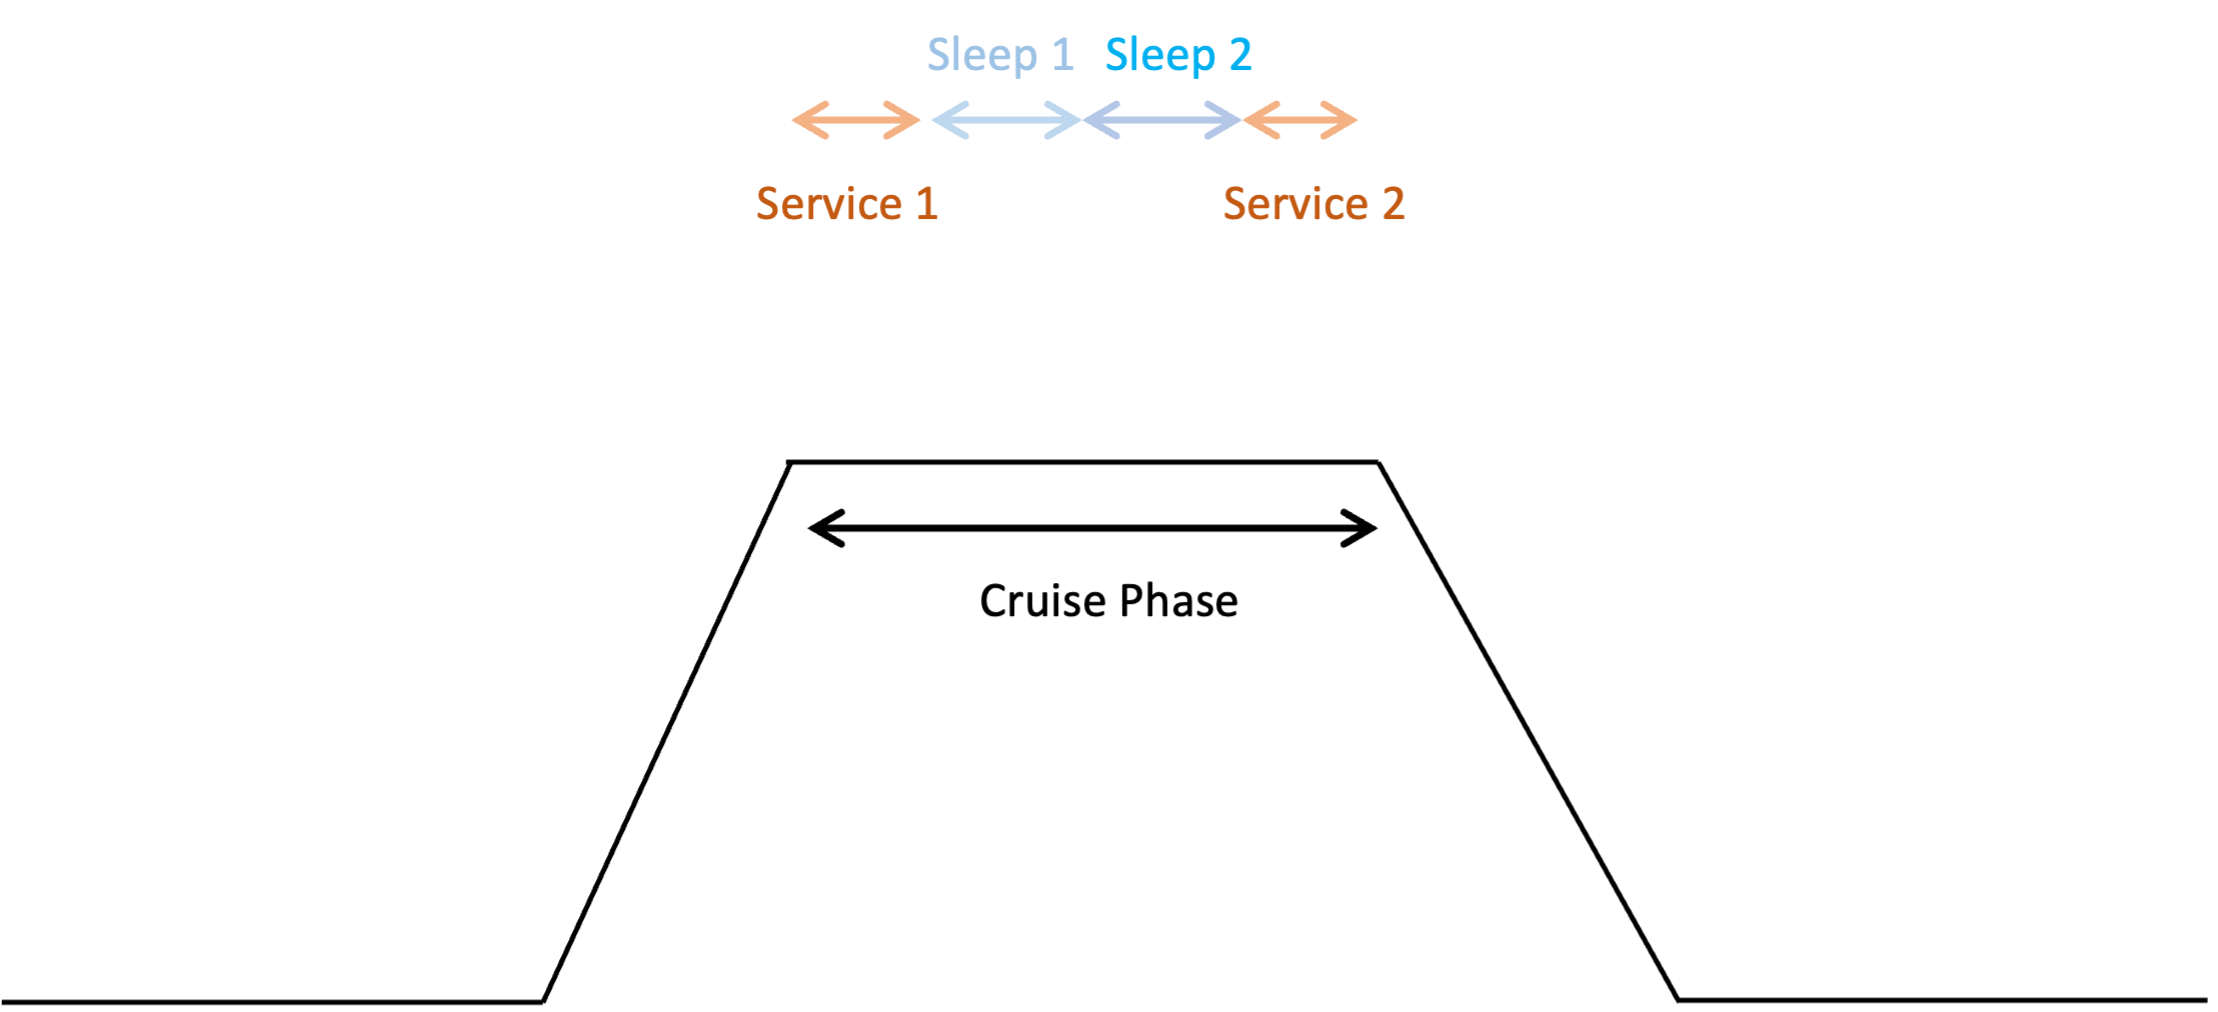
When creating a duty for cabin crew you must use the following reference to use this pattern. Set:
- Crew composition to Cabin Crew
- Cabin Crew Sleep Pattern to Normal Long-Haul Pattern 1 or 2 sleep periods
- Sleep Count to 1
- Sleep Order to 1st or 2nd
- Sleep Class to one of the following:
- Class 1 - Bunk
- Class 2 - Cabin seat: 40 degrees or more recline
- Class 3 - Flight deck seat
- Class 4 - Economy seat: Less than 40 degrees recline
- Class 5 - Jump seat
Pattern 1 - ULR Pattern 1 or 2 sleep periods, short service
Read this pattern as standard long-haul operations with augmented cabin crew and shorter services.
Reduced sleep times for shorter flight
Using this pattern will result in increased time for cabin crew sleeps for ultra-long haul duty. But it will give less sleep time for flights where cabin crew operate in a flights shorter than 6-7 hours.
This pattern works for duty comprising one or two sectors only with a single in-duty rest period. It allows for slightly reduced service times at the start and end of the flight because augmented crew will deliver and clear up the service faster, thereby providing an enhanced rest opportunity.
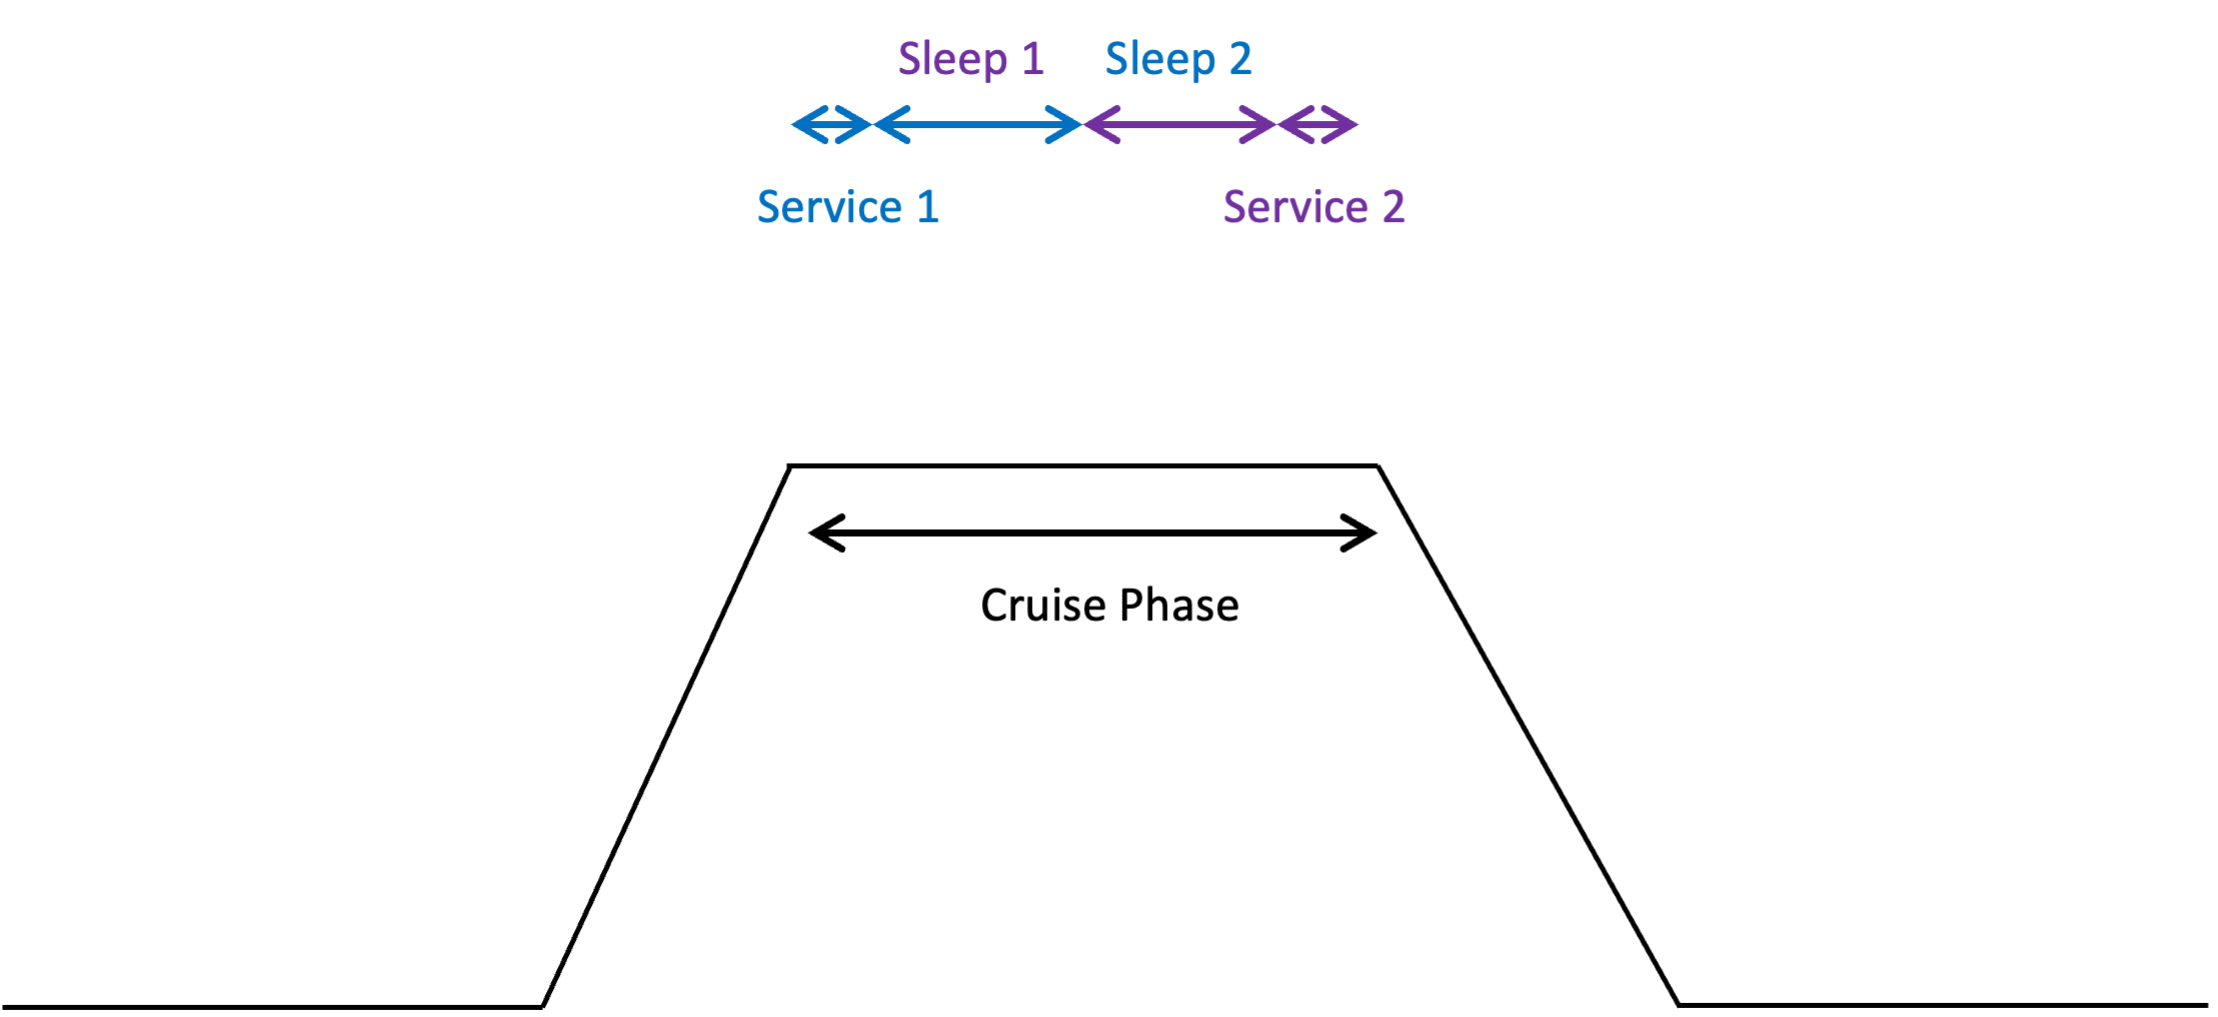
When creating a duty for cabin crew you must use the following reference to use this pattern. Set:
- Crew composition to Cabin Crew
- Cabin Crew Sleep Pattern to ULR Pattern 1 or 2 sleep periods, short service
- Sleep Count to 1 or 2
- Sleep Order to 1st or 2nd
- Sleep Class to one of the following:
- Class 1 - Bunk
- Class 2 - Cabin seat: 40 degrees or more recline
- Class 3 - Flight deck seat
- Class 4 - Economy seat: Less than 40 degrees recline
- Class 5 - Jump seat
Pattern 2 - ULR Pattern 1 sleep period, 50% cruise phase (not recommended for two sleep periods)
Read this pattern as long haul and ultra-long haul flights with one sleep period for 50% of the cruise phase.
This pattern calculates rest periods for cabin crew during flights without a designated service period. It assumes the crew operates on a two-shift system during a single-sector, ultra-long-haul flight. The crew is allotted two rest periods: the first occurs in the initial half of the cruise phase, following service delivery, and the second takes place in the latter half of the cruise phase, prior to the next service delivery.
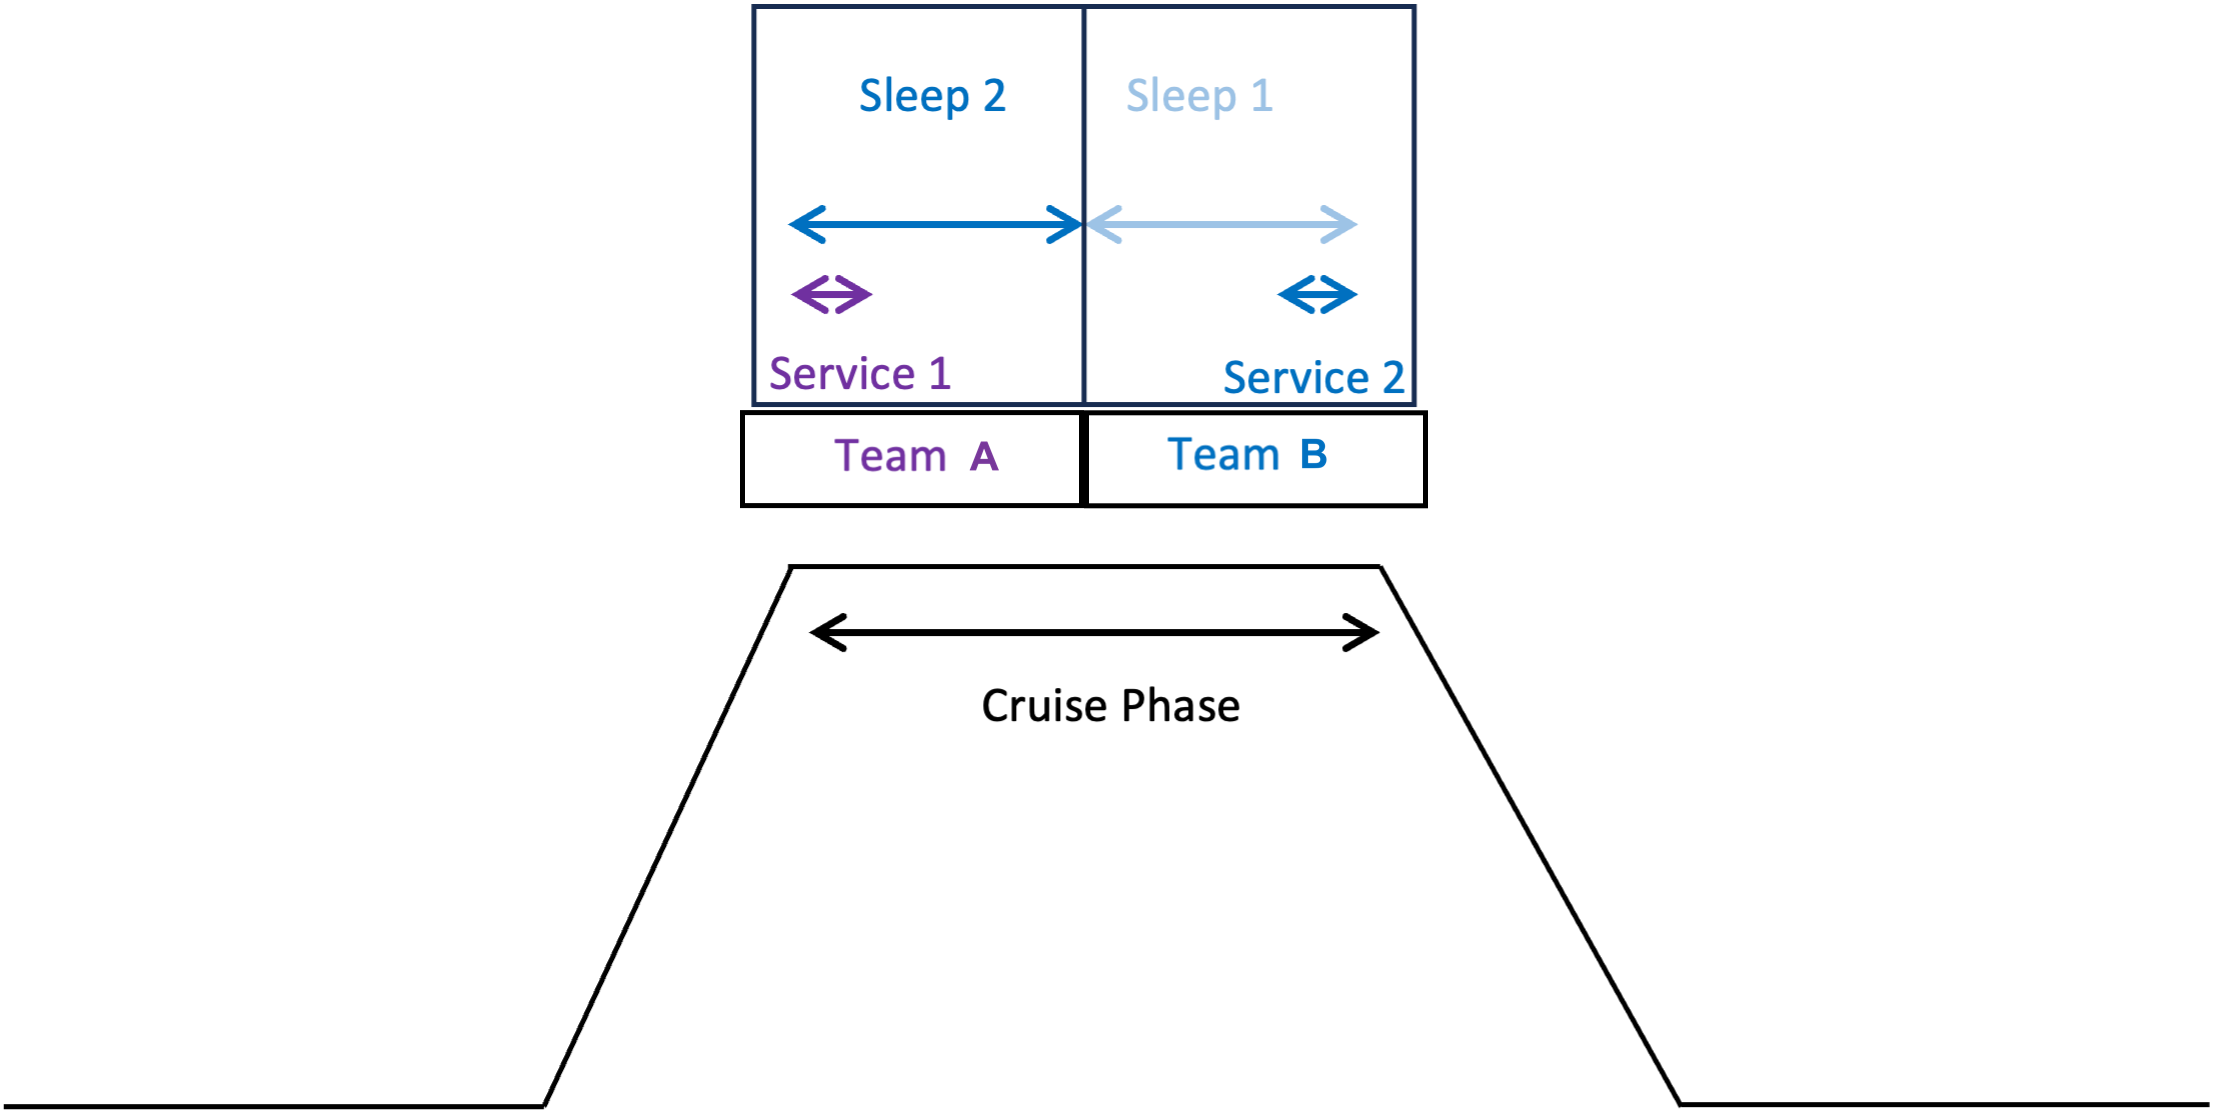
When creating a duty for cabin crew you must use the following reference to use this pattern. Set:
- Crew composition to Cabin Crew
- Cabin Crew Sleep Pattern to ULR Pattern 1 sleep period, 50% cruise phase
- Sleep Count to 1
- Sleep Order to 1st
- Sleep Class to one of the following:
- Class 1 - Bunk
- Class 2 - Cabin seat: 40 degrees or more recline
- Class 3 - Flight deck seat
- Class 4 - Economy seat: Less than 40 degrees recline
- Class 5 - Jump seat
Pattern 3 - ULR Pattern Main Crew 1 or 2 sleep periods
Read this pattern as long haul and ultra-long haul flights with augmented crew and one sleep period between services.
This pattern is designed for ULR flights, and assumes an augmented cabin crew. As the crew are augmented, service is provided quickly giving more time for rest between services.
The time between services is split into 4 sections, with half of the crew taking the first rest opportunity and the other half being allocated the second rest opportunity.
Two rest periods for each team are provided, just as for pilots, given that there is enough time during this long ULR flight for all crew to take two rest periods. The difference, though, is that the first rest period for both teams will be unequal with the first rest period being shorter than the second rest period.
Crew will be rested before the duty, so, after the first service, the amount of time normally allowed for sleep during the first rest period will be a lot more than the sleep that is likely to be achieved. However, for the second rest period, the crew will be a lot more tired and able to sleep for longer.
Consequently, the first rest opportunity is reduced to better match the time required to achieve the likely sleep at that time, leaving a longer period for longer sleep to be achieved later in the duty when the crew are a lot more tired.
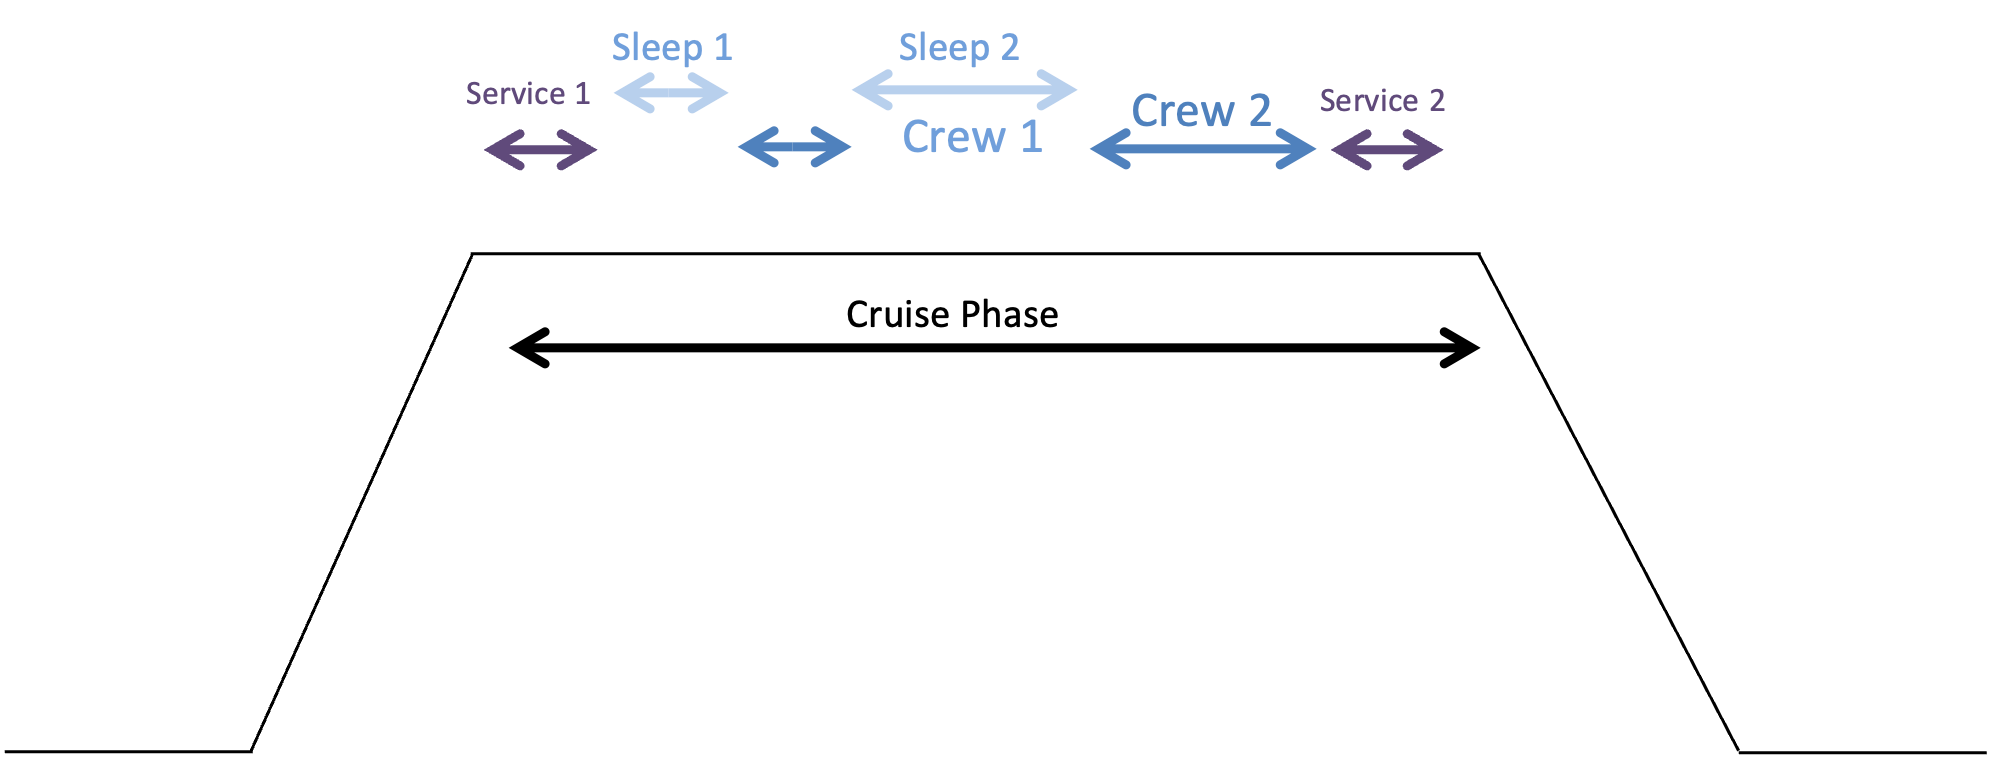
When creating a duty for cabin crew you must use the following reference to use this pattern. Set:
- Crew composition to Cabin Crew
- Cabin Crew Sleep Pattern to ULR Pattern Main Crew 1 or 2 sleep periods>12hr duty, 2 rest periods, short then long
- Sleep Count to 2
- Sleep Order to 1st
- Sleep Class to one of the following:
- Class 1 - Bunk
- Class 2 - Cabin seat: 40 degrees or more recline
- Class 3 - Flight deck seat
- Class 4 - Economy seat: Less than 40 degrees recline
- Class 5 - Jump seat
Reference chart for sleep pattern settings
| Sleep pattern | Pattern 0 | Pattern 1 | Pattern 2 | Pattern 3 | |
|---|---|---|---|---|---|
| Pattern data entry | 0 | 1 | 2 | 3 | |
| Crew Composition | Cabin Crew | Cabin Crew | Cabin Crew | Cabin Crew | |
| Sleep Count | 1 |  |
|
|
 |
| 2 | |
|
|
|
|
| Sleep Order | 1st | |
|
|
|
| 2nd | |
|
|
|
|
| Sleep Class | Class 1 - Bunk | |
|
|
|
| Class 2 - Cabin seat: 40 degrees or more recline | |
|
|
|
|
| Class 3 - Flight deck seat | |
|
|
|
|
| Class 4 - Economy seat: Less than 40 degrees recline | |
|
|
|
|
| Class 5 - Jump seat | |
|
|
|
|
Activities
While the overall duty may be too fatiguing, it is possible for you to look at the activities, determine that the fatigue score at the end of the last flying sector is within the risk envelope and accept the duty as safe to fly. However, you must be vigilant that the pilot does not drive home on landing if he is fatigued given that a duty of care still exists, and most road accidents occur within 20 minutes from home.
Often when a fatiguing duty is identified, it is interesting and useful to have an overlay on the duty display to show the positioning of each activity within a duty. To tag activities against a schedule, FRMSc allows you to upload a file containing the activities within the schedule. The following activity types are accepted.
Activity description is free-form field
- Activity description is a free form field. You need not enter the activity code in the description. You can use the field to to add your own descriptions of the activity. Most users enter the flight number or start and end airport codes in the description field .
- The Code shown below will be used in the display as a shorthand label for the activity.
| Activity | Code |
|---|---|
| Check in | CHKI |
| Flight | FLT |
| Waiting time | WTT |
| Time at hotel | HTL |
| Positioning | POS |
| Commuting | COM |
| Simulator duty | SIM |
| Ground duty | GND |
| Check out | CHKO |
| Standby duty | STD |
| Vacation | VAC |
| Day off duty | OFF |
About SAFE
SAFE is a predictive fatigue tool that was designed from original work completed by the Institute of Aviation Medicine (IAM) in the 1970s. IAM later became part of the UK Ministry of Defence’s (MoD) science research group, the Defence Evaluation and Research Agency (DERA), located at the site of the Royal Aircraft Establishment, (RAE) Farnborough, England. In 2001, most of the research agencies belonging to MoD were privatised, and absorbed into a new company, QinetiQ Limited, whose headquarters remained at the Farnborough site.
The original studies into human fatigue were carried out with UK Ministry of Defence funding to describe fatigue in humans and understand fatigue during potential sustained and intensive air operations.
The base model for all subsequently occupationally tailored models, includes the sleep homeostat, circadian rhythm and sleep inertia and models that are based on these three elements are now known as “three-process models”. This “three-process” base model was developed during the 1970s and 1980s and called “The CHS model”, after the Centre of Human Sciences, the name of the department formed in 1995 within DERA from IAM and Army and Navy research groups.
Over the subsequent 25 years and more, a series of targeted studies were conducted using volunteer pilots from several airlines across the world that covered long haul, short haul, ultra-long haul and cargo operations. A very significant and comprehensive database was created from these studies that were used to create the SAFE software model.
Version 5.0
During 2001 the initial version 2.09 was distributed to the airline industry to gain feedback on its usability and value. As a result of this exercise the model was further developed with the addition of more features to increase usability. The basic algorithms calculating sleep and fatigue did not require any change. Version 5.0 was delivered to UK CAA for its exclusive use in 2003.
Importantly, the sleep studies conducted in the cockpit to assess the quality of sleep during in-flight rest with augmented crew were completed before 2001, when airline security was massively increased after the New York Twin Towers tragedy. After 2001, the increase security measures and general awareness amongst the travelling public about possible terrorist acts from humans wearing any form of electrical wiring, rendered such studies essentially impossible to complete.
Happily, the required study data was already collected by the IAM team and secured, but other model providers that started their studies after 2001 (which includes all alternative models) were not so fortunate.
Since then, the model has been used by both CAA and QinetiQ in their respective work within the airline and defence industries and in 2011, the Intellectual Property was licensed exclusively to Fatigue Risk Management Science Limited who, since then have further refined the algorithms by incorporating additional study data and improved reliability, security, scalability and resilience by developing the model into an application that is hosted on the Microsoft Azure Cloud. Version 5.5 was available to the aviation industry from 1st January 2012 and this version, version 10, is available from 1st July 2023.
Version 5.5
Version 5.5 differs from Version 5.0 in that version 5.0 is a product designed exclusively for UK CAA, whilst version 5.5 was designed as a tool both for airlines and regulators to predict the likely fatigue levels in any given duty for the average pilot.
As SAFE and CARE are tools, not decision-making systems, it is important that the output of the model is correctly driven by the correct datasets to ensure delivery of the appropriate analysis. Similarly, the subsequently interpretation of the scores that drive any subsequent action taken because of the analysis, will be based on the user’s understanding of human fatigue, fatigue counter measures, and the risk appetite for their airline. Accordingly, all users of the model must receive appropriate training in not only how to navigate and use the model, but also how to interpret the output data to implement the best choice of strategy to manage fatigue in aircrew.
Version 6.0
Versions 6.0 onwards incorporates optional access to the Cabin crew Alertness and Rest Evaluation model (CARE) that is designed for cabin crew. CARE was built on the same principles as SAFE using data from cabin crew. CARE is available as an option for those who require it. CARE adjusts the in- flight rest timings and on-board facilities available as well as adjusting the workload to reflect the more fatiguing activities of cabin crew.
Version 7.0
Version 7.0 was released when the SAFE and CARE application was rewritten for the Microsoft Azure Cloud hosting platform. The Azure Cloud system provides clients with improved security, resilience and scalability and is an ISO27000 certified platform. Each client retains separated databases, and all data is encrypted both in movement and at rest.
On-demand air taxi operators are particularly processor hungry, so all clients are now likely to have access to more than enough processing power for their needs for the foreseeable future.
As version 7.0 is much more powerful, it is necessary to put limits on the performance of SAFE in order to contain the negative effects of any errors in data upload. This is particularly important for users of the API who drive data directly from their rostering programmes. A simple error that sends huge datasets to SAFE when it was hosted on a single server with a shared processor would cause the processor into overload and the system would slow down and ultimately seize up.
Version 8.0
With the new version 8 architecture, an overload of data will cause more processors to be added to handle the load. This means that clients will consequentially drown in the amount of data provided by SAFE and Microsoft will issue a very large invoice for processing services.
Version 9.0
Versions 8 and 9 had improvements to the IT system that augmented security and additional features added, mostly providing better usability. However, it became clear on 2019 that a complete rewrite was required to take advantage of some significant improvements in the Azure hosting platform to improve workflow, security and usability. More features were also developed and were ready for inclusion in the next upgrade, planned as version 10.
Version 10.0
Version 10.0 has a higher performance as workflow has been streamlined and new features added both at the IT level with Single-Sign-On (SSO) and two-factor authentication as well as modelling features that improve the granularity and score of analysis.
It also has a Duty Risk metric included that considers both the risk of becoming fatigued and the nature of the risks to human performance caused by the operational requirements of each duty. This metric is particularly useful for operations where consideration of the fatigue scores alone does not represent the risk to operations adequately. There are times when fatigue scores are low but risk is high; and vice versa.
Glossary
Acclimatisation chart
The acclimatisation curve shows both the position of the pilot’s body clock in relation to the base time zone and the position compared to local time. See Acclimatisation chart for more information.
Activity
Activity is a breakdown of the duty performed within an aircrew schedule during their roster. Some of the activities that could be a part of duty are Check in, Flight, Commuting, and Time at hotel among others.
CARE
Cabin crew Alertness and Rest Evaluation (CARE) is a predictive fatigue tool that is designed to understand the fatigue and alertness levels of flight attendants of commercial air transport airlines.
Cumulative fatigue chart
The cumulative fatigue distribution curve is a useful curve to indicate the number of fatigue scores that are in evidence throughout the schedule. See Cumulative fatigue chart to learn more.
Duty
Duty is the time between the check in at the start of the duty work period and the check out at the end of the duty work period, and contains a series of activites carried out by the schedule that do not include standby. Standby duties are a special form of duty.
Duty risk metric
Duty Risk Metric describes not just the risk of becoming fatigued, which has a knock-on effect of increasing the likelihood of microsleeps, poor communication and degraded vigilance etc, but directly offers a metric to describe the likelihood of a reportable incident relative to a duty with 2 pilots acclimatised to their time zone working a duty that starts at 10:00 and finishes at 20:00, with two flying sectors. See Duty risk metric to learn more.
Fatigue scale
Fatigue scales are metrics designed to reflect the fatigue scores of the personnel. FRMSc supports seven types of scales. See Supported scales for more information.
FRI
The Fatigue Risk Index (FRI) for general shift work is an excel based model that was built to a specification provided by the UK Government’s Health and Safety Executive (HSE), who are a UK government department responsible for safety in the workplace.
FRI+
FRI+ is an upgraded version of the original HSE Fatigue Risk Index which was developed by FRMSc personnel, this model assesses fatigue risk from shift work patterns.
When in 2015 the FRMSc model website was created on the Microsoft Azure Cloud that provided enhanced scalability, security and resilience, the FRI algorithms were integrated into the Azure hosting platform to provide these inherent advantages to all subscribing clients. The name of the model was changed to FRI-Plus (FRI+) to differentiate this enhanced version of FRI from the original product - FRI.
FRI PRO
FRI PRO is a further enhanced version of FRI+ that comes with change of architecture and algorithm library to include the features that are appropriate for a shift worker model which are currently included in the SAFE and CARE models. It provides fatigue scores for each 15-minutes period, individualised sleep periods, and analyse fatigue mitigation strategies entered by a user. It is a very flexible model that can be used in aviaiton for ground crew and ATC.
Nicholson chart
Nicholson chart compares sleep taken within a schedule with work-rate of the schedule to indicate inherent adequacy of sleep for the planned work rate. See Nicholson Chart for more information.
Overview chart
Overview chart provides a picture of the rising and falling fatigue throughout each duty in the schedule. See Overview Chart for more information.
Roster
Roster is a collection of aircrew schedules within the same file.
SAFE
System for Aircrew Fatigue Evaluation (SAFE) is a predictive fatigue model that was originally designed to to evaluate the likley fatigue in piltos of commercial passenger aircraft. It predicts fatigue and duty risk of pilots. Cargo operators can use thie SAFE model but variants of this model are avaiaible for corporate fleets, air taxis and emergency medical services. The CARE model is available for cabin crew.
SAFE API
SAFE API provides a seamless interface to integrate SAFE with your rostering software suite. When a rostering suite calls the SAFE API, it can receive the fatigue scores from the SAFE alogrithm and provide the scores for local display within the rostering software suite.
We have designed the SAFE API to work with large majority of commercially available crew management systems. If your rostering system does not have the SAFE API already embedded in it, please ask your supplier to contact us at info@frmsc.com. We will provide the code along with instructions and technical support. Alternatively, you can ask them to visit our developer portal for more information.
Schedule
Schedule refers to a series of consecutive duties for an aircrew that may typically cover a single month of duties, before some time off is planned to allow recovery.
Sleep reservoir chart
The sleep reservoir curve shows sleep in terms of a reservoir that is full at the end of a good sleep period and then dissipates with time awake, just like a water reservoir. See Sleep Reservoir Chart for more information.
FAQs
Using the models
Why are my scores different from what I’ve seen before?
The upgraded SAFE version offers additional configurable options. If your fatigue scores differ from before, it may be due to changes in settings. Check the Preferences Screen for Default Preparation Time and Default Commute Time, which were previously set to 1 hour. Administrators should verify the Administrator Settings and the Preferred main sleep settings for any custom main sleep configurations for sountries where your aircrew are based and ensure they align with the prior version. When uploading rosters via Excel or CSV, review the Commute settings column for any custom commute times.
What is the Duty risk metric?
The Duty Risk Metric is a new metric that FRMSc has developed to determine the overall risk of a fatigue incident during a duty. See Duty risk metric to learn more.
What are the default Cabin Crew ULR Sleep Patterns in CARE?
CARE now supports varied sleep patterns for ULR cabin crew, including augmented duties, to accommodate diverse scheduling practices. See Cabin Crew Sleep Pattern for more details. Default sleep patterns for Cabin Crew are unchanged from previous CARE versions.
Can I use SAFE and CARE for ground crew?
No. SAFE and CARE has been developed and validated for aircrew. FRMSc has its own shiftworkers model, the Fatigue Risk Index (FRI) that has been developed for shift workers, including ground crew.
Using the application
The performance of the application is not great.
Unfortunately, no application is free from errors and bugs. While our application is relatively stable due to years of development and maintenance, there might be areas that need improvement. You can reach out to us at info@frmsc.com to tell us more about your issues.
In the meantime, we recommend that you access our product suite (SAFE and CARE) through Chromium-based browsers (Microsoft Edge, Google Chrome) or Apple's Safari. While the application works well in Firefox, Chromium-based browsers deliver optimum performance and functionality.
I don't see a button to add activity through UI.
There are no main menu buttons to add activity to a duty. Instead, right-click on the duty to which you want to add the activity and choose Activity from the context menu. See our UI workflow for step-by-step instructions to add activity.
When uploading duty and activity, I get errors, but I don't see how to resolve them.
When you bulk upload the schedule, you won't be able to resolve the errors from UI. You must return to the CSV file and resolve the error shown in the UI.
Then, delete the roster with faulty data and re-upload the schedule.
Why can’t I unlock a Roster?
Rosters that are locked can only be unlocked by the user who locked them or by your instance administrator.
What is sharing rosters?
Sharing rosters is a new function that enables private rosters to be shared with other users in your operation or for private or public rosters to be shared with users in another instance, or in a read-only format with people who do not have a SAFE license.
I’ve got existing Excel/CSV roster data, can I still upload them into the upgraded SAFE?
Yes. The upload templates are backward compatible with the previous version of SAFE and CARE and so they can still be used. The upgraded version has 3 additional columns - the end of the duty data for Crew Preparation time, Crew commute time, and Cabin Crew rest pattern.
Using the APIs
How do I connect to the API?
API usage is included in your licensing terms. To verify API licensing, the instance administrator can check for an API tab on the Settings Page. If there is an API tab then you have a license. If absent, contact us to discuss adding API access to your license. For connection instructions, refer to the SAFE API documentation.
Why aren’t I getting fatigue scores back into my Crew Management software?
Integration with our models varies across different crew management software providers. If you are not getting expected information back into your crew management software, please contact your crew management software provider.
Ended: Concepts
User Guides ↵
How do the models work?
Our biomathematical models use rosters to predict the fatigue levels and risk of different work schedules. The nature of the occupation dictates what data needs to be uploaded into the different models.
In its simplest form, an individual’s work schedule comprises one or more duties over a given period. Each duty has characteristics, such as start and finish date-time and workload. A roster comprises one or more schedules. Roster data is uploaded into the model where our sophisticated, mature algorithms analyse the schedules, construct sleep patterns and predict levels of fatigue and risk, considering factors including workload, cumulative fatigue, circadian rhythm and time zone shifts.
The models output fatigue scores at regular intervals throughout the duty, allowing scheduling/rostering/crewing managers to assess rosters for fatigue risk. See Fatigue Score and Duty Risk Metric to learn more about the output.
Limitations of the model
A model isn't reality, and no user should expect a model alone to predict whether a schedule is safe or not for any individual. A model will predict likely fatigue for the average person in a homogeneous population (such as pilots or cabin crew) but won't assess the risk of the hazard to an airline.
To translate fatigue levels into a risk metric for the operation, the user must make judgements based on risk appetite, mitigations employed, experience and knowledge including relevant information from other sources. The strengths and weaknesses of the model and likely inherent errors from the modelling construction must also be known so the output can be put into context before a judgement on risk can be made.
The user shouldn't assume that the model output offers an absolute representation of the fatigue and risk of an individual. All models are based on the average of a given population. Consequently, the research conducted from which the algorithms are constructed must be that of the target audience that is study pilots to create a pilot model, and cabin crew to create a cabin crew model. Using studies of process workers for use by aircrew won't provide a good average for aircrew.
A model is a tool to help users make that decision of whether to accept the risk in its entirety, add in mitigations to reduce risk before permitting the duty to be implemented or to stop it and re-plan. A model isn't a decision-making system; it's a tool to help the user, or the Fatigue Safety Action Group (FSAG), decide on which of the mitigations at their disposal is best to use within the performance capabilities of the model, when managing risk.
SAFE provides a score every 15 minutes and a Duty Risk for the whole duty. It does not judge whether the calculated scores are safe levels to work with or not, but it provides useful measures to help a user to make those judgment themselves. Humans decide the level of risk to take in concert with the risk appetite of the company and the constraints and mitigation options available at the time.
The output of any model requires a good understanding not only of the subject that it’s modelling but also the assumptions that are built into the model. A manager should not expect the model to make a judgement or decision; that is the preserve of the manager alone. The model merely provides one set of data from which the manager may formulate an opinion. The manager may use a model to evaluate the relative effects of alternative strategies (do they improve or degrade performance or are they practical and fit with the resources available at the time?) before adopting any change.
The SAFE and CARE models are particularly suited to commercial aviation operations, because they are built specifically using the research studies implemented for each of these occupations and will identify potential hazards by calculating the likely fatigue score and Duty Risk of the average pilot or cabin crew, not specific individuals, that may be asked to perform the schedule of duties under scrutiny. It is the manager’s responsibility to decide whether the hazard or portfolio of hazards identified is within the risk appetite of the airline or whether action needs to be taken to mitigate them or simply re-cast the schedule design.
Accordingly, it is vital that before SAFE or CARE are used in airline operations, training is taken. This should cover using the model, the assumptions that are built into the model, its limitation, how human performance is affected by fatigue and fatigue countermeasures. Rostering staff and managers will necessarily have to interpret the Fatigue and Duty Risk scores in their daily assessment of safety for the schedule under scrutiny.
What is this screen ↵
Menu panel
You can see the menu panel on the left edge of the browser window in the SAFE web application after a successful login.
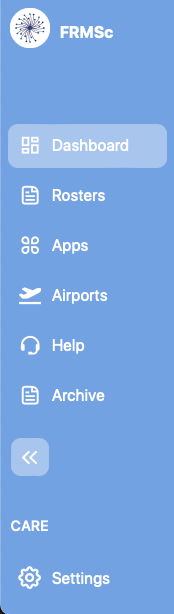
The menu panel in the SAFE web application is the central control that allows you to navigate through different functionalities offered in the SAFE application. If you have the required permissions you will see the following menu items on the menu panel.
- The Dashboard menu item lets you access the Dashboard screen.
- The Rosters menu item lets you access the Rosters screen.
- The Apps menu item lets you access the Apps screen.
- The Airports menu item lets you access the Airports screen.
- The Help menu item lets you access the Help screen.
- The Archive menu item lets you access the Archive screen.
- The Expand/Collapse menu item lets you expand or collapse the menu panel.
- The expanded view will show the icons for each screen along with their names.
- The collapsed view will reduce the menu panel width, hiding the names of the screens and showing only the icons.
-
The label that reads CARE lets you switch between the CARE and SAFE models.
Switching between models
Depending on the models you have subscribed to, the text on this label will change. However, the action you can perform using this menu item will be the same. It will let you switch between different models.
-
Settings menu item lets you access the Settings screen.
Dashboard
To view the Dashboard screen, click Dashboard from the menu panel.
The Dashboard screen is designed to give you a quick look at the recently created or accessed rosters. It shows you a maximum of 5 recently opened rosters. If you click on the roster name, you will be able to taken the Roster screen and the roster analysis will be presented to you.
The Dashboard screen is a changing space. We're working to show you more information in this screen.
Rosters
To view the Rosters screen, click Rosters from the menu panel.
Rosters screen lets you manage the rosters in your instance. You can upload a roster, edit it or delete it using this screen.
There are multiple ways to upload roster data to SAFE and CARE models. You can either setup Apps, use SAFE web application, or call the SAFE APIs to load roster data into SAFE.
Regardless of the ways you use to upload the roster, you can view the uploaded rosters and its fatigue analysis from this screen. You can search for a specific roster using the search bar or scrolling through the list of rosters that you will see on next to the menu panel.
After you have opened a roster, you can access the roster control bar. This bar lets you perform multiple actions on the roster, including editing, sharing, commenting, deleting, bookmarking, or even exporting the analysis. You can export the analysis in PDF, Microsoft Excel or CSV formats.
Furthermore, the Rosters screen will also allow you to access schedule details. See How to work with rosters to learn how.
Roster analysis
In an open roster, you will see an analysis for the entire roster beneath the Roster control bar. See below for an image of the roster analysis along with the description of each element (numbered).

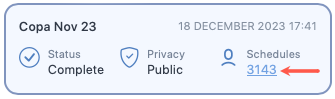
General information
- The name of the roster
- The visibility of the roster
- This label reads Yes, if you have integrated with our Harvest app and have sent this roster to Harvest.
- The date at which this roster was created or uploaded
- The creator of this roster
- The total number of schedule data associated with this roster.
- The tags assigned to this roster
Score tables
Understanding the scores
-
The tables of scores show icons before the schedule names. You can use these icons to quickly identify whether the schedule is a pilot or a cabin crew. The icon for pilot shows P in a blue circle whereas the icon for cabin crew shows C in a red circle.
-
These scores and thresholds are based on the scale your company administrator has set to this instance.
- The 5 schedules in the roster, which received the highest fatigue score and their corresponding fatigue scores. The shorthand for the scale type is shown next to the Schedule header.
- The 5 schedules in the roster, which received the highest risk score along with their corresponding risk scores. These scores are based on our Duty Risk Metric.
- The 5 schedules in the roster, which were above fatigue threshold during their duty and the corresponding percentage by which they were above the threshold.
- The 5 schedules in the roster, which were above fatigue threshold during their duty and the corresponding time (in minutes) they were above the threshold.
Cumulative distribution curve
- The cumulative fatigue curve for this roster. See Cumulative Fatigue Curve for more information on this chart.
Schedules
To view the Schedules screen, see View a schedule section in the How to work with rosters guide. In short, you will have to click on the schedule count that appears on a roster card in the Rosters screen to view a schedule.
Schedule screen lets you manage the schedules in the roster you selected. You can create a schedule, edit it or delete it using this screen.
There are multiple ways to upload schedule data to SAFE and CARE models. You can either setup Apps, use SAFE web application, or call the SAFE APIs to upload schedules data into SAFE.
Regardless of the ways you use to upload the schedules, you can view the uploaded schedules and their analysis from this screen. You can search for a specific schedule using the search bar or scrolling through the list of schedules that you will see on next to the menu panel.
After you have opened a schedule, you can access the schedule control bar. This bar lets you perform multiple actions on the schedule, including editing, sharing, commenting, deleting, bookmarking, or even exporting the analysis. You can export the analysis in PDF, Microsoft Excel or CSV formats.
See How to work with schedules to learn more about the actions you can perform on this screen.
Schedule analysis
In an open schedule, you will different analyses for the schedule beneath the schedule control bar. See below for an image of the roster analysis along with the description of each tab (numbered).
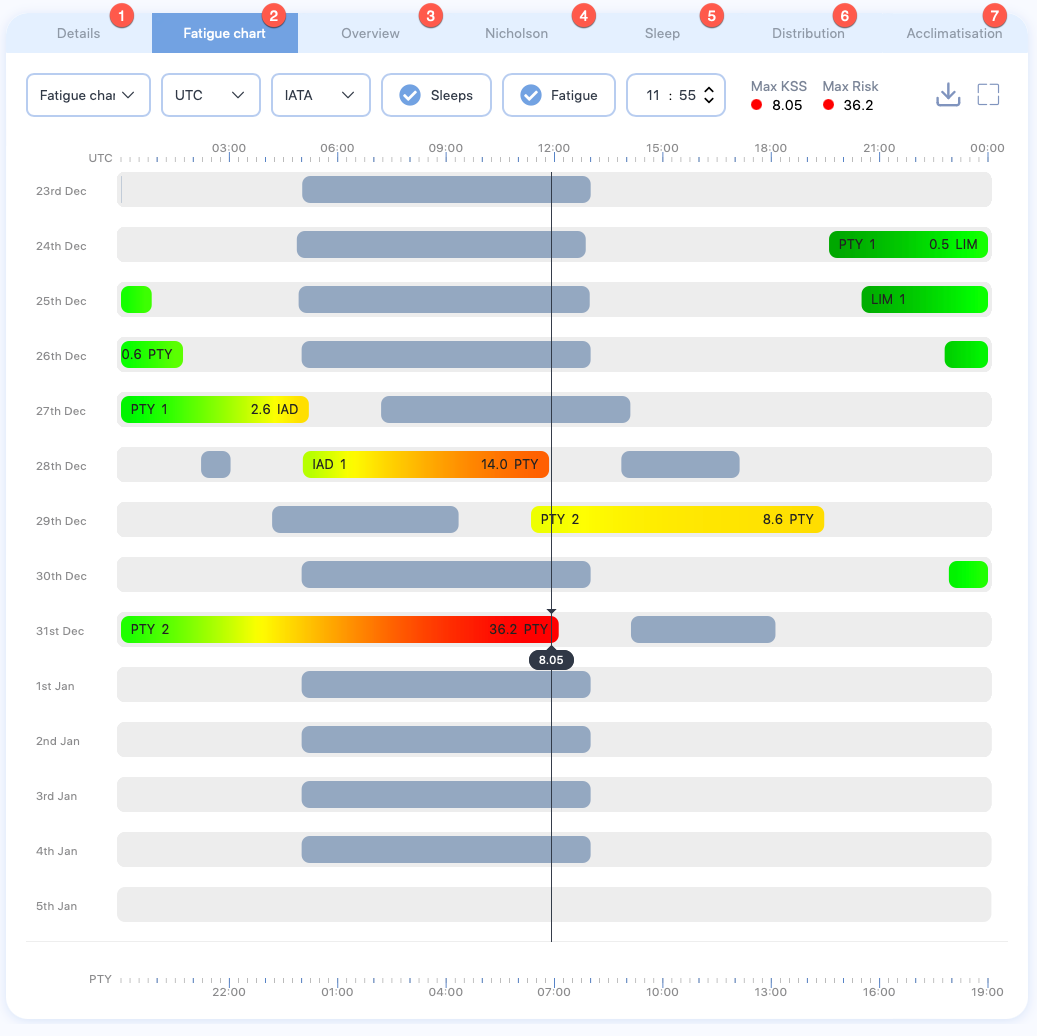
- The Details tab shows details about the schedule, including name, base airport, and maximum fatigue score among others.
- The Fatigue chart tab shows an interactive chart, displaying the fatigue score for this schedule across their duty. See How to work with the fatigue chart to learn more about this chart.
- The Overview chart tab shows a snapshot of rising and falling fatigue scores throughout each duty. See The overview Chart to learn more about the information this chart is showing.
- The Nicholson tab compares the sleep taken within a schedule with work- rate of the schedule. See The Nicholson curve to learn more about the information this chart is showing.
- The Sleep tab compares the rise and fall in the energy level of a schedule in between sleep periods. See The sleep reservoir curve to learn more about the information this chart is showing.
- The Distribution tab shows the cumulative fatigue distribution. Unlike the cumulative fatigue distribution chart in the Rosters screen, this chart doesn't show the fatigue distribution for entire roster; it shows the fatigue distribution for this schedule throughout their duty start and ends times.
- The Acclimatisation tab shows both the position of the pilot’s body clock in relation to the base time zone (blue line) and the position compared to local time (orange line). See The acclimatisation curve to learn more about the information this chart is showing.
Apps
To view the Airports screen, click Apps from the menu panel.
The Apps screen provides a list of methods and applications that you can use to import roster into the SAFE application. This screen has been designed with a focus on customers who may encounter challenges while integrating with our standard APIs.

Unlike our standard APIs, the methods in Apps page use the pull mechanism. Meaning, if the setup permits, the SAFE application will start checking the destination indicated in this pull method for new files and automatically retrieve them for analysis. SAFE application can also return the analysed data back to the destination if the setup supports it.
Can't find the method you are looking for?
We have already catered for most major CMS suppliers. However, if you require any new methods in your instance, a small amount of initial setup and development is required to construct the translation mechanism. Should you require the new method, please email us.
See How to setup apps for more information.
Airports
Airport codes added by you are exclusive
- Airport codes are exclusive to the instance where you add them. If your company operates multiple instances of the SAFE application, adding an airport code in one instance will not automatically propagate it to all the other instances.
- Only administrators can view this screen.
To view the Airports screen, click Airports from the menu panel.
The Airports screen lets you view and manage airports and their codes.
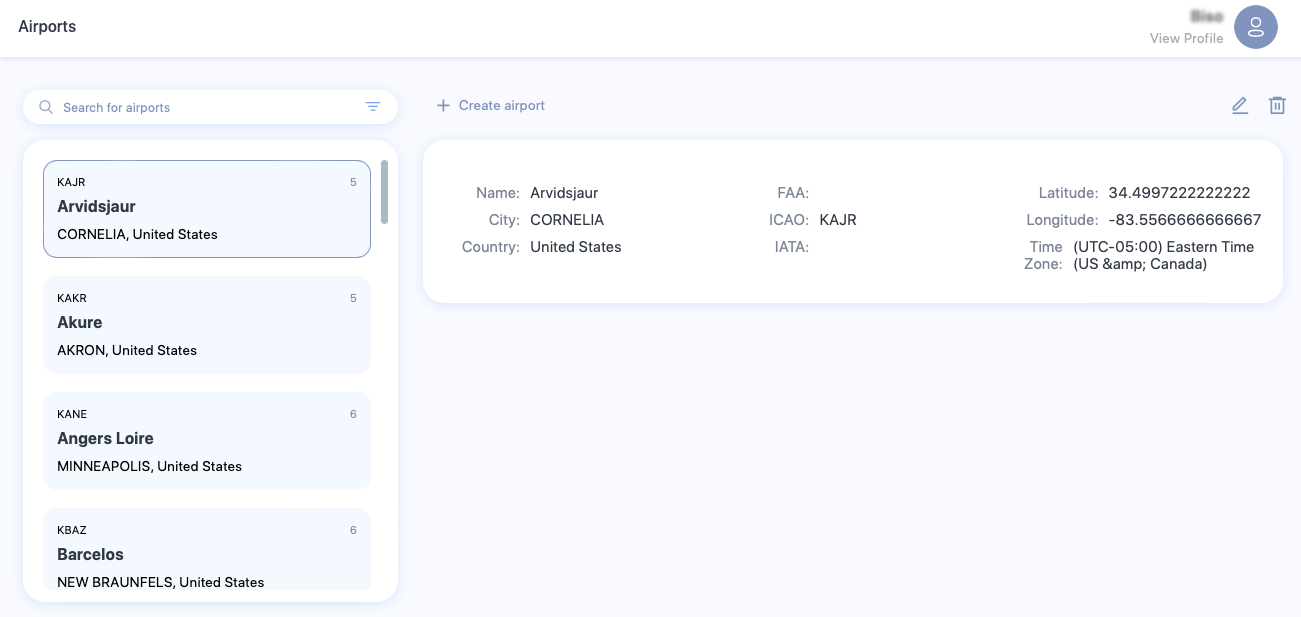
See How to manage airports to learn more about the actions you can perform in the screen.
Help
To view the Help screen, click Help from the left panel.
The Help screen is designed to get you help in the event you run across any issue while using the SAFE application. This screen is also very easy to use. Lets take a look at how to submit for help.
- Using the Select product type dropdown, select SAFE.
- In the Description box, provide a detailed description of the issue you are facing.
- Click Submit
- Using the Select product type dropdown, select SAFE UPLOAD API.
- In the Description box, provide a detailed description of the issue you are facing.
- In the Request box, provide a trace of the API request, which you are facing issues with.
- In the Response box, provide a trace of the API response, which you are facing issues with.
- Using the Attachment property, upload any useful files or image that can help us resolve your issue quickly.
- Click Submit
- Using the Select product type dropdown, select SAFE API.
- In the Description box, provide a detailed description of the issue you are facing.
- In the Request box, provide a trace of the API request, which you are facing issues with.
- In the Response box, provide a trace of the API response, which you are facing issues with.
- Using the Attachment property, upload any useful files or image that can help us resolve your issue quickly.
- Click Submit
Archive
Limited access
Only administrators or users with appropriate permissions can view this screen.
To view the Archive screen, click Archive from the menu panel.
The Archive screen lets you archive a roster analysis so that you can keep the data for future references. Archived rosters however can't be analysed or processed.
Archiving a roster will remove it from the Rosters screen and reduce the total number of active duties held by this instance. This feature can be used as a workaround to continue processing rosters without increasing the duty limit for this instance. In this guide, we will see how to manage archives.
Archive a roster
To archive a roster:
- Goto the Rosters screen.
- Search and select the roster you want to archive.
- From the control panel that appears on top of the roster analysis, click the Delete/Archive Roster icon and select Archive Roster.
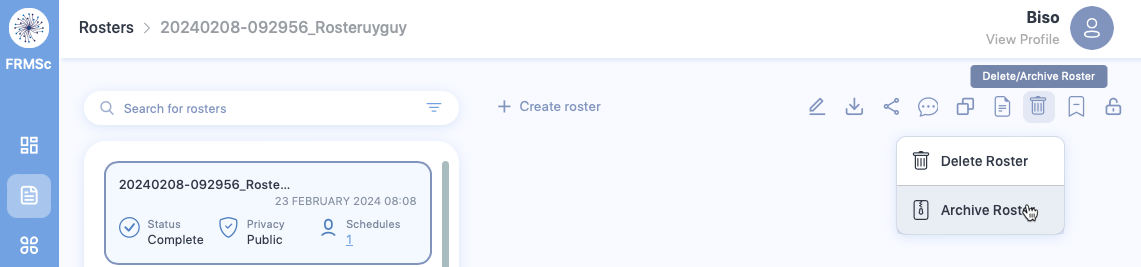
- A confirmation box will appear. Click Archive to archive the roster.
View an archived roster
You can view an archived roster from the Archive screen. You can either use the search bar in the Archive screen to search for an archived roster or scroll through the list of archived rosters to view the roster you want.
Unarchive a roster
You can unarchive a roster from the Archive screen. To unarchive:
- Search and select the roster you want to unarchive.
- Click the Unarchive icon.
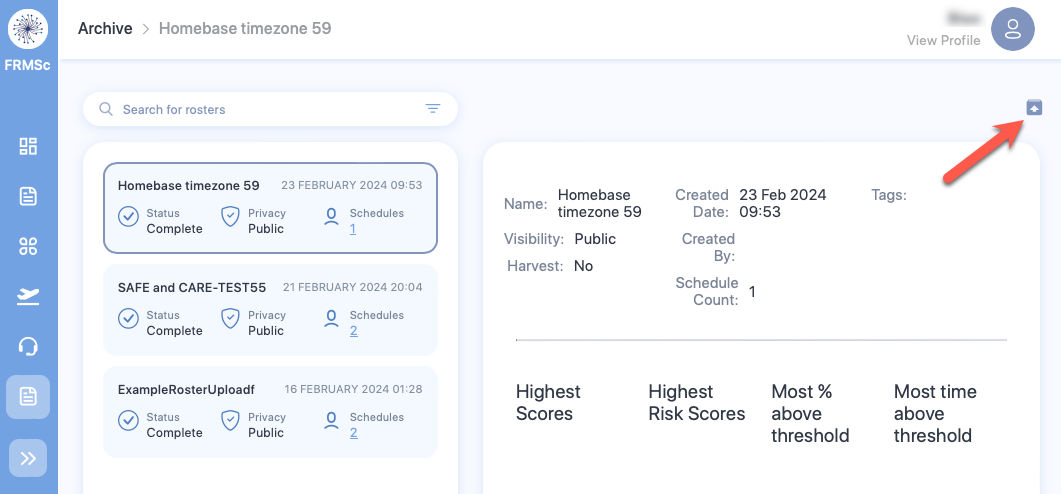
- A confirmation box will appear. Click Un-archive to unarchive the roster. An unarchived roster will appear as an active roster in the Rosters screen.
Settings
Saved your changes?
Settings screen must be used with caution. If you want to save the changes you have made, click on the Save button that appears underneath the tab where you have made your changes. Changing a property underneath a tab and clicking the Save button underneath a different tab won't save your changes.
To open this screen, click on the gear () icon at the bottom of the menu panel in the SAFE web application.
The Settings screen allows you, the user or the administrator or the company administrator, to change the fundamental behaviour of the SAFE application. Using this screen you can change default values of most of the properties you will find in the SAFE application according to your role. This screen comes with 5 different tabs. In this guide, we will look at the functionality tied to each of these tabs.
Preferences
The Preferences tab is as straightforward as it can get. It allows any user to change their default display options and also manage when they want to receive email notification from us. See the table below for more details on properties available under this tab.
| Property | Description |
|---|---|
| Default Time References | This dropdown lets you choose the default time zone SAFE application must use to show time entries. Choose either UTC, Base time, or Local time. |
| Default Airport Code | This dropdown lets you choose the default format for the airport codes shown in the application. Choose either IATA, ICAO, or FAA. Not all airports have codes allocated to them. If the code is missing, no code will be displayed. |
| Default create roster visibility | This dropdown lets you choose the default visibility option that should be selected when you are creating a new roster. Choose either Public or Private.
|
| Show sleeps | This dropdown lets you choose whether to show the sleep data or hide it. Choose either Show sleeps or Hide sleeps. |
| Show fatigue | This dropdown lets you choose whether to show the fatigue data or hide it. Choose either Show fatigue or Hide fatigue. |
| Show risk | This dropdown lets you choose whether to show the Duty Risk Metric data or hide it. Choose either Show risk or Hide risk. |
| Email on Roster Upload Success | This dropdown lets you choose whether to send email notification to you after a roster is successfully uploaded to SAFE application. Choose either Send email or Do not send email. |
| Email on Roster Upload Failure | This dropdown lets you choose whether to send email notification to you if a roster could not be uploaded to SAFE application. Choose either Send email or Do not send email. |
| Email on Roster Shared | This dropdown lets you choose whether to send email notification to you when your roster is shared with anyone. Choose either Send email or Do not send email. |
Administrator Settings
Only the Company Administrator can see the Administrator Settings tab. This tab has different sections that allow you to fine-tune the application’s behaviour. Explore the tabs below for more details on properties available for each section under Administrator Settings tab.
| Property | Description |
|---|---|
| Roster Visibility | Use this dropdown to set the visibility of the uploaded roster.
|
| Date Format | Use this dropdown to select the default date format for uploaded roster. Choose between:
If the uploaded roster has dates in a different format, SAFE application will see it as an upload error. |
| Base Airport | Use this property to set the base airport for your airline. If the control is showing an airport:
|
| Preferred Scale | Use this property to set the default scale that should be used to show alertness. See below for a video demonstration. Choose between:
|
| Pilot Threshold | Use this property to change the scale threshold for pilots. You can change the value of this property by adjusting the slider control left or right. We recommend that you use SP scale and set the Pilot Threshold to 5.0. |
| Cabin Crew Threshold | Use this property to change the scale threshold for cabin crew. You can change the value of this property by adjusting the slider control left or right. We recommend that you use SP scale and set the Cabin Crew Threshold to 5.5. |
| Insert rest into multi-sector augmented duty | Use this property to set automatic sleep value for aircrew flying multiple sectors. Choose:
|
| Default Schedule Preparation Time | Use this property to select the default preparation time for the crew. |
| Default Duty Commute Time | Use this property to select the default duty commute time for the crew. See below for a video demonstration. |
| Default Cabin Crew Sleep Pattern | Use this property to select the default cabin crew sleep pattern for normal long haul and ultra long haul (ULR) flights. Choose either:
See Cabin Crew Sleep Pattern to learn more. |
| Default Upload Format | Use this property to set the default format for the CSV or XLSX file you want to upload to the SAFE application. The file format of your choice will be translated to SAFE and CARE format automatically. Choose one option from the following to prescribe the upload format to the SAFE application:
If your Crew Management System is not included in this list, please email info@frmsc.com for assistance to create the connectivity option.
|
How to change alertness scale?
How to change commute times?
| Property | Description |
|---|---|
| Basic Field Upload | Use this property to accept (or ignore) In-Duty Rest and Partial augmentation properties. If this property is checked, partial augmentation and in-duty rest values will be ignored. |
| Upload Error Handling | Use this dropdown to select the action SAFE application must take if the upload has errors. Choose either:
|
| Property | Description |
|---|---|
| Date Range to Purge | Use this dropdown to delete roster analysis that are past a certain age. You can choose from different time intervals, such as 1 day, 2 days, 30 days, 60 days, or 365 days. Analyses that are older than the selected value will be removed from the application by an automatic process that runs at night. You can turn this functionality off by choosing the Off option from the dropdown. |
| User's Data to Purge (Optional) | Use this property to delete only the uploads of specific user(s).
|
| Property | Description |
|---|---|
| Duties in system | The total number of duties held by this instance of the application. |
| Limit | The total number of duties this instance of the application can hold. If you want to increase this limit, contact us at info@frmsc.com.
If the number of duties in this instance has reached the instance limit, you will not be able to process new duties. You could delete old duties or archive them as a workaround, if you would like to continue processing new duties without increasing the instance limit. However, archived duties can't be analysed or processed.
|
This section lets you configure the preferred start and the end times of main sleeps for each country. This configuration should usually be based on the sleep times of a normal resident of the country. If any country is unconfigured, the default sleep start time will be midnight and default sleep end time will be 08:00.
| Property | Description |
|---|---|
| Country | Use this dropdown to select the country, which you want to configure the sleep times for. There is no limit on the number of countries you can configure. However, if the sleep time is already configured for the selected country, you can't edit it. You must delete the configuration and add the configuration with new settings. |
| Sleep Start | Use this dropdown to select the default sleep start time for the selected country. |
| Sleep End | Use this dropdown to select the default sleep end time for the selected country. |
This section also features two buttons.
| Button | Description |
|---|---|
| Add | Use this button to store your sleep configuration for the selected country. Click this button to add the country’s sleep configuration to the list at the bottom of this section. 
|
| Delete | Use this button to delete the sleep configuration. Click this button to delete the sleep configuration for the country on the left of this button.
|
Company Settings
Like Administrator Settings, only the Company Administrator can see the Company Settings screen. The properties you see in this page are focused on managing login and user session behaviour. See the table below to learn more about each property.
| Property | Description |
|---|---|
| Remember me enabled | Use this property to enable or disable the Remember me checkbox you will see in the login screen. If toggled on, the Remember me checkbox will appear in the login screen. |
| Log on warning message | Use this property to show a message to each user upon successful login. Type in the message you want show. If left blank, the warning message screen will not appear.
Use caution when enabling this message as it can disorient your users. Only enable this feature, if you are trying to share important information to the users.
|
| Account suspension active | Use this property to decide whether to suspend an account after a certain number of failed login attempts. Toggle this property on to enable suspension. You can set the threshold for failed attempts below. |
| Suspend user account days | Use this property to set the number of days a user can remain inactive before their account is automatically suspended. |
| Maximum login attempts | Use this property to specify the threshold for failed login attempts. This property works in conjunction with Account suspension active property. |
| Lockout suspension days | Use this property to set the number of days a suspended user will be locked out before they can attempt to login again. |
| Two Factor Enabled | Use this property to enable or disable two factor authentication (2FA). If enabled, users must use the code received in their email to validate their account before accessing the system. |
| Saml SSO Enabled | Use this property to enable or disable SAML Single Sign On feature. When you toggle this property on, you will see a list of the following additional properties you must set to start using SAML Single Sign On.
|
User Management
Only administrators can see the User Management screen. The properties you see in this page are focused on managing users in your company. There are a few actions you can take using this screen. You can learn about them in How to manage users
API
Most users can see this screen, however this screen is designed solely to get keys required to use SAFE APIs. You can learn more about FRMSc SAFE APIs in our developer documentation.
User profile
To open this screen, click on View Profile link below your name on the top right of SAFE application.
The User Profile screen allows you view a brief snapshot of your account details, including the permission(s) assigned to you and a history of your successful logins into the SAFE application.

You can also see a few buttons on the top right of this screen.
-
The first button in row is the Edit button.
- Click on it to open Update User form.
- Edit your name. You can also enable (or disable) two factor authentication (2FA). However, you can't disable 2FA, if your administrator has forced 2FA for you.
- To keep the changes, click Save. Click Cancel to discard changes and close this form.
-
The second button in the row is the Change Password button.
- Click on it to open the Change Password screen.
- Enter your current password and new password.
- Click Change Password button to change your password and you will be returned to the User Profile screen.
-
The third button in the row is the Logout button. Click on this button to sign out of the SAFE application.
Ended: What is this screen
How to load data using SAFE web application
There are multiple ways to upload roster data to SAFE and CARE models. You can either setup Apps, use SAFE web application, or call the SAFE APIs to load data into SAFE.
In this guide we will focus on loading roster files in SAFE and CARE format into SAFE using the SAFE web application. For this approach, you can choose between two methods - individual entry and bulk upload. This guide will walk you through both those methods in detail.
Individual entry
Individual entry is one of the easiest way to submit data to SAFE analysis. The step-by-step wizard will allow you to enter the roster data, limiting errors during data input. To manually submit individual roster entry into SAFE, follow the steps below:
- Navigate to the Rosters screen using the menu panel.

- Click + Create roster
- Click Construct manually

- The Create Roster form will appear. Enter relevant values in the available fields. Refer to the Tables of properties section below for more information.
- Click Next
- The Create Schedule form will appear. Enter relevant values in the available fields. Refer to the Tables of properties section below for more information.
- Click Submit.
- The Create Duty form will appear. Enter relevant values in the available fields. Refer to the Tables of properties section below for more information.
- Click Create
- The Fatigue chart will start showing immediately.

To add more duties to a schedule, right click on the day and select Create Duty. Repeat Step 8 to create duty.
To add additional schedules for more personnel, click + Create Schedule located above the chart. - Right click on the duty and select Activities to start adding activities to the duty.

- The Activities pop-up form will appear. Click on the + icon.

- The Create Activity form will appear. Enter relevant values in the available fields. Refer to the Tables of properties section below for more information.
- Click Create and close the Activities pop-up. The Fatigue chart will update. Continue adding more activities and duty to refine the results.
Bulk upload
Example CSV or Microsoft Excel (.xlsx) files
Download the example files for Duty (csv and .xlsx) and Activities (csv and .xlsx) here.
Alternatively, you can view the order and column names of the files in the Duty file specification and the Activity file specification sections. You can also see Where to get file formats document to learn about additional places you get the file formats from.
Bulk entry is one of the fastest way to submit data to SAFE and CARE using the web UI. Using the CSV or Microsoft Excel file, you can submit multiple schedules data at once, reducing the time taken to enter the data manually. To submit bulk roster entries into SAFE web UI, follow the steps below:
-
Navigate to the Rosters screen using the menu panel.
-
Click + Create roster
- Click Construct with duties only

- The file explorer opens. Navigate to the location of the CSV or Microsoft Excel (.xlsx) file that has roster data with duties and select it.
- The Create Roster form will appear. Enter relevant values in the available fields. Refer to the Tables of properties section below for more information.
- Click Next
- The roster data will start processing.
- If any errors or warnings are found on the file, they will be listed at the bottom of the Process roster screen. You will also receive an email notification with the list of errors you need to resolve.


- Resolve the errors and warnings and upload again or view the schedules to fix the errors using the web UI.
- If any errors or warnings are found on the file, they will be listed at the bottom of the Process roster screen. You will also receive an email notification with the list of errors you need to resolve.
- After the processing is complete, a fly-out banner will appear on the top right of the screen. You will also receive an email notification to indicate successful completion. Click
- View roster summary to view roster summary
- View schedules to view the schedules and fatigue charts
-
Navigate to the Rosters screen using the menu panel.
-
Click + Create roster
- Click Construct with duties and activities

- The file explorer opens. Navigate to the location of the CSV or Microsoft Excel (.xlsx) file that has roster data with duties and select it.
- The Activity upload dialog appears. Click Ok to continue.
- The file explorer opens. Navigate to the location of the CSV or Microsoft Excel (.xlsx) file that has roster data with activites and select it.
- The Create Roster form will appear. Enter relevant values in the available fields. Refer to the Tables of properties section below for more information.
- Click Next
- The roster data will start processing.
- If any errors or warnings are found on the file, they will be listed at the bottom of the Process roster screen. You will also receive an email notification with the list of errors you need to resolve.
- Resolve the errors and warnings and upload again or view the schedules to fix the errors using the web UI.
- If any errors or warnings are found on the file, they will be listed at the bottom of the Process roster screen. You will also receive an email notification with the list of errors you need to resolve.
- After the processing is complete, a fly-out banner will appear on the top right of the screen. You will also receive an email notification to indicate successful completion. Click
- View roster summary to view roster summary
- View schedules to view the schedules and fatigue charts
Tables of properties
Roster properties

| Property (* required) |
Description |
|---|---|
| Name* | The name of the schedule. Usually the identifier of the pilot or the crew member e.g., employee number |
| Visibility | If other users should not be able to see the roster, choose Private else choose Public |
| Tags | The label attached to the Roster which can be used to group rosters together. |
Schedule properties

| Property (* required) |
Description |
|---|---|
| Name* | The name of the schedule. Usually the name of the pilot or the crew member. |
| Rank | A label for indicating the rank of the pilot or the crew member. |
| Base Airport* | The homebase airport of the pilot or the crew member. Click on the airport name to view a text box. Type ICAO, IATA, or FAA airport codes in the text box and choose the airport from the drop down. |
| Preparation time | The time required to prepare after waking from a main sleep. |
| Crew Type* | The type of personnel. Choose between Pilot or Cabin crew. |
Duty properties

Cabin crew properties
Some of the properties shown below are exclusive to cabin crew i.e., the Create Duty form will not show some of the following properties for Pilots. Such properties will have the symbol -  - next to the property name.
| Section | Property (* required) |
Description |
|---|---|---|
| General | Duty type* | Choose the type of duty from the dropdown. |
| Crew composition | Select the number of pilots in the flight from the dropdown or select 9 for cabin crew. | |
| On duty date and time* | The duty start date. Use the date time controls to set the date and time. | |
| Off duty date and time* | The duty end date. Use the date time controls to set the date and time. | |
| Time zone selector check boxes* | The time zone which the duty times are based on. Check the box that indicates the timezone. | |
| Time zone lock check boxes | Select this property if you want the web application to automatically convert your entered dates and times to match your time zone selection when swapping between UTC and local time zones. | |
| Start Airport* | The airport where the duty started. Default is the base airport. To change the airport, click on the airport name to view a text box. Then, type ICAO, IATA, or FAA airport codes and choose the airport from the drop down. | |
| End Airport* | The airport where the duty ended. Default is the base airport. To change the airport, click on the airport name to view a text box. Then, type ICAO, IATA, or FAA airport codes and choose the airport from the drop down. | |
| Commute Time | Select the time taken to commute to the duty. Default value is 1 hour. | |
| Fleet | A label you can use to indicate the aircraft being used. | |
| Sector Count | Select the number of flights in the duty. Default value is 1. | |
| Cabin Crew Sleep Pattern |
Select one of the following sleep patterns for the cabin crew.
See Cabin Crew Sleep Pattern to learn more. |
|
| Workload | Move the seeker bar horizontally to increase or decrease the workload in percentage increments (decrement) from the normal workload (workload=0) for the duty. Workload can be increased up to 100% of the normal workload (100= twice the normal workload level) or decreased by 50% of normal workload (-50 = half the normal workload) | |
| Rest Definition |
Select the method SAFE and CARE must use to calculate sleep periods. Depending on your selection additional properties will appear on this form.
|
|
| Sleep Details | Sleep Count |
The number of sleeps a cabin crew had during their duty. |
| Sleep Class |
The class where the cabin crew slept. Select:
|
|
| Sleep Order |
The rank, which the crew member slept in. | |
| Augmented Duty | On Duty Date Time |
The date and time the cabin crew started their augmented duty. See Partial Augmentation for more information on augmented duty. |
| Off Duty Date Time |
The date and time the cabin crew ended their augmented duty. See Partial Augmentation for more information on augmented duty. | |
| Time zone selector check boxes |
Select the time zones for the sleep start and end date times. You will see a separate set of time zone selector check boxes below Sleep Start Date Time and Sleep End Date Time. Selecting time zone for Sleep Start Date Time or Sleep End Date Time doesn't automatically select the time zone for corresponding Sleep End Date Time or Sleep Start Date Time.
|
|
| Time zone lock check boxes |
Select this property if you want the web application to automatically convert your entered dates and times to match your time zone selection when swapping between UTC and local time zones. | |
| Rest Period | Sleep Class |
The place where the cabin crew slept. |
| First rest start date time |
The date and time the cabin crew started their first rest. See In-duty rest for more information on rest period. | |
| First rest end date time |
The date and time the cabin crew ended their first rest. See In-duty rest for more information on rest period. | |
| Time zone selector check boxes |
Select the time zones for the duty start and end date times. You will see a separate set of time zone selector check boxes below On Duty Date Time and Off Duty Date Time. Selecting time zone for Sleep Start Date Time or Sleep End Date Time doesn't automatically select the time zone for corresponding Sleep End Date Time or Sleep Start Date Time.
|
|
| Time zone lock check boxes |
Select this property if you want the web application to automatically convert your entered dates and times to match your time zone selection when swapping between UTC and local time zones. | |
| Add second rest |
Click on this link if you want to add second rest date and times. A click on this link will produce additional properties for second rest. These properties and their selections are very similar to the first rest. See above for details. |
Activity properties

| Property (* required) |
Description |
|---|---|
| Activity type* | Choose the type of activity from the dropdown. Click here to see the available types. |
| Description | Add a short description about or comment on the activity. |
| Activity start date and time* | The activity start date. Use the date time controls to set the date and time. |
| Activity end date and time* | The activity end date. Use the date time controls to set the date and time. |
| Time zone selector check boxes* | The time zone which the activity times are based on. Check the box that indicates the timezone. |
| Time zone lock check boxes | Select this property if you want the web application to automatically convert your entered dates and times to match your time zone selection when swapping between UTC and local time zones. |
| Nearest airport* | The airport that is nearest to this activity. You can not change this property. The nearest airport for any activity is the departure airport of the duty it belongs to. |
Duty file specification
The table below shows a list of columns you can include in the CSV or Microsoft Excel file. The columns must be in the same order as listed below.
You can omit the column titles. In such case, the order in which the column titles are listed below will be assumed. You can send multiple rows at a time.
Date format
We have set the date format to DD/MM/YYYY below. This can be changed to MM/DD/YYYY from the Settings page.
| ColumnName (+ required) |
Format | Description |
|---|---|---|
| Reference+ | Text | A free-text property usually used to indicate a pilot. Use pilot's name or ID. |
| OnDutyDate+ | Date (DD/MM/YYYY) | The duty start date. |
| OnDutyTime+ | Time (hh:mm) | The duty start time. |
| StartAirport+ | Text | The airport at which the duty started. Send ICAO, IATA, or FAA airport codes or a combination of these codes. |
| OffDutyDate+ | Date (DD/MM/YYYY) | The duty end date. |
| OffDutyTime+ | Time (hh:mm) | The duty end time. |
| EndAirport+ | Text | The airport at which the duty ended. Send ICAO, IATA, or FAA airport codes or a combination of these codes. |
| Sectors | Number | The number of flights in duty. Default value is 1. |
| CrewComposition | Number | Send
|
| SleepCount | Number (0-2) | The number of sleeps the pilot or the crew member slept on duty. |
| SleepOrder | Number (1-3) | The rank, which the pilot or the crew member slept in. Send
|
| SleepClass | Number (1-5) | Send
|
| HomeBase+ | Text | Send ICAO, IATA, or FAA airport codes or a combination of these codes. Default value is Start airport code. |
| TimeReference+ | Number (0-2) | The reference time zone. Send
|
| OnPartialAugmentDate | Date (DD/MM/YYYY) | The time at which the pilot or the crew member started their partial augmentation. |
| OnPartialAugmentTime | Time (hh:mm) | The time at which the pilot or the crew member started their partial augmentation. |
| OffPartialAugmentDate | Date (DD/MM/YYYY) | The date on which the pilot or the crew member ended their partial augmentation. |
| OffPartialAugmentTime | Time (hh:mm) | The time at which the pilot or the crew member ended their partial augmentation. |
| FirstRestStartDate | Date (DD/MM/YYYY) | The date on which the pilot or the crew member started their first rest. |
| FirstRestStartTime | Time (hh:mm) | The time at which the pilot or the crew member started their first rest. |
| FirstRestEndDate | Date (DD/MM/YYYY) | The date on which the pilot or the crew member ended their first rest. |
| FirstRestEndTime | Time (hh:mm) | The time at which the pilot or the crew member ended their first rest. |
| SecondRestStartDate | Date (DD/MM/YYYY) | The date on which the pilot or the crew member started their second rest. |
| SecondRestStartTime | Time (hh:mm) | The time at which the pilot or the crew member started their second rest. |
| SecondRestEndDate | Date (DD/MM/YYYY) | The date on which the pilot or the crew member ended their second rest. |
| SecondRestEndTime | Time (hh:mm) | The time at which the pilot or the crew member ended their second rest. |
| SplitShift | Number (0-1) | Indicates whether the pilot or crew member had rested in between flight. Send
|
| DutyType | Number (1-3) | The type of duty. Send
|
| Fleet | Text | A free-text property used to indicate fleet message. |
| Rank | Text | A free-text property used to indicate a pilot's rank. |
| Workload | Number | When the sector count is 0, send
|
| CrewPrepTime | Number | The time taken for crew to prepare. Value indicates minutes. Default value is 60 minutes. |
| DutyCommuteTime | Number | The time taken to commute to the duty. Value indicates minutes. Default value is 60 minutes. |
| CabinCrewSleepPattern | Number (0-3) | Send
Default value is 0. See Cabin Crew Sleep Pattern to learn more. |
Activity file specification
The table below shows a list of columns you can include in the CSV or Microsoft Excel file. The columns must be in the same order as listed below.
You can omit the column titles. In such case, the order in which the column titles are listed below will be assumed.
Matching date times
Start and end times for activites should be within the start and end times for the duty.
| ColumnName (+ required) |
Format | Description |
|---|---|---|
| Reference+ | Text | A free-text field usually used to indicate a Activity. Use pilot's name or ID. Ensure that the name of the pilot matches the names in the duty file. |
| ActivityStartDate+ | Date (DD/MM/YYYY) | The activity start date. |
| ActivityStartTime+ | Time (hh:mm) | The activity start time. |
| ActivityEndDate+ | Date (DD/MM/YYYY) | The activity end date. |
| ActivityEndTime+ | Time (hh:mm) | The activity end time. |
| ActivityType+ | Text | Send one of the following
|
| Description+ | Text | A free text field to explain the activity. |
| TimeReference+ | Number (0-2) | Send
|
| StartAirport+ | Time (hh:mm) | The airport at which the activity started. Send ICAO, IATA, or FAA airport codes or a combination of these codes. |
| EndAirport+ | Text | The airport at which the activity ended. Send ICAO, IATA, or FAA airport codes or a combination of these codes. |
| Homebase+ | Text | The pilot's or the crew member's home airport. Send ICAO, IATA, or FAA airport codes or a combination of these codes. Default value is Start airport code. |
How to work with rosters
Scope of this guide
This guide is focused on working with rosters using the SAFE web application. If you want to learn about API interactions see FRMSc API documentation or Apps.
You can manage rosters through the Rosters screen.

You can perform the following actions through this screen.
Create a new roster
Create manually
The workflow
Creating roster is the initial step in a larger workflow. The steps below isolate creating roster from that workflow. To learn how to create a new roster as part of the entire workflow, see the Individual entry method in the How to load data into SAFE guide.
To create a new roster manually:
-
Click the + Create Roster button to create a new roster.
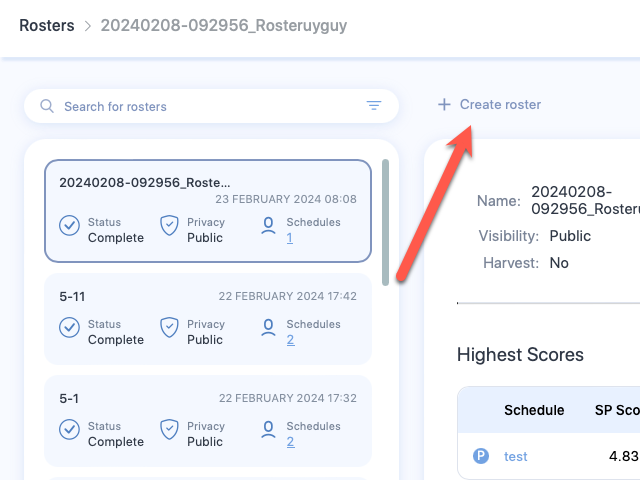
-
The Create Roster screen appears. Click Construct manually.
- Enter the values into the property fields. See Roster properties for more information on each property.
- Click Next. Your roster will be created.
- The Create schedule form will appear. You can continue adding a schedule to the newly created roster, following the entire workflow or cancel the form to return to this roster later. If you are returning to create a schedule and seek a guide, see Create a schedule manually.
Create by bulk upload
To create a roster by bulk upload method, see the Bulk upload method in How to load data into SAFE.
View a roster
There are multiple ways to view or search a roster. However, we recommend that you familiarise yourself with the roster card first.
Roster card
A roster card is an item that represents a roster in the roster list. It shows you key details about the roster. See below for an image of the roster card and the description of each label (numbered) on it.
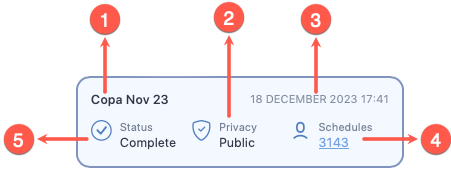
- The name of the roster
- The visibility of the roster
- The date this roster was uploaded or created
- The total number of schedule data in this roster
- The status of processing for this roster
Simple search
Type the roster name in the Rosters screen's search bar to search for a roster. Then, click on the card associated with the roster to open it and view its details.
Advanced search
You can perform an advanced search on your roster list. To perform an advanced search:
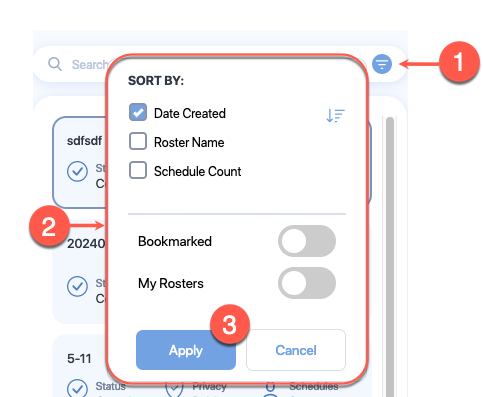
- Click the Advanced Search icon at the end of the search bar.
- Search options appear that allow you to make search adjustments. See the Advanced search properties below for more information on each property.
- Click Apply.
- Click on the card associated with the roster to open it and view its details.
Scroll roster list
You can also scroll through the list of rosters to find a roster. Click on the card associated with the roster to open it and view its details.
Roster analysis
See Roster analysis for more information.
View schedules
To view schedules associated with a roster, you must be in the Rosters screen. Follow the steps below to view a schedule.
- Find the roster, whose schedule you want to view.
- On the roster card that appears on the list of rosters, click the link below the schedule. This number on that link is the total number of schedules associated with that roster.
- The Schedules screen will open showing a list of schedules associated with that roster.
Share a roster
You can share private and public rosters. You can share a roster with colleagues in the same organisation, SAFE and CARE licencees in different organisations, and individuals, who are outside your organisation, without SAFE and CARE licence. However, restrictions apply.
If you share a roster, private or public, with someone within your organisation or SAFE and CARE licencees in different organisations, they will get a copy of the roster, which they will own. They can't edit the original but they can edit the copy.
A recipient who is neither a licenced user of SAFE and CARE nor a colleague, they can only view but not edit the copy of the roster. To help you understand these restrictions, we have prepared a roster share matrix (shown below).

How to share roster?
Edit a roster
See roster control bar.
Delete a roster
See roster control bar.
Access the roster control bar
Access control
Only the user who locked a roster can unlock the roster, except for administrators.
The roster control bar appears on top right of each open roster. The control bar features a rich set of icons that control various functionalities related to the roster.
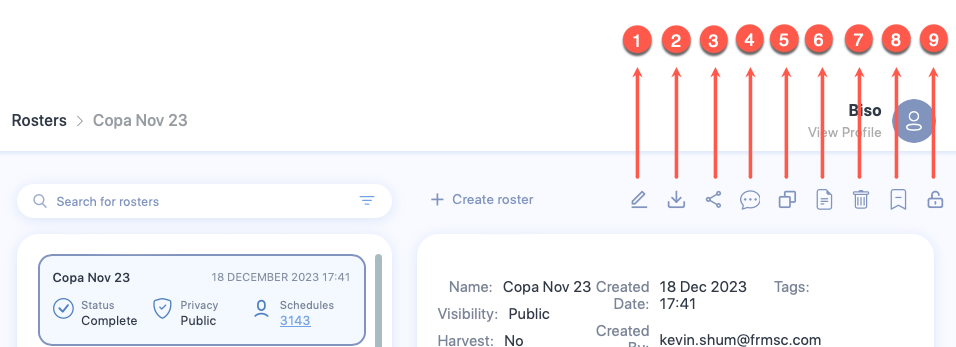
- The Edit icon lets you edit the roster properties. See Roster properties for a list of properties that you can edit.
- The Download icon lets you download the roster analyses. If you click on this icon, the Download Roster box appears which lets you choose the format of the files that you want to download. Upon continuing, a folder containing multiple files is downloaded. These files will contain the following data.
- Schedule
- Alertness
-
The Share icon lets you share the roster with people in your company. If your company administrator has enabled sharing externally for you, you can also send the roster analyses in an email to the people outside of your company. See Share a roster for more information.
How to share roster?
-
The Comment icon lets you add a comment to the open roster. If you click on this icon, the Comment box appears which lets you view existing comments in the roster or add a new comment in the roster.
How to add comments to a roster?
-
The Copy icon lets you create a duplicate of this roster. If you click on this icon, the Copy Roster box appears. You need to change the title of the Roster and click Copy to create a duplicate roster.
- The Generate roster file for upload icon, unlike the Downloads icon, downloads only the roster data but not the analysis so that you can use the roster data to upload to a different instance that your company operates. If you click on this icon, the Generate roster box appears which lets you download the roster data as CSV.
- The Delete/Archive Roster icon produces a dropdown menu that has two options - Delete Roster and Archive Roster.
- If you click on Delete Roster, you will be prompted to confirm your action. If you confirm the delete action, the roster will be deleted from your instance and the rosters list will refresh to remove the roster.
- If you click on Archive Roster, your roster will be archived. See Archive screen for more information on archived roster.
- The Bookmark icon attaches a small bookmark icon on top of this roster's card. You can view the icon on top of this roster's card when you search for this roster. Bookmarking a roster lets you search the roster using the Advanced search.
-
The Lock icon lets you control any new changes to this roster. If you click on this icon, a lock will be placed disabling anyone to change the roster. After a lock is placed, this icon will be replaced by the Unlock icon. If you click on the Unlock icon, the roster can be changed.
How to lock or unlock a roster?
Table of properties
Roster properties
| Property (* required) |
Description |
|---|---|
| Name* | The name of the schedule. Usually the identifier of the pilot or the crew member e.g., employee number |
| Visibility | If other users should not be able to see the roster, choose Private else choose Public |
| Tags | The label attached to the Roster which can be used to group rosters together. |
Advanced search properties
| Property controls | Property | Description |
|---|---|---|
| Sorting | Date Created | Check this box to sort the rosters by the date they were created. It is the default sorting option. You can also see descending sort (  ) or ascending sort ( ) or ascending sort ( ) icons next to the Date Created property. Click on these icons to toggle between ascending or descending sort. ) icons next to the Date Created property. Click on these icons to toggle between ascending or descending sort. |
| Roster Name | Check this box to sort the rosters by their names. You can also see descending sort ( ) or ascending sort () icons next to the Roster Name property. Click on these icons to toggle between ascending or descending sort. |
|
| Schedule Count | Check this box to sort the rosters by the number of schedules in a roster. You can also see descending sort ( ) or ascending sort () icons next to the Schedule Count property. Click on these icons to toggle between ascending or descending sort. |
|
| Roster visibility | Bookmarked | Enable this property to only show bookmarked rosters. |
| My Rosters | Enable this property to only show rosters that you created or uploaded. |
How to work with schedules
Scope of this guide
This guide is focused on working with schedules using the SAFE web application. If you want to learn about API interactions see FRMSc API documentation or Apps.
You can manage schedules through the Schedules screen.
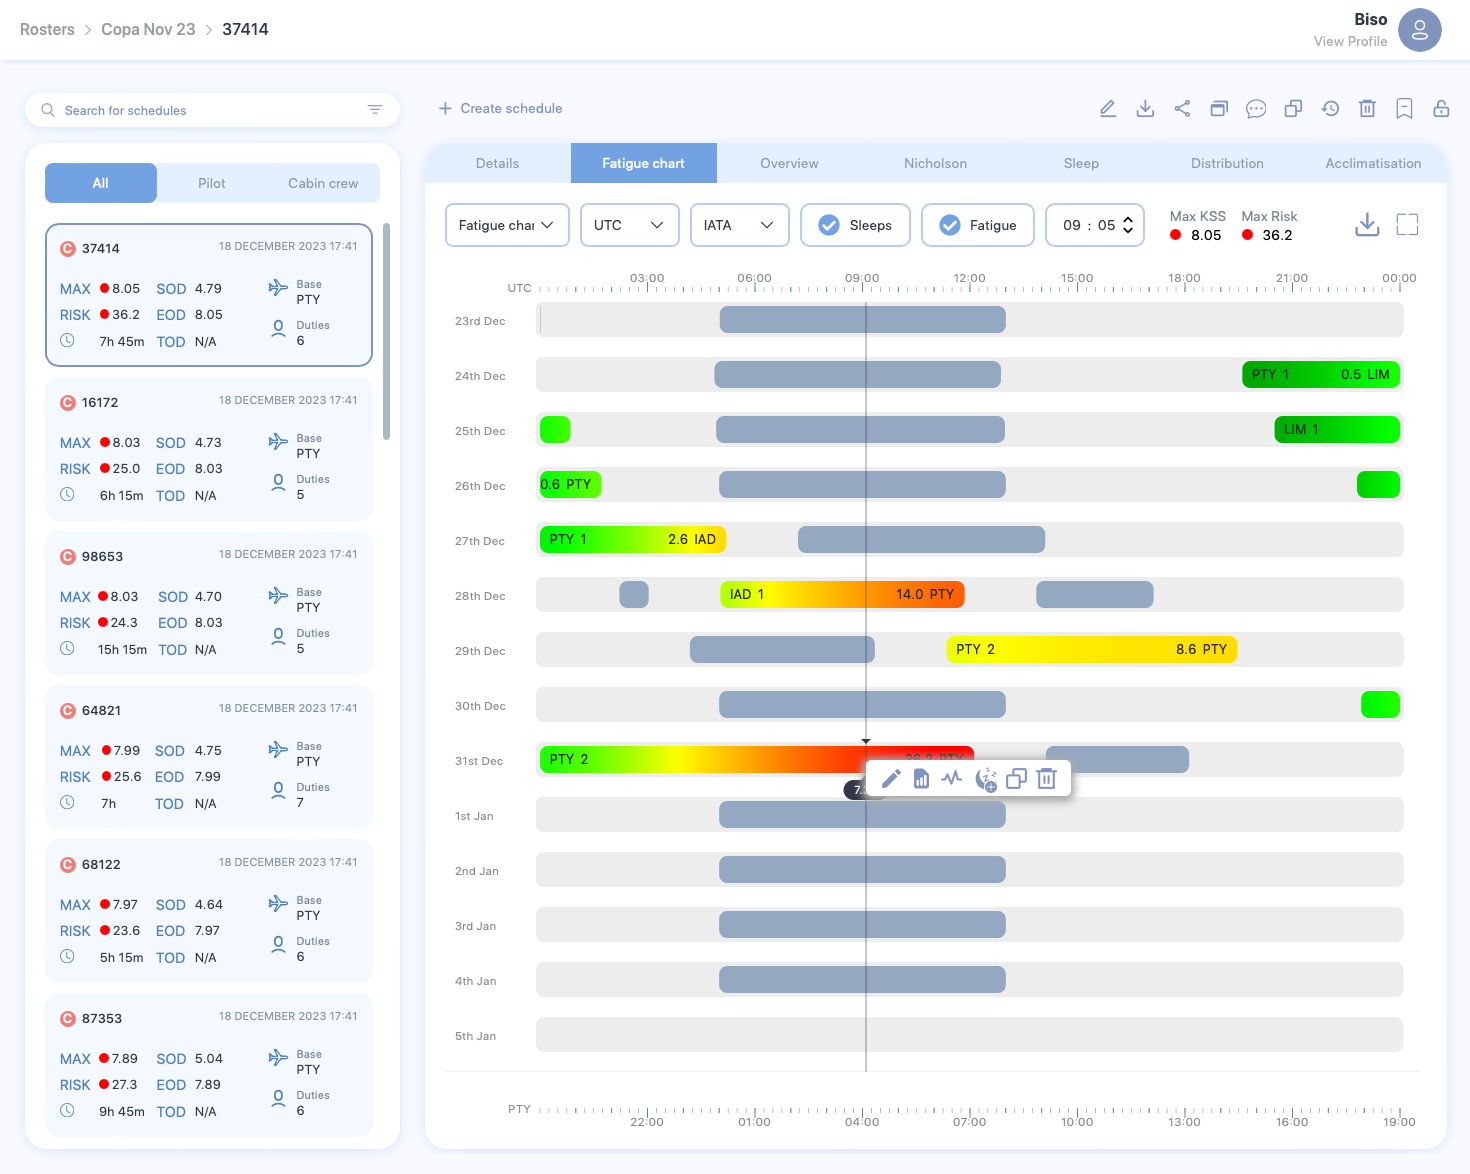
You can perform the following actions through this screen.
Create a schedule
Create manually
The workflow
Creating schedule is only a step in a larger workflow. The steps below isolate creating schedule from that workflow. The following steps demonstrate schedule creation process for users returning to create a schedule in a roster.
To learn how to create a new schedule as part of the entire workflow, see the Individual entry method in the How to load data into SAFE guide.
To create a new schedule manually:
- Open schedules screen from an existing roster.
-
Click the + Create schedule button to create a new schedule.
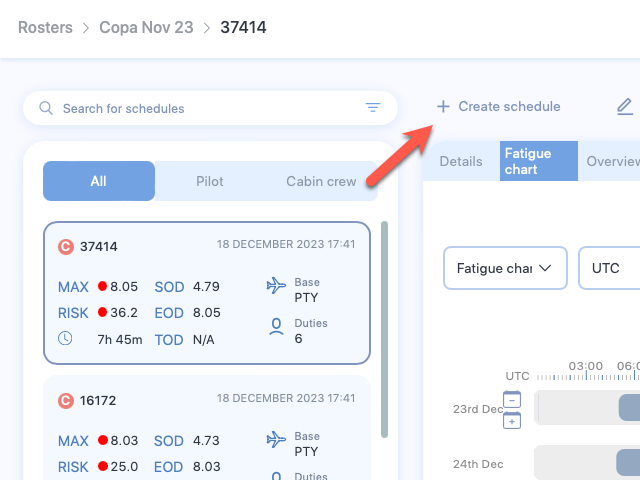
-
The Create schedule form appears. Enter the required values to the properties shown in the form. See Schedule properties to learn more about each property shown in this screen.
- Click Submit. A new schedule will be created.
- The Create Duty form appears. You can continue adding duty to the newly created schedule, following the entire workflow or cancel the form to return to this schedule later. If you are returning to add a duty and seek a guide, see Create a duty.
Create by bulk upload
To create a roster by bulk upload method, see the Bulk upload method in How to load data into SAFE.
View a schedule
Empty schedule?
If you open an empty schedule, the Create Duty form will appear, prompting you to add a new duty to the schedule.
There are multiple ways to view or search a schedule. However, we recommend that you familiarise yourself with the schedule card first.
Schedule card
A schedule card is an item that represents a schedule in the schedule list. It shows you key details about the schedule. See below for an image of the schedule card and the description of each label (numbered) on it.
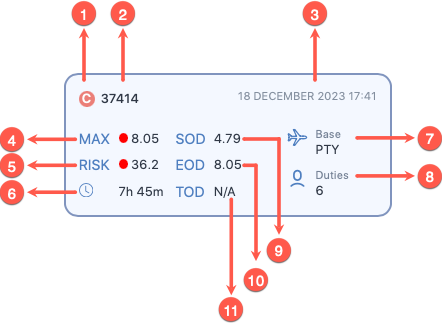
- The schedule type icon. If the schedule is a pilot, it would show a blue circle with the letter P inside it. For a cabin crew, the icon would show a red circle with the letter C inside it.
- The schedule name
- The date this schedule was uploaded or created
- The maximum fatigue score for this schedule. See the bottom of this list to learn more about the coloured circle appearing in the front of this score.
- The maximum risk score for this schedule. See the bottom of this to learn more about the coloured circle appearing in the front of this score.
- The total time this schedule rested throughout their duties.
- The short code for home base airport
- The total number of duties performed by this schedule within this entry
- The maximum fatigue score at the start of the duty
- The maximum fatigue score at the end of the duty
- The maximum fatigue score at the top of the descent
In the front of the maximum fatigue score and maximum risk score, you will see a coloured circle. The colour of this circle can change depending on the score for this schedule.
- A green dot (
 ) means the fatigue score or the risk score is within the set threshold for this schedule
 - A yellow dot (
 ) means the fatigue score or the risk score is nearing the set threshold for this schedule
 - A red dot (
 ) means the fatigue score or the risk score has exceeded the set threshold for this schedule
Simple search
Type the schedule name in the Schedules screen's search bar to search for a schedule. Then, click on the card associated with the schedule to open it and view its details.
Advanced search
You can perform an advanced search on your schedule list. To perform an advanced search:
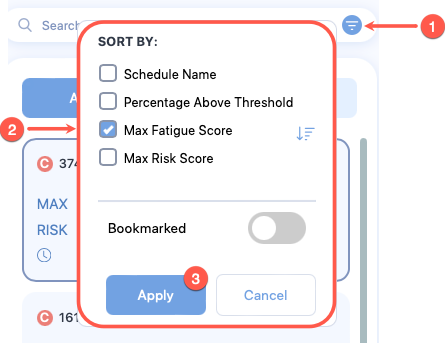
- Click the Advanced Search icon at the end of the search bar.
- Search options appear that allow you to make search adjustments. See the Advanced search properties below for more information on each property.
- Click Apply.
- Click on the card associated with the schedule to open it and view its details.
Scroll schedule list
You can also scroll through the list of schedules to find a schedule. Click on the card associated with the schedule to open it and view its details.
You can also use the easy-filter buttons below the search bar to limit the number of schedules appearing on the list. These buttons let you filter the schedules by their types.
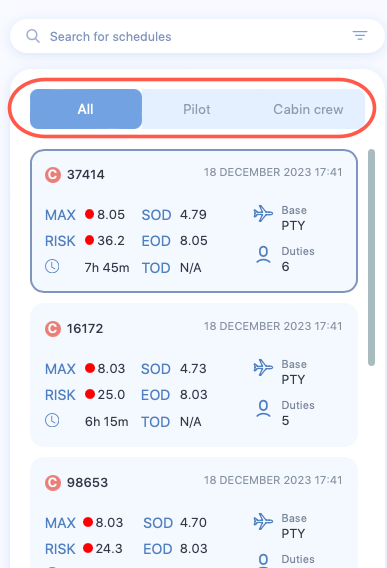
- If you click All, all schedules regardless of their types are listed in the schedule list.
- If you click Pilot, only pilots are listed in the schedule list.
- If you click Cabin crew, only cabin crew are listed in the schedule list.
Share a schedule
You can share private and public schedules, individually. You can share a schedule with colleagues in the same organisation, SAFE and CARE licencees in different organisations, and individuals, who are outside your organisation, without SAFE and CARE licence.
If you share a schedule, private or public, with someone within your organisation or SAFE and CARE licencees in different organisations, they will get a copy of the schedule, which they will own. They can't edit the original but they can edit the copy.
A recipient who is neither a licenced user of SAFE and CARE nor a colleague, they can only view but not edit the copy of the schedule. To help you understand these restrictions, we have prepared a schedule share matrix (shown below).
Schedule analysis
See Schedule to learn more.
Edit a schedule
See Schedule control bar to learn how.
Delete a schedule
See Schedule control bar to learn how.
Access the schedule control bar
Access control
Only the user who locked a schedule can unlock the schedule, except for administrators.
The schedule control bar appears on top right of each open schedule. Like the roster control bar, this control bar features a rich set of icons that control various functionalities related to the schedule.

- The Edit icon lets you edit the schedule properties. See Schedule properties for a list of properties that you can edit.
- The Download icon lets you download the schedule analyses. If you click on this icon, the Download Schedule box appears which lets you choose the format of the files that you want to download. Upon continuing, a folder containing multiple files is downloaded. These files will contain the following data.
- Activities
- Alertness based on Karolinska Sleepiness Scale
- Alertness based on Samn Perelli scale
- Alertness summary
- Last sector's fatigue scores at the top of the descent
- Schedule data
- Sleep periods
- Time in duty
- The Share icon lets you share the schedule with people in your company. If your company administrator has enabled sharing externally for you, you can also send the schedule analyses in an email to the people outside of your company. See Share a schedule for more information.
-
The Copy icon lets you create a duplicate of this schedule. If you click on this icon, the Copy Schedule box appears. You need to change the title of the Schedule and click Copy to create a duplicate schedule.
How to copy a schedule?
-
The Comment icon lets you add a comment to the open schedule. If you click on this icon, the Comment box appears which lets you view existing comments in the schedule or add a new comment in the schedule.
-
The History icon lets you view a list of changes made to the schedule and undo those changes.
- Click this icon to open the Schedule Version History box.
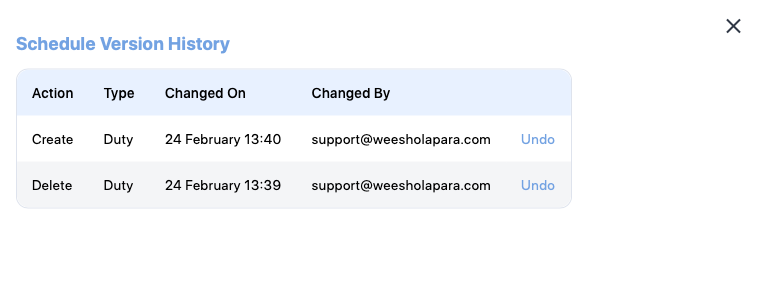
- This box lists all changes made to this schedule. An Undo link also appears at the end of each item.
- Click on the link to remove that change. The Schedule analysis screen refreshes and removes the change from the schedule.
- Click this icon to open the Schedule Version History box.
-
The Delete icon lets you remove the schedule from the roster. If you click on this icon, you will be prompted to confirm your action. If you confirm the delete action, the schedule will be deleted from your instance and the schedule list will refresh to remove the schedule.
- The Bookmark icon attaches a small bookmark icon on top of this schedule's card. You can view the icon on top of this schedule's card when you search for this schedule. Bookmarking a schedule lets you search the roster using the Advanced search.
- The Lock icon lets you control any new changes to this schedule. If you click on this icon, a lock will be placed disabling anyone to change the schedule. After a lock is placed, this icon will be replaced by the Unlock icon. If you click on the Unlock icon, the schedule can be changed.
Table of properties
Schedule properties
| Property (* required) |
Description |
|---|---|
| Name* | The name of the schedule. Usually the name of the pilot or the crew member. |
| Rank | A label for indicating the rank of the pilot or the crew member. |
| Base Airport* | The homebase airport of the pilot or the crew member. Click on the airport name to view a text box. Type ICAO, IATA, or FAA airport codes in the text box and choose the airport from the drop down. |
| Preparation time | The time required to prepare after waking from a main sleep. |
| Crew Type* | The type of personnel. Choose between Pilot or Cabin crew. |
Advanced search properties
| Property controls | Property | Description |
|---|---|---|
| Sorting | Schedule Name | Check this box to sort the schedules by their names. You can also see descending sort ( ) or ascending sort () icons next to the Schedule Name property. Click on these icons to toggle between ascending or descending sort. |
| Percentage Above Threshold | Check this box to sort the schedules by their percentage above threshold value. You can also see descending sort ( ) or ascending sort () icons next to the Percentage Above Threshold property. Click on these icons to toggle between ascending or descending sort. |
|
| Max Fatigue Score | Check this box to sort the schedules by their maximum fatigue scores. It is the default sorting option. You can also see descending sort ( ) or ascending sort () icons next to the Max Fatigue Score property. Click on these icons to toggle between ascending or descending sort. |
|
| Max Risk Score | Check this box to sort the schedules by their maximum risk scores. You can also see descending sort ( ) or ascending sort () icons next to the Max Risk Score property. Click on these icons to toggle between ascending or descending sort. |
|
| Schedule visibility | Bookmarked | Enable this property to only show bookmarked schedules. |
How to work with duty
Scope of this guide
This guide is focused on working with duties using the SAFE web application. If you want to learn about API interactions see FRMSc API documentation or Apps.
You can create a new duty using the Create Duty form. You can access this form from the Schedules screen after you have created a schedule. You can also access it from the fatigue chart of the schedule. The control bar for duties in the fatigue chart, however, allows you to do more than just create a duty.
In this guide, we will learn how to manage duties using the web application.
Add a duty
There are two ways to add duty to a schedule. See below for instructions on both.
First duty in a schedule
The workflow
Creating duty is only a step in a larger workflow. The steps below isolate creating duty from that workflow. The following steps demonstrate duty creation process for users returning to create a duty in a roster.
To learn how to create a new duty as part of the entire workflow, see the Individual entry method in the How to load data into SAFE guide.
Adding duty to an blank schedule?
If you are returning to add first duty to a schedule, simply click on the schedule's card and follow the steps below.
- Create a schedule.
- The Create Duty form will appear. Enter the values in the properties. See Duty properties for more information on each property.
- Click Create. The schedule analysis screen and the schedule card will refresh and update. You can also continue further by adding activities and sleep period to the duty.
Additional duties
To add additional duties to a schedule:
- Right click on a blank area of the fatigue chart and select Create Duty. A blank area is any region in the chart with the lightest shade of grey.

- The Create Duty form will appear. Enter the values in the properties. See Duty properties for more information on each property.
- Click Create. The schedule analysis screen and the schedule card will will refresh and update. You can also continue further by adding activities and sleep period to the duty.
Edit a duty
See duty control bar.
How to edit duty?
Optimise rest
Until the recent past, long-haul duties were exclusively single sector flight. However, it has become common to fly 2 sectors with augmented crew which creates a requirement to place the automatically generated sleep periods using the sleep count, sleep order and sleep class properties within a chosen flight sector. The administrator can decide the default sector to add the sleep - either the longest sector or the shortest sector, or the first or the last sector. The optimise rest function lets you override the administrator default for the duty. To optimise rest, just click the Optimise Rest icon when it appears on the duty control bar.
Manage sleep period
You can easily identify a sleep period in the fatigue-chart. A sleep period is any region in the chart with the darkest shade of grey or the brightest shade of blue.
The darkest shade of grey indicates the sleep period calculated by the models. The models' automatic calculation is based on the sleep assumptions set up by the administrators. See the following video to learn how to add model-generated sleep.
How to add model-defined sleep to a duty?
Users can also define sleep periods for duties. Such sleep periods appear in the brightest shade of blue to indicate the sleep is user-defined.
Add user-defined sleep period
How to add user-defined sleep to a duty?
To add user-defined sleep period:
- Right-click a duty and select Create Sleep.
- The Create Sleep form appears. Enter appropriate values to the properties in this form. See Sleep properties for more information.
- Click Create. The fatigue chart reloads and sleep is added to the duty. For the ease of visualisation, the region will be coloured in blue.
Edit sleep period
How to edit sleep?
To edit a sleep period:
- Right-click the sleep period and select Edit Sleep.
- The Edit Sleep form appears. Enter appropriate values to the properties in this form. See Sleep properties for more information.
- Click Save to keep the changes made to the sleep. The fatigue chart reloads, showing the changes.
Delete sleep period
To delete a sleep period:
- Right-click the sleep period and select Delete Sleep. A sleep period is any region in the chart with the darkest shade of grey.
- A confirmation box appears, asking you to confirm your action. Click Delete to continue deleting the sleep period.
- The fatigue chart reloads and the sleep period is removed from the duty. However, an outline (the same shade of colour, which it originally was in) appears over the removed sleep period.
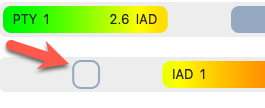
If you right-click over the outline, you will see the Restore Sleep icon. Click on the icon to restore the deleted sleep period.
Copy and paste duty
Limitations
- You can paste a duty once. After you click paste, the icon disappears from the control bar on the next right-click.
- You can't paste a duty over an existing duty. Such action shows an error and the Paste Duty icon disappears.
The Copy Duty icon lets you copy the information in a duty to the clipboard. You can then paste that information in a blank area within the fatigue chart. See below for step-by-step instructions.
- Right-click a duty and select Copy Duty.
- Move your cursor over to a blank area in the fatigue chart.
- Right-click over the blank area and select Paste Duty. The schedule analysis screen will reload and the duty information will appear over the blank area.
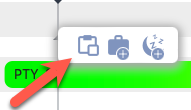
Delete a duty
See duty control bar.
Access the duty control bar
The schedule control bar appears when you right-click on the fatigue chart over a duty entry. This control bar also features a rich set of icons that control various functionalities related to the duty.
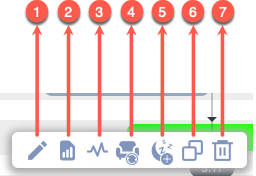
-
The Edit icon lets you edit the duty properties. Click on this icon to open the Edit Duty form. See Duty properties for a list of properties that you can edit. After you have made your changes, click Save at the bottom of the form to keep your changes.
How to edit duty?
-
The View Summary icon lets you see the key statistical analysis of the duty. If you click on this icon, a pop-up screen will open showing the key statistics. See below for an image of the pop-up along with the description of each label (alphabetical).
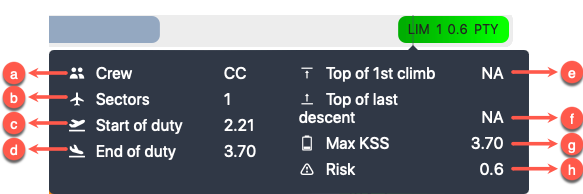
- The number of crew members in this duty
- The total number of sectors flown
- The fatigue score at the start of the duty
- The fatigue score at the end of the duty
- The fatigue score at the top of the first climb
- The fatigue score at the top of the last descent
- The maximum fatigue score during this duty. This score is based on the scale the company administrator has set.
- The total risk score for this duty.
-
The Activities icon lets you view the Activities form. You can use this form to add or remove any activity from the duty. See How to work with activities for more information.
- The Optimise Rest icon only appears if a duty has an activity that lasted more than 3 hours. A click on this icon automatically generates sleep periods for the duty. See Optimise rest to learn more.
- The Create Sleep icon lets you view the Create Sleep form and add a user-defined sleep period to a duty. See Add sleep to learn more.
-
The Copy Duty icon lets you copy the information in this duty to the clipboard. See Copy and paste duty to learn more.
How to copy duty?
-
The Delete Duty icon lets you remove the duty from the schedule and the fatigue chart. If you click on this icon, you will be prompted to confirm your action. If you confirm the delete action, the duty will be deleted from your instance and the fatigue chart will reload.
Table of properties
Duty properties
Cabin crew properties
Some of the properties shown below are exclusive to cabin crew i.e., the Create Duty form will not show some of the following properties for Pilots. Such properties will have the symbol - - next to the property name.
| Section | Property (* required) |
Description |
|---|---|---|
| General | Duty type* | Choose the type of duty from the dropdown. |
| Crew composition | Select the number of pilots in the flight from the dropdown or select 9 for cabin crew. | |
| On duty date and time* | The duty start date. Use the date time controls to set the date and time. | |
| Off duty date and time* | The duty end date. Use the date time controls to set the date and time. | |
| Time zone selector check boxes* | The time zone which the duty times are based on. Check the box that indicates the timezone. | |
| Time zone lock check boxes | Select this property if you want the web application to automatically convert your entered dates and times to match your time zone selection when swapping between UTC and local time zones. | |
| Start Airport* | The airport where the duty started. Default is the base airport. To change the airport, click on the airport name to view a text box. Then, type ICAO, IATA, or FAA airport codes and choose the airport from the drop down. | |
| End Airport* | The airport where the duty ended. Default is the base airport. To change the airport, click on the airport name to view a text box. Then, type ICAO, IATA, or FAA airport codes and choose the airport from the drop down. | |
| Commute Time | Select the time taken to commute to the duty. Default value is 1 hour. | |
| Fleet | A label you can use to indicate the aircraft being used. | |
| Sector Count | Select the number of flights in the duty. Default value is 1. | |
| Cabin Crew Sleep Pattern |
Select one of the following sleep patterns for the cabin crew.
See Cabin Crew Sleep Pattern to learn more. |
|
| Workload | Move the seeker bar horizontally to increase or decrease the workload in percentage increments (decrement) from the normal workload (workload=0) for the duty. Workload can be increased up to 100% of the normal workload (100= twice the normal workload level) or decreased by 50% of normal workload (-50 = half the normal workload) | |
| Rest Definition |
Select the method SAFE and CARE must use to calculate sleep periods. Depending on your selection additional properties will appear on this form.
|
|
| Sleep Details | Sleep Count |
The number of sleeps a cabin crew had during their duty. |
| Sleep Class |
The class where the cabin crew slept. Select:
|
|
| Sleep Order |
The rank, which the crew member slept in. | |
| Augmented Duty | On Duty Date Time |
The date and time the cabin crew started their augmented duty. See Partial Augmentation for more information on augmented duty. |
| Off Duty Date Time |
The date and time the cabin crew ended their augmented duty. See Partial Augmentation for more information on augmented duty. | |
| Time zone selector check boxes |
Select the time zones for the sleep start and end date times. You will see a separate set of time zone selector check boxes below Sleep Start Date Time and Sleep End Date Time. Selecting time zone for Sleep Start Date Time or Sleep End Date Time doesn't automatically select the time zone for corresponding Sleep End Date Time or Sleep Start Date Time.
|
|
| Time zone lock check boxes |
Select this property if you want the web application to automatically convert your entered dates and times to match your time zone selection when swapping between UTC and local time zones. | |
| Rest Period | Sleep Class |
The place where the cabin crew slept. |
| First rest start date time |
The date and time the cabin crew started their first rest. See In-duty rest for more information on rest period. | |
| First rest end date time |
The date and time the cabin crew ended their first rest. See In-duty rest for more information on rest period. | |
| Time zone selector check boxes |
Select the time zones for the duty start and end date times. You will see a separate set of time zone selector check boxes below On Duty Date Time and Off Duty Date Time. Selecting time zone for Sleep Start Date Time or Sleep End Date Time doesn't automatically select the time zone for corresponding Sleep End Date Time or Sleep Start Date Time.
|
|
| Time zone lock check boxes |
Select this property if you want the web application to automatically convert your entered dates and times to match your time zone selection when swapping between UTC and local time zones. | |
| Add second rest |
Click on this link if you want to add second rest date and times. A click on this link will produce additional properties for second rest. These properties and their selections are very similar to the first rest. See above for details. |
Sleep properties

| Property | Description |
|---|---|
| Sleep Start Date Time | The date and time the schedule started their sleep opportunity. |
| Sleep End Date Time | The date and time the schedule ended their sleep opportunity. |
| Time zone selector check boxes | Select the time zones for the sleep start and end date times. You will see a separate set of time zone selector check boxes below Sleep Start Date Time and Sleep End Date Time. Selecting time zone for Sleep Start Date Time or Sleep End Date Time doesn't automatically select the time zone for corresponding Sleep End Date Time or Sleep Start Date Time.
|
| Time zone lock check boxes | Select this property if you want the web application to automatically convert your entered dates and times to match your time zone selection when swapping between UTC and local time zones. |
| Nearest Airport | The start or end airport that is nearest to this sleep opportunity. You cannot change this property. The nearest airport is determined by the position of your cursor on the fatigue chart when you add a new sleep.
|
How to work with activity
Scope of this guide
This guide is focused on working with activities using the SAFE web application. If you want to learn about API interactions see FRMSc API documentation or Apps.
The Activities box is a scrollable box that lets you view, add or change granularities in your duty. To access this form, right-click a duty entry on the fatigue chart and select Activities.
This form breaks down duty start and end times into 15-minute intervals, displaying them sequentially as a list. Additionally, the fatigue score appears in the column next to the time intervals.
If no activities are set for an interval, the region between the interval and the fatigue score is blank. However, if there is an activity set for an interval, the type of the activity is shown in that region.

In this guide, we will learn how to manage activities using the web application.
Add an activity
The workflow
Adding an activity is only a step in a larger workflow. The steps below isolate creating activity from that workflow. To learn how to create a new activity as part of the entire workflow, see the Individual entry method in the How to load data into SAFE guide.
Overwriting activity?
You can't add an activity for an interval, which already has an activity set. Such action shows an error. If you want to overwrite an activity, you might want to try editing it. You could also delete an existing activity from an interval and a new activity over the interval to mimic overwriting.
To add an activity:
- Right-click a duty entry on the fatigue chart and select Activities.
- The Activities box appears. Click the + icon at the top-left of the box. Alternatively, you can right-click a blank interval, which you want to set the activity for and select the + icon.
- The Create Activity form appears. Enter appropriate values to the properties in the form. See Activity properties for more information on each property.
- Click Create. The Create Activity form closes and the activity is shown on the Activities box for that interval.
- Click the close icon () at the top-right of the box to close the Activities box. The fatigue chart reloads, showing the updated analysis.
How to add activity?
View activities
To view activities, open the Activities box by right-clicking a duty entry on the fatigue chart and selecting Activities.
You can view existing activities set for a duty from the Activities box. If you uploaded activities file using the bulk upload method or our APIs, they will also be shown in this box. You can also see the fatigue scores throughout the duty for each activity.
Edit an activity
To edit an activity:
- Open the activities box by right-clicking a duty entry on the fatigue chart and selecting Activities.
- Right-click the interval, which has the activity want to edit, and select the Edit Activity icon.

- The Edit Activity form appears. Make the necessary changes to the activity using the available properties in the form. See Activity properties for more information on each property.
- Click Save. The Edit Activity form closes and the changes are shown on the Activities box for that interval.
Delete an activity
To delete an activity:
- Open the activities box by right-clicking a duty entry on the fatigue chart and selecting Activities.
- Right-click the interval, which has the activity want to edit, and select the Delete Activity icon.

- A confirmation box appears, asking you to confirm your action. Click Delete to continue deleting the activity.
- The screen reloads and the updated Activities box appears.
Table of properties
Activity properties
| Property (* required) |
Description |
|---|---|
| Activity type* | Choose the type of activity from the dropdown. Click here to see the available types. |
| Description | Add a short description about or comment on the activity. |
| Activity start date and time* | The activity start date. Use the date time controls to set the date and time. |
| Activity end date and time* | The activity end date. Use the date time controls to set the date and time. |
| Time zone selector check boxes* | The time zone which the activity times are based on. Check the box that indicates the timezone. |
| Time zone lock check boxes | Select this property if you want the web application to automatically convert your entered dates and times to match your time zone selection when swapping between UTC and local time zones. |
| Nearest airport* | The airport that is nearest to this activity. You can not change this property. The nearest airport for any activity is the departure airport of the duty it belongs to. |
Fatigue chart
The fatigue chart in the SAFE web application is an interactive visual element, which is loaded with information and rich set of controls. It's also the immediately obvious element of the Schedules screen. In this guide we will learn more about the information this chart is showing along with the control set it offers.
Visual elements
The fatigue chart is scrollable. See below for an image of the fatigue chart and the description of each label (numbered) on it.
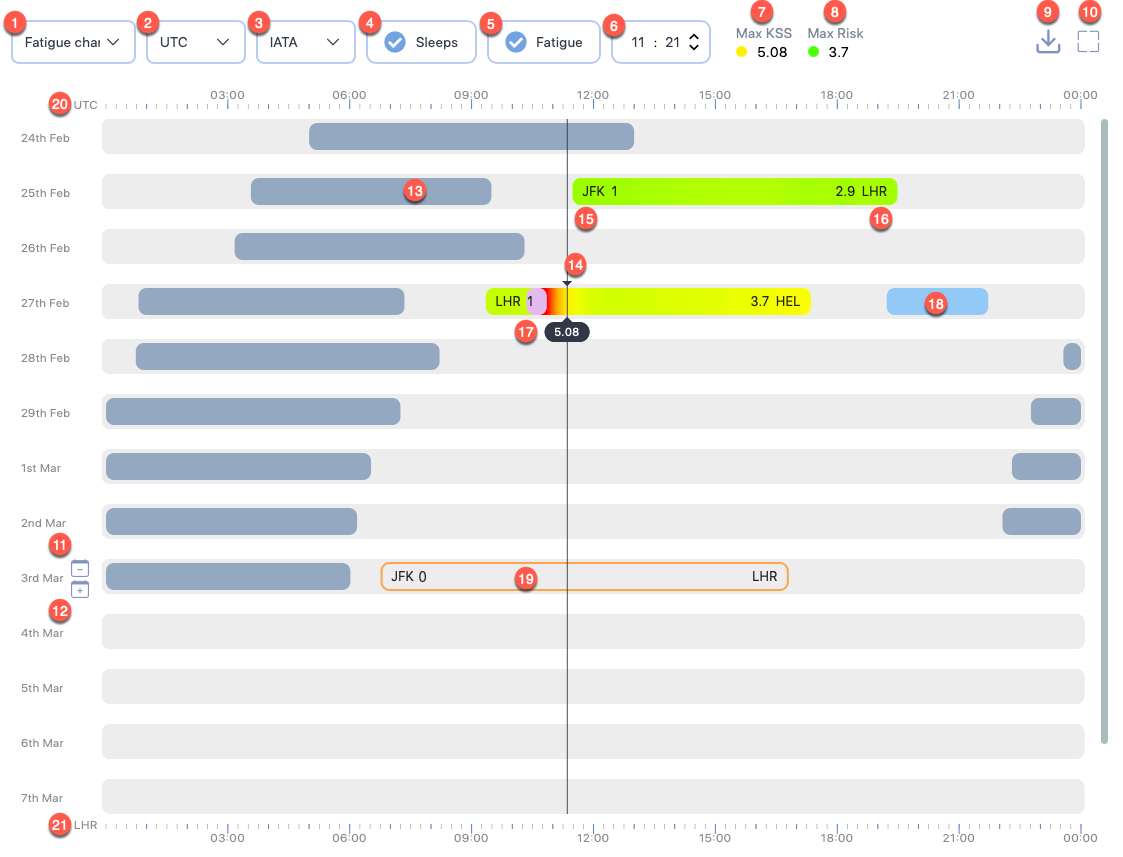
1. Display options
This dropdown shows a choice of display options that you can use to replace the fatigue chart. Click on this dropdown to see the following options:
- Fatigue chart- This is the default option, which shows an interactive fatigue chart.
- Fatigue data - This option lets you view a sequential list of fatigue scores for the all duties in the selected schedule. The scores are shown in 15-minute intervals for the duty periods.
- Risk data - This option lets you view the analysed risk scores for all duties in the selected schedule.
- Sleep data - This option lets you view the a list of calculated and user-defined sleep periods for this schedule.
2. Time scales
This dropdown shows a choice of time zones, which the scale at the top of the fatigue chart should be in. Click on this dropdown to see the following options:
- UTC - This is the default option, which bases the scale at the top of the fatigue chart in UTC.
- Homebase - This option bases the scale at the top of the fatigue chart in home base airport timezone.
3. Airport short codes
This dropdown shows a choice of airport short code format to use for the airport codes displayed in the fatigue chart. You can choose between IATA, ICAO, and FAA formats.
4. Show/hide sleeps
Check this option to show sleep periods in the fatigue chart. To hide sleep periods, uncheck this option.
5. Show/hide fatigue
Check this option to show fatigue information in the fatigue chart. To hide fatigue information, uncheck this option.
6. Seeker time
This option displays the exact time corresponding to the cursor position. The time is based on the 2. Time scales selection.
7. Max KSS
This label shows the maximum fatigue score for this schedule based on the scale the administrators have set for this instance. The administrator also set the fatigue threshold for this instance, which is the basis for the coloured circle shown before the score.
The colours move through low (🟢) scores to middling (🟡) scores and finally change into high (🔴) scores. The colour changes are gradual and smooth and don't suddenly change from dark green to dark amber.
If you click on this label, a pop-up screen will appear that provides a score narrative. The narrative is based on the scale set for this instance.
8. Max Risk
This label shows the maximum risk score for this schedule. The administrator also set the risk threshold for this instance, which is the basis for the coloured circle shown before the score.
The colours move through low (🟢) scores to middling (🟡) scores and finally change into high (🔴) scores. The colour changes are gradual and smooth and don't suddenly change from dark green to dark amber.
9. Download chart
This button opens a Download Chart box that lets you download the chart as a JPG or a PDF file. If you opt to download a JPG file for a schedule with months long data, we recommend that you maximise the chart and the browser window before downloading. We also recommend that you crop any unneeded section from the downloaded file to make the information easily scannable.
10. Maximize
This button lets you expand the fatigue chart to fill most of the entire browser window. After you click on the Maximize icon, the icon is replaced by a Minimize icon. Click on the Minimize icon to toggle the chart or report data to the original size.
11. Remove day
Can't remove day with duty
You can't remove a day if a duty starts on that day.
This button appears when you hover your mouse over the left edge of the chart. It lets you remove 24 hours from the all the duties and sleeps starting after the day you intended to remove. To remove a day:
- Click the Remove day () button.
- A confirmation box appears, asking you to confirm your action.
- Click Remove. The fatigue chart will reload, shifting up all the duties and sleep periods after that day by one day.
12. Insert day
This button appears when you hover your mouse over the left edge of the chart. It lets you add 24 hours to the all the duties and sleeps starting after the day where you intended to insert. To insert a day:
- Click the Insert day () button.
- A confirmation box appears, asking you to confirm your action.
- Click Add. The fatigue chart will reload, shifting down all the duties and sleep periods after that day by one day.
13. Model-generated sleep period
Entries in the chart that appear in the darkest shade of the grey indicate sleep periods generated by the model.
14. The cursor
The position of your selection. Notice a horizontal black line from the top to the bottom of the chart. This line is designed to make it easier for you to read the time.
15. Starting airport and information
This label shows the start airport code and the number of sectors flown. The airport code formats can be changed by changing the 3. Airport short codes.
16. Ending airport and information
This label shows the end airport code and the duty risk metric score. The airport code formats can be changed by changing the 3. Airport short codes.
17. Sleep inertia
Such vibrant-coloured sections in a duty entry indicate the transitional state between sleep and wake, marked by impaired performance, reduced vigilance, and a desire to return to sleep. These sections are positioned right after the end of a sleep period.
18. User-defined sleep period
Entries in the chart that appear in a brighter shade of blue indicate sleep periods added by a user for a schedule.
19. Standby duty
This entry indicates standby duty.
20. Top time scale
This time scale can be changed to show the time in UTC or base airport times. See 2. Time scales.

21. Bottom time scale
This time scale can be changed to show the time at the location of duty start airports or duty end airports.

You can select, which airport time to base this scale one by selecting the airport shortcodes in any duty entry. You can also click anywhere on the first half of a duty entry to base the time scale on the duty start airport times. If you click on the later half of a duty entry, the time scale will be based on the duty end airport.
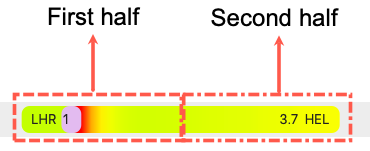
Interactive elements
On top of the visual elements shown above, the fatigue chart also offers interactive controls. Using the fatigue chart, you can:
- Add, edit, copy & paste, or delete a duty
- View duty summary
- Optimise rest
- Manage sleep
- Add and view activities
How to setup apps
Limited access
Only administrators can see the Apps screen.
Can't find the method you are looking for?
We have already catered for most major CMS suppliers. However, if you require any new methods in your instance, a small amount of initial setup and development is required to construct the translation mechanism. Should you require the new method, please email us.
You can setup apps through the Apps screen. To view the Apps screen, click Apps from the left panel.
Click on the App's icon to view the properties for each app. See below on how to setup each app.
The CAE Crew Manager system users will already have the API installed and connected with the SAFE application. They will only need the SAFE Application API key.
Crew Manager places all the data required into an agreed upon end point and simultaneously sends a message to SAFE and CARE to declare there is new data in the end point.
SAFE and CARE will collect that data. The data in the end point will be pre-mapped to the SAFE and CARE data structure requirements. The collected data will be uploaded into SAFE and CARE, validated and then analysed. The analysis will be returned to the another agreed upon end point for use in Crew Manager. To setup Crew Manager, you will need to provide value to the following properties:
| Property | Description |
|---|---|
| Enable Crew Manager Interaction | The property that controls if CREW manager can send and receive messages from SAFE and Care. Check this property to enable messaging. |
| Base Url | The base url of the Crew Manager |
| Customer Id | The customer Id of Crew Manager system to integrate with |
| Customer App Id | The customer app Id of Crew Manager system to integrate with |
| Company | The company which the intergation is associated with |
| Username | The username that SAFE must use when messaging Crew Manager |
| Processing Lead Days | The number of days prior the schedule start day from which the data must be collected from the Crew Manager to analyse the roster |
If you are using Amazon S3, SAFE and CARE can automatically check address for new files and retrieve them for analysis. To setup Amazon S3, you will need to provide value to the following properties:
| Property | Description |
|---|---|
| Bucket name | The name of Amazon S3 bucket |
| Access key | The Amazon S3 access key |
| Secret Key | The Amazon S3 secret key |
| Region name | The region in Amazon S3 where your bucket is hosted |
| Conversion Format | The format in which the roster data is in |
If you are using Azure Storage, SAFE and CARE can automatically check address for new files and retrieve them for analysis. To setup Azure Storage, you will need to provide value to the following properties:
| Property | Description |
|---|---|
| Blob container | The URL to the Azure blob container |
| Storage connection string | The connection string to use to validate access to the blob container |
| Conversion Format | The format in which the roster data is in |
IDEAGEN’s Coruson FDM application is also integrated with SAFE and CARE. After you have set it up, SAFE can receive data from your crew management system, analyse it and afterwards place it into Coruson to assist in FDM analysis. To setup Ideagen/Coruson, you will need to provide value to the following properties:
| Property | Description |
|---|---|
| Source | The bucket name for the source of the roster data |
| Destination | The bucket name for the destination where the analysed roster should be shared |
| Source access key | The access key to the source |
| Source secret key | The secret key to the source |
| Source region name | The region name of the source |
| Destination access key | The access key to the destination |
| Destination secret key | The secret key to the destination |
| Destination region name | The region name of the destination |
Like Azure Storage and Amazon S3, SAFE and CARE can automatically check SFTP address for new files and retrieve them for analysis. To setup SFTP, you will need to provide value to the following properties:
| Property | Description |
|---|---|
| Server Name | The url to the server |
| Port | The port SAFE application must use when connecting to this server |
| User Name | The username SAFE application must use when connecting to this server |
| Password | The password SAFE application must use when connecting to this server |
| Files Path | The path to the roster data that SAFE application must check after connecting to this server |
| Conversion Format | The format in which the roster data is in |
Like Azure Storage and Amazon S3, SAFE and CARE can automatically check FTP address for new files and retrieve them for analysis. To setup SFTP, you will need to provide value to the following properties:
| Property | Description |
|---|---|
| Server Name | The url to the server |
| User Name | The username SAFE application must use when connecting to this server |
| Password | The password SAFE application must use when connecting to this server |
| Files Path | The path to the roster data that SAFE application must check after connecting to this server |
| Conversion Format | The format in which the roster data is in |
How to manage airports
Limited access
Only administrators can see the User Management screen.
You can manage airports through the Airports screen. To view the Airports screen, click Airports from the left panel.
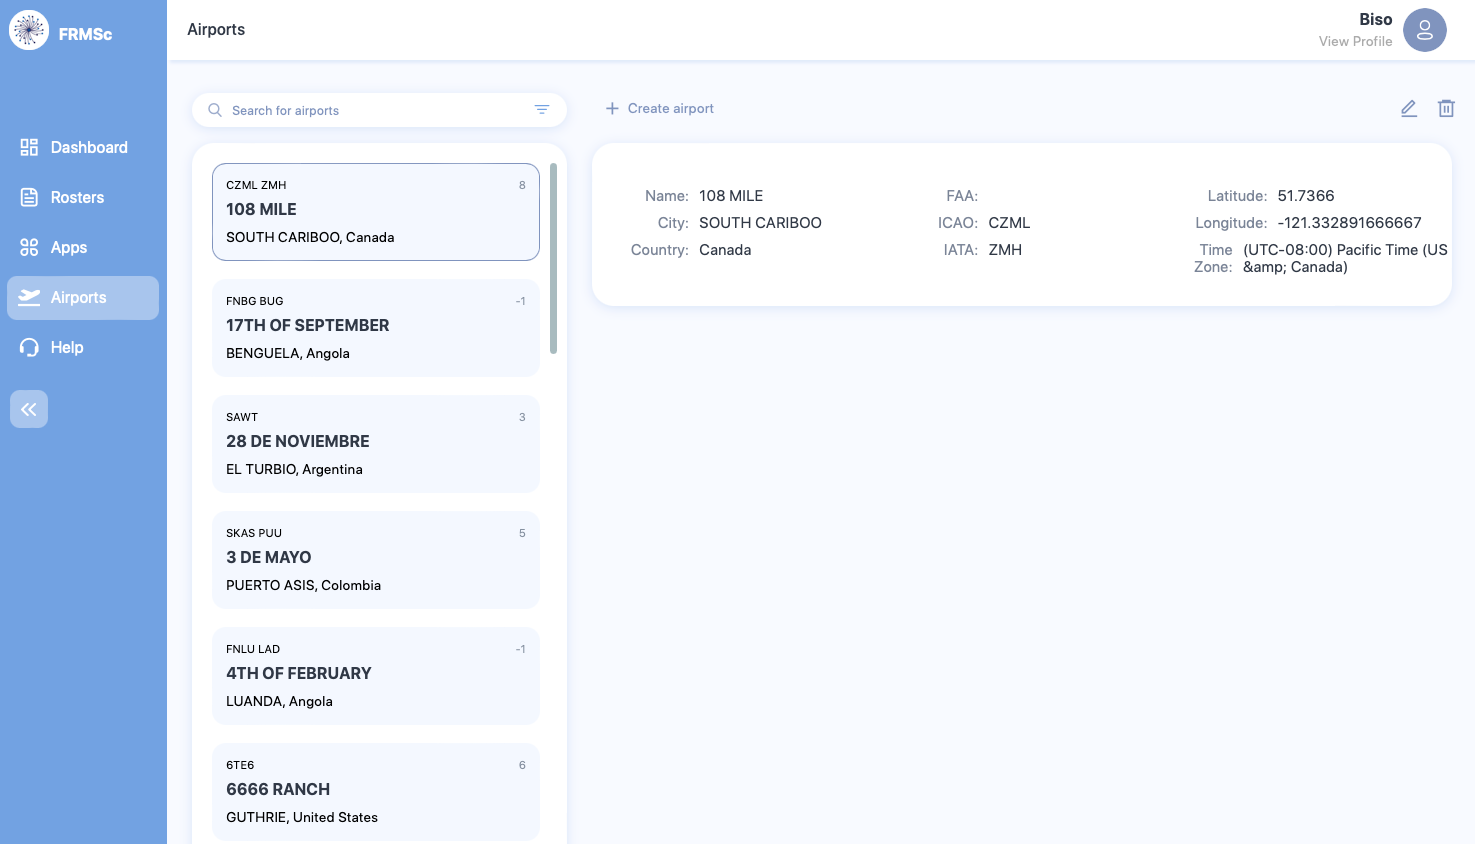
You can perform the following actions through the Airports screen.
Add an airport
Only one airport code
- When adding a new airport, you are required to fill at least one of the codes. You can choose between FAA, ICAO, and IATA codes. However, we recommend that you enter all the codes if available and permitted.
- If a code already exists in the SAFE application, you can't create a new airport with same code.
To add a new airport:
- Click + Create airport to see properties where you can set the details for the new airport.
- Enter the details of the airport in the available properties. See the Table of Fields below for more information.
- Click Create to store the airport details or Cancel to discard the details.
View an airport
Use the search bar in the Airport screen to search for an airport. Use either of the airport properties to search. Alternatively, you can also scroll through the list of airports to find an airport.
Click on the card associated with the airport to view its details.
Edit an airport
To edit an airport:
- Click on the card associated with the airport that you want to edit.
- Click the Edit icon.

- Make the necessary changes to the properties. See the Table of Fields below for more information on each property.
- Click Save to keep your changes or Cancel to discard them.
Delete an airport
To delete an airport:
- Click on the card associated with the airport that you want to delete.
- Click the Delete icon.
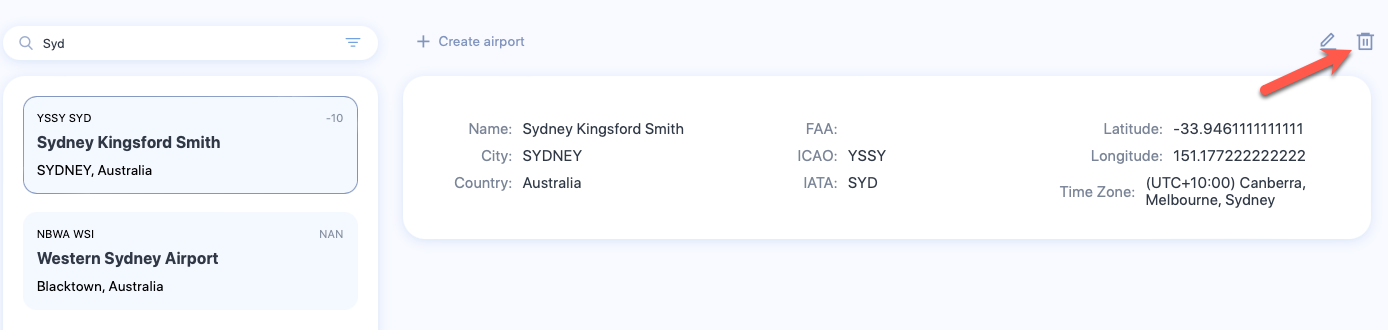
- A confirmation box will appear. Click Delete to remove the airport from the SAFE application.
Table of Fields
Airport properties
| Property (* required) |
Description |
|---|---|
| Name* | The name of the airport |
| City* | The city where this airport is located |
| Country* | The country where this aiport is located |
| ICAO* | The ICAO code for this airport. If you have set this property, you can ignore IATA and FAA codes. |
| IATA* | The IATA code for this airport. If you have set this property, you can ignore ICAO and FAA codes. |
| FAA* | The FAA code for this aiport. If you have set this property, you can ignore IATA and ICAO codes. |
| Latitude | The latitude coordinate of this airport |
| Longitutde | The longitude coordinate of this airport |
| Timezone | The local timezone for this airport |
How to manage users
Limited access
Only administrators can see the User Management screen.
To view the User Management screen, click Settings from the menu panel and navigate to User Management tab.
You can manage your users through the User Management screen.

You can perform the following actions through the Airports screen.
Add a user
To add a user:
- Click the Invite User button.
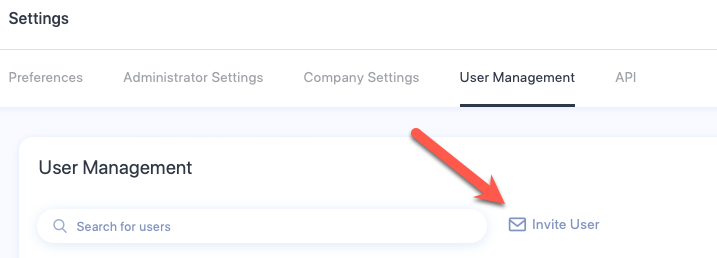
- The Invite User form will appear. Type the email address of the user you want to invite.
- Click Next to send invitation or Cancel to close the form.
View a user
There are multiple ways to view a user. To view the details of user, see Edit a user. For a short overview of the user:
- Type in the email address of the user in the search bar, or
- Use the pagination controls at the bottom of the screen to move between the pages to find the user.
Edit a user

To edit the details of a user.
- Click on the Edit/View link in the same row as the user you want to view/edit.
- The Edit User form will appear. View the details or make necessary changes. See the Table of properties below for more information on each property.
- Click Save to keep your changes or Cancel to discard any changes.
Remove a user
To remove a user:
- Click on the Remove link in the same row as the user you want to remove.
- A confirmation box will appear. Click Remove to delete the user from SAFE application.
Table of properties
User detail properties
| Property | Description |
|---|---|
| The email used to register the user | |
| Name | The name of the user |
| User Validity | The period until which the user details will be valid. If you choose Expires, User Expiry property will appear beneath this property. Use the User Expiry property to specify the date after which the user details will become invalid. |
| Password Validity | The interval for which the password associated with this user will be valid. If you choose Expires, Password Expiry property will appear beneath this property. Use the Password Expiry property to specify the interval as number of days after which the user must change their password. |
| External Share Enabled | The option that lets you control whether this user can share roster analysis externally. If you choose User can share externally, a share button will be available for this user on top of each roster analysis. |
| Permission | The dropdown that lets you control the role for this user. Use this property to assign appropriate role to this user. See Permissions in SAFE for more information. |
| Is Enabled | The option that lets you control whether (or not) this user details can be used to access this application. Uncheck the box to disable this user's access to the SAFE application. |
| Change Password Next Login | The option that lets you control whether (or not) this user must change their password next time they successfully login to this application. Check the box to force the user to change password on next login. |
| Two Factor Enabled | The option that lets you control whether (or not) two factor authentication (2FA) should be enabled for this user. If enabled, the user must use the code received in their email to validate their account before accessing the system. Check the box to force two factor authentication for this user. |
| Permission | A snapshot of this user's permissions/roles across all the instances of SAFE application they are invited to. |
| User Logins | A history of successful login by this user. |
Where to get duty and activity file formats
This document will show you where you can get the duty and activity file formats from.
Duty file format and specification
You can find the format for the duty file across our documentation site and also within the SAFE web application. Alternatively, you can also view the file formats from the SAFE web application. You can try the following ways:
- Download the duty file from the bulk upload section in How to load data into SAFE.
- See Duty file specification to view the file formats from within this documentation site
- To download an example duty file, click Example duty upload link.
- Click on the Duty upload specification link. You will be re-directed to a new page that shows the duty file format and specification.
- Click to expand the Upload Specification and File Format dropdown. The duty file format and specification will be shown.
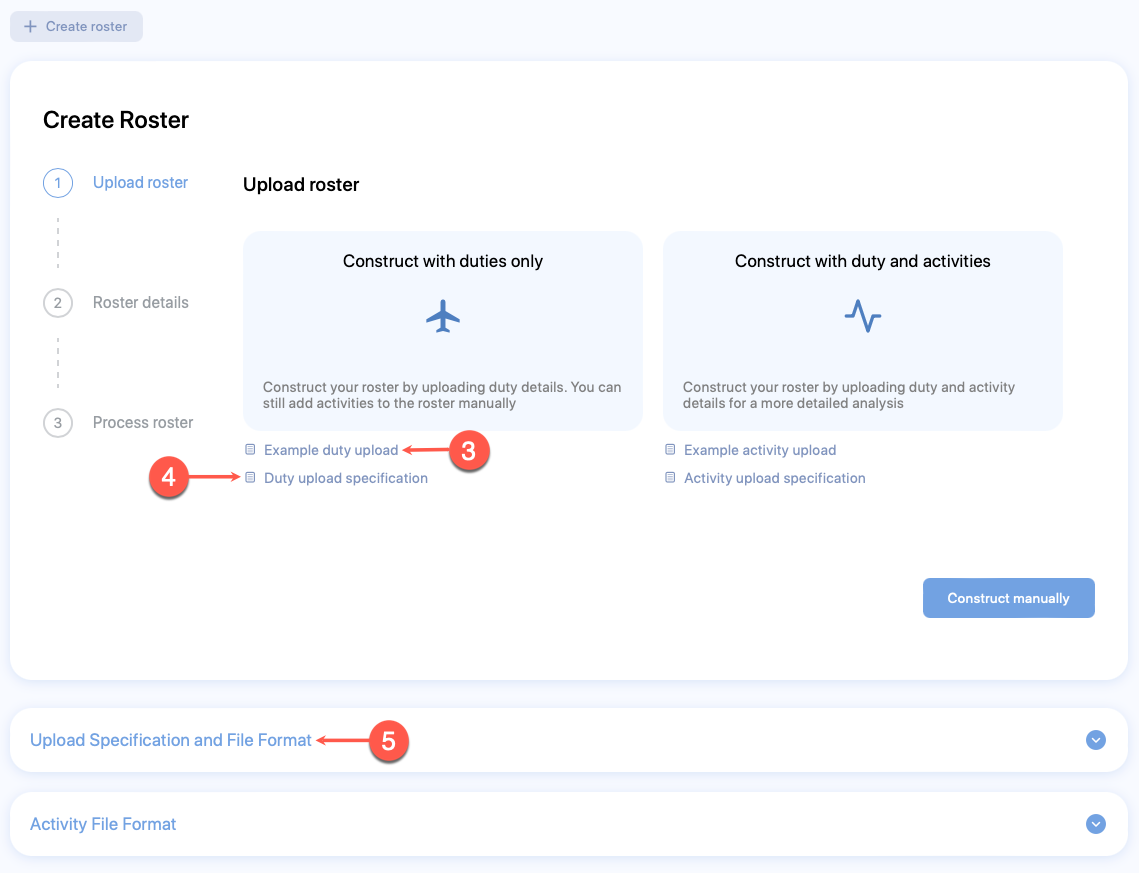
Activity file format and specification
You can find the format for the activity file across our documentation site and also within the SAFE web application. Alternatively, you can also view the file formats from the SAFE web application. You can try the following ways:
- Download the activity file from the bulk upload section in How to load data into SAFE.
- See Activity file specification to view the file formats from within this documentation site
- To download an example duty file, click Example activity upload link.
- Click on the Activity upload specification link. You will be re-directed to a new page that shows the activity file format and specification.
- Click to expand the Activity File Format dropdown. The activity file format and specification will be shown.
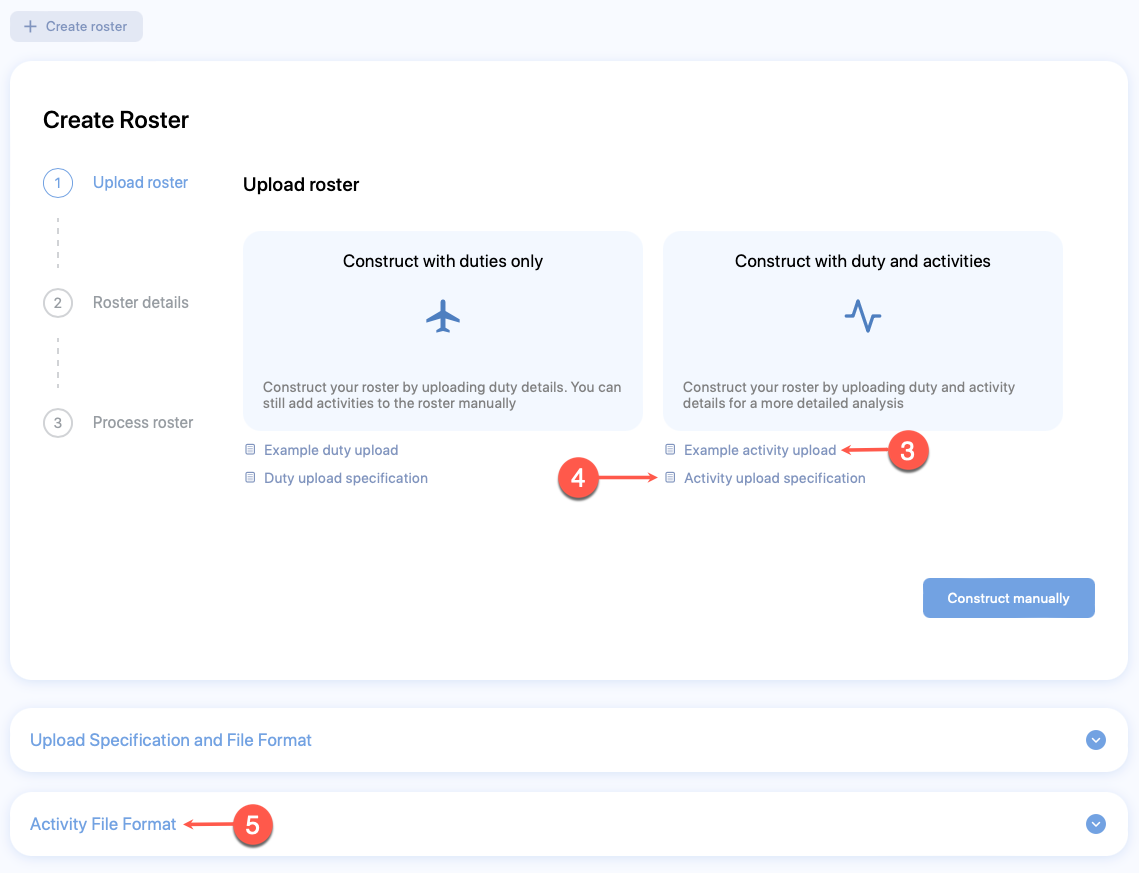
Ended: User Guides
Reference ↵
Duty risk metric
Overview
FRMSc has developed a Duty Risk metric to resolve the difficulties in identifying the likelihood of a reportable incident occurring due to fatigue in aircrew.
This metric identifies duties that present a higher risk but are not easily identifiable by fatigue alone, e.g. consecutive early morning starts.
It has been designed as a relative risk metric, serving as a single composite metric that considers the physiological response of the aircrew to fatigue levels they experience when performing their duties. It also considers the likely risk to operations and risk of a reportable incident at any given point from the nature of the task undertaken by the aircrew, e.g. taking off or landing an aircraft, and the corresponding fatigue score.
The duty risk metric compares the relative risk of any duty with that to a baseline ‘standard duty.’ A standard duty is considered to be a shift for two pilots who are acclimatised to their time zone, starting at 10:00 AM and ending at 8:00 PM, with two flight sectors. This standard duty is given a risk score of 1. All other duties are evaluated against this standard to determine their risk score. For example, a duty that is overnight might be assessed as 15 times riskier than the standard, so it would have a duty risk score of 15.
Like the other scales supported by FRMSc, each operation will determine its specific duty risk threshold. Our recommendation is for pilots, to consider 1 to 13 being generally acceptable risk, 13-18 being heightened but still acceptable risk with caution, and 18+ being high risk for pilots that should be avoided. For cabin crew, we would suggest 1-15 being acceptable risk, 15 to 20 being heightened but still acceptable risk, with caution.

If possible, duties with a risk score over 18 for pilots, and over 20 for cabin crew should be avoided. A typical high-risk duty would involve a fully rested pilot in their home time zone flying a four-sector duty from 8 PM to 6 AM.
The Reference Score
The reference fatigue risk score of 1.0 relates to a 2-sector duty with 2 acclimatised pilots operating from 10 AM until 8 PM local time.
The metric will read zero if the aircrew is stationary or involved with duties that contain no flights, but it will read high, for example, if the pilots are landing when the fatigue levels are high.
Similarly, during the cruise phase, the risks of a reportable incident for pilots will be reduced, reducing the risk score. It means that even if the fatigue levels are relatively high, the overall risk is relatively low during the cruise phase compared with the landing phase. But, if a pilot has flown multiple sectors and landed numerous times, they will also have a higher risk score than an equivalent pilot flying a single-sector duty.
The reportable incidents are different for pilots and cabin crew. For cabin crew, the cruise phase is difficult as unruly passengers and maleficent actors may choose that phase of the flight to create a nuisance, increasing cabin crew's risk score. However, the risk score is usually lower for them during take-off and landing unless circumstances cause a difficult take-off or landing.
Pilots have fewer reportable incidents, but those may have a high impact. Cabin crew may have more reportable incidents, but from a safety perspective, the impacts of these incidents on the risk score are likely to be lower than those experienced by pilots. The cabin crew incidents might lower the passenger satisfaction, which is crucial for the marketing department that aims to maintain both passenger safety and loyalty.
Finally, it must be reiterated that the FRMSc Duty Risk Metric is a tool to assist airline fatigue risk managers in reducing the risks from fatigue during operations by having a single metric to alert them of a duty with possible higher risk than is acceptable to their company. It is always necessary to also ensure that no duty contains fatigue levels more than those set by the airline FSAG or Safety department.
The FRMSc training programmes cover managing risk, setting threshold levels and use of this risk metric to detect counter-intuitive fatigue threats.
Supported scales
The SAFE predictive model suite includes seven scales: one for fatigue, two for sleepiness, and four dedicated to performance metrics.
The Samn Perelli scale (Fatigue)
In their original paper on linking scores to fatigue, (Samn, SW and Perelli, LP. Estimating Aircrew Fatigue: A Technique with Application to Airlift operations. Report SAM-TR – 82-21. December 1981. USAF School of Aerospace Medicine.) authors Samn and Perelli classified their Samn-Perelli (SP) scores between 5 and 6 as being associated with moderate to severe fatigue with some performance impairment possibly occurring. They considered flying duties permissible but not recommended.
Initially designed for military pilots, the scale was based on data gathered during computer-simulated airline operations. The scale is shown below.
Samn Perelli Subjective Fatigue Scale
1. Fully Alert, wide awake
2. Very lively, responsive, but not at peak
3. Okay, somewhat fresh
4. A little tired, less than fresh
5. Moderately tired, let down
6. Extremely tired, very difficult to concentrate
7. Completely exhausted, unable to function
The advantage of using this scale is that the scale is validated with studies of tired aircrew in simulators. Moreover, the descriptions are easy to understand.
The Karolinska Sleepiness Scale (Sleepiness)
Designed by the Karolinska Institute in Stockholm, the Karolinska Sleepiness scale (KSS) started its life as a 9-point scale but with definition covering only alternative levels as follows:
1. Extremely alert
2.
3. Alert
4.
5. Neither sleepy nor alert
6.
7. Sleepy - but no difficulty remaining awake
8.
9. Extremely sleepy - fighting sleep
In time, the definitions of each level were revised and published with the missing levels completed.
Karolinska Sleepiness Scale Definitions
1.  Very alert
2.  Very lively, responsive, but not at peak
3.  Alert, normal level
4.  Okay, somewhat fresh
5.  Neither alert nor sleepy
6.  Moderately tired, let down
7.  Sleepy, but no effort to keep awake
8.  Extremely tired, very difficult to concentrate
9.  Very sleepy, great effort to keep awake
More recently, a 10th level was included to match level 7 on the Samn Perelli scale.
10. Extremely sleepy, cannot keep awake
The advantage of using the KSS scale is its validation in studies using an electroencephalogram (EEG) to measure brain activity.
As the SP scale is a 7-point scale and the KSS is a 9/10-point scale, some users believe the two to be interchangeable when measuring either fatigue or sleepiness in a fatigue management programme. However, SP scale is a fatigue scale and the Karolinska Scale is a sleepiness scale.
The 100-point alertness scale
Use SP scale
We suggest clients to use SP fatigue scale.
Score comparison
0 on the AS is not the same as 1 on the SP scale. Similarly, 100 on the AS is not the same as 7 on the SP scale.
FRMSc team developed this scale in the 1970s to identify and measure the fatigue experienced by aircrew of (initially) military aircraft. Since then, the range of alertness challenges has changed. This is a linear 0-100 scale where 0 indicates low alertness, and 100 indicates high alertness.
Karolinska Probability Scale (Sleepiness)
Some biomathematical models have only one score for each duty. In these circumstances it is useful to know the sleepiness at the end of the duty is at the higher levels. The Karolinska probability scale has been created to indicate whether the stated duty sleepiness metric is likely greater or equal to 8 at the end of the duty.
Vigilance Degradation scale
Vigilance Degradation scale measures visual vigilance degradation. It shows the likely performance at the CRD under the level of fatigue calculated by SAFE. The SAFE model provides an indication of how much visual vigilance is degraded by fatigue when using that test.
Complex Reaction Degradation scale
The Complex Reaction Degradation scale compares the speed of reaction during a standard laboratory test to that of the personnel when fatigued. The SAFE model indicates degradation when using that test by declaring, “At this level of alertness, the response time on a warning light on a complex task is degraded by 36.1% compared with a typical rested value”.
Percentage Missed Response scale
Like the Vigilance Degradation and Reaction Degradation scales, the Percentage Missed Response scale is based on a standard laboratory test and indicates the likely general degradation of human performance.
The SAFE model provides an indication of likely degradation when using that test, “At this level of alertness, the percentage of missed responses in a sustained attention task is 17.64%. This compares with a typical rested value of 6%”
There is also an 8th scale for comparing human performance when fatigued with alcohol impaired performance. This scale was removed from the SAFE models after consideration of its overall value given that the performance degradation due to alcohol intoxication or fatigue are not adequately coherent.
Permissions in SAFE
There are currently 5 types of permissions in SAFE. Each permission has a list of functionality tied to it. A user is
Company Administrator
Change Company Administrator?
Only FRMSc can make any changes to the Company Administrator account upon receiving instructions from the license holder.
A Company Administrator is the super user. This permission allows a user to:
- Access all functionalities in the Settings page
- Set security features like Two Factor Authentication (2FA), Log-on Messages, and the Single Sign-On (SSO).
- Grant permissions to the users to become Instance Administrators.
Instance Administrator
Instance Administrator is a subset of Company Administrator with reduced access. This permission allows a user to:
- Access most settings excluding Administrator Setting and Company Setting
- Add, delete and edit users.
- Provide a username and password to the user and change some security settings related to the password.
- Add, edit and delete airport codes.
- Change the fatigue threshold setting.
- Change the date format.
Web User
A Web User is a normal user. This permission:
- Lets a user access the model functionality
- Restricts adding and editing Users and airports
- Restricts access to the Instance Administrator or Company Administrator settings.
Developer
A Developer refers a software developer employed by a client who wishes to:
- Access Preferences and API Setting
- Access model functionality
- Access Apps page
Survey App User
A Survey App User is someone with access to FRMSc sleep and activity data collection iOS/Android app(s). This user can:
- Submit data collected in a spreadsheet to the SAFE server.
- not access any other functionalities.
The fatigue chart
The fatigue chart is an interactive chart that shows fatigue, risk and sleep periods for a schedule. You can learn more about it in How to work with the fatigue chart.

The overview chart
This chart provides a picture of the rising and falling fatigue throughout each duty.
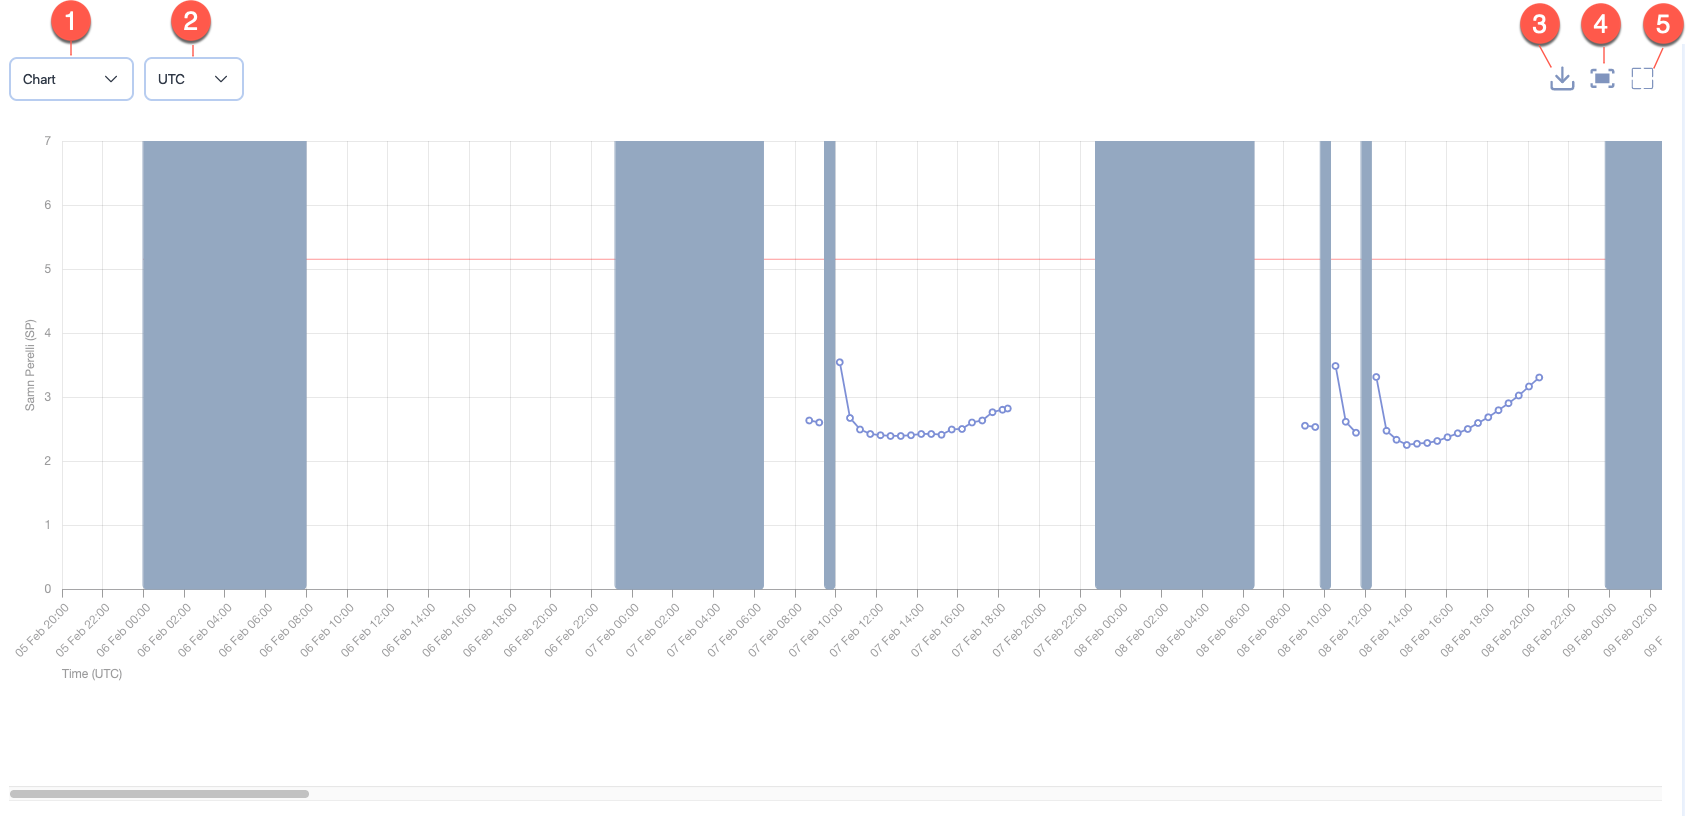
Note the tools for the Overview screen: from left to right:
- The Chart dropdown lets you choose between chart and report modes.
- The Time reference dropdown lets you choose whether the overview chart should be in UTC or base time.
- The Download icon lets you download the chart or the report.
- The Fit to Screen icon attempts to fit the chart or the report data within the visible area and hides the scroll bar for the chart or the report data.
- The Maximise icon maximises the report or the data to fill most of entire browser screen.
- After you click on the Maximise icon, the icon is replaced by a Minimise icon.

- Click on the Minimise icon to toggle the chart or report data to the original size.
- After you click on the Maximise icon, the icon is replaced by a Minimise icon.
The acclimatisation curve
The acclimatisation curve shows both the position of the pilot’s body clock in relation to the base time zone (blue line) and the position compared to local time (orange line). There are two button that can be used to turn off either of the curves to better demonstrate one of them. Also, there is a button next to these buttons to choose either the chart as shown below, or a report displaying the data behind the curve
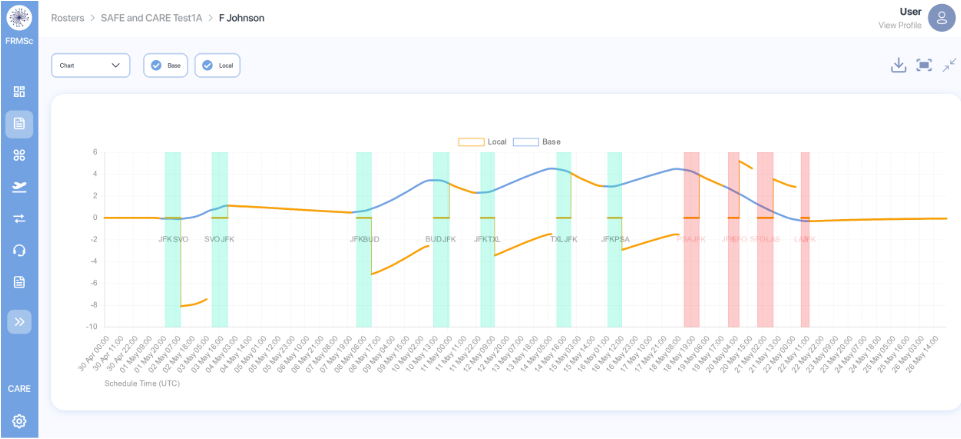
The vertical green bars indicate each duty and those to the right that have turned red indicate fatigue scores above the user defined threshold. The X scale is in hours with eastward movement progressing up the page from the 0 point of acclimatisation to home base. Westward movements push the curve down the page, as indicated in the last days to the right of the schedule above.
The group of icons to the top right indicate a pdf download is available and the screen can be minimised (and maximised) and the curve fitted to the width of the screen.
The sleep reservoir curve
The sleep reservoir curve below shows sleep in terms of a reservoir that is full at the end of a good sleep period and then dissipates with time awake, just like a water reservoir. It indicates the growth of the sleep propensity to sleep as a lower sleep reservoir, which falls in harmony with the circadian rhythm that in turn stimulates the need to sleep.
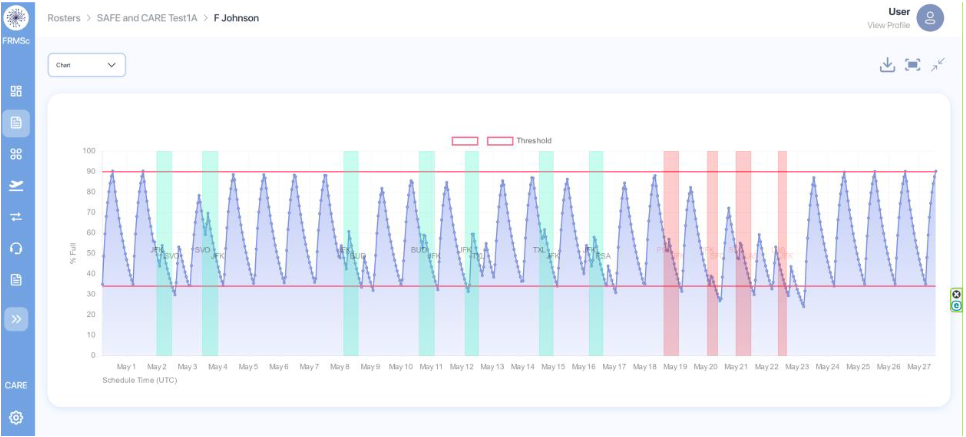
The group of three icons to the top right indicate a pdf download is available, the curve can be fitted to the width of the screen and the maximised screen can be minimised to return it to the original format.
The longer the time awake the more the reservoir drains of sleep, and this drives a greater propensity to sleep. Note that the red lines indicate normal waking (upper line) and normal sleep (lower line) points. Note the times where the reservoir falls below the reserve set by the lower red line indicating the aircrew are staying awake beyond their normal bedtime.
It can be seen amongst the red duties that indicate a breach of the fatigue threshold, to the right of the display, that the sleep reservoir has fallen below the normal time of sleep onset and does not reach the normal time of wakening, indicating lack of sleep from both causes.
The cumulative fatigue distribution curve
Cumulative fatigue curve for Rosters
You can also see the cumulative fatigue curve in the Rosters screen. Unlike the cumulative fatigue curve in Schedules screen, which is focused on the fatigue number of the selected schedule, the curve in Rosters screen shows a combined curve for all schedules in a roster.
The cumulative fatigue distribution curve is a useful curve to indicate the number of fatigue scores that are in evidence throughout the schedule. This curve shows the score distribution across the scale your company administrator has set for this instance.
You will also notice various data points across the curve. If you hover over a data point in a curve, you will see the a fatigue score based on the scale set for this instance. This score is for a schedule type (a pilot or a cabin crew). Below the score, you can see the percentage of scores that are below that score.
The vertical line which goes from the top to the bottom of this chart shows the threshold set by your company administrator for each schedule type.
Image from Rosters screen
The image below is a snapshot of the fatigue curve taken from the Rosters screen. This roster had multiple schedules and schedule types that is why the curve is showing two different lines for different schedule types - pilots and the cabin crew. The fatigue curve in Schedules screen will only show a single line and is specific to the the selected schedule.
In the image below, the curve shows distribution for the schedules that fall into bands between SP2 and SP3, SP3 and SP4, SP4 and SP5, and so on, on the Samn Perelli scale. The cabin crew threshold for this instance is set to 5.5 and the pilot threshold is set to 5. The cursor sits at SP score 6.1 and shows that 96.1% of the scores are below that score. It also shows that to get 100% under the threshold, it should be set at above SP6.7, which is too high.
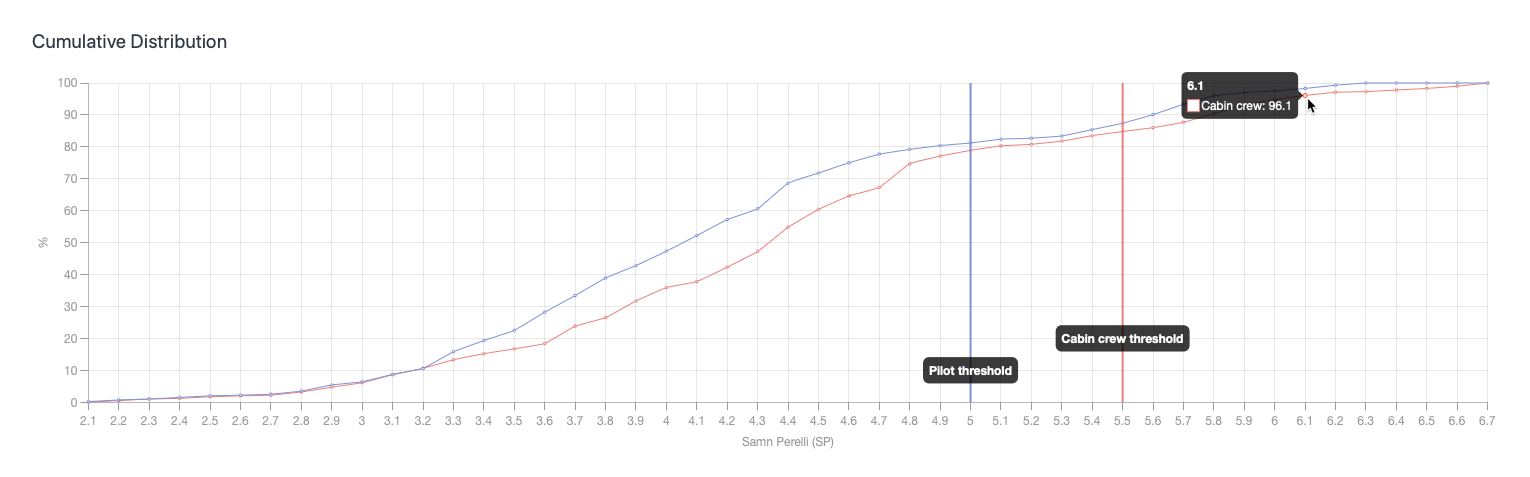
This curve demonstrates an overall level of “goodness” in terms of the design of the schedule as it illuminates the risks inherent in the schedule in a simple chart.
Ended: Reference
Tables of Properties ↵
Roster properties
You can find these properties when creating (or editing) a roster.
| Property (* required) |
Description |
|---|---|
| Name* | The name of the schedule. Usually the identifier of the pilot or the crew member e.g., employee number |
| Visibility | If other users should not be able to see the roster, choose Private else choose Public |
| Tags | The label attached to the Roster which can be used to group rosters together. |
Roster search properties
You can see these properties when you click the Advanced search icon at the end of the search bar in the Rosters screen. screen.
| Property controls | Property | Description |
|---|---|---|
| Sorting | Date Created | Check this box to sort the rosters by the date they were created. It is the default sorting option. You can also see descending sort ( ) or ascending sort () icons next to the Date Created property. Click on these icons to toggle between ascending or descending sort. |
| Roster Name | Check this box to sort the rosters by their names. You can also see descending sort ( ) or ascending sort () icons next to the Roster Name property. Click on these icons to toggle between ascending or descending sort. |
|
| Schedule Count | Check this box to sort the rosters by the number of schedules in a roster. You can also see descending sort ( ) or ascending sort () icons next to the Schedule Count property. Click on these icons to toggle between ascending or descending sort. |
|
| Roster visibility | Bookmarked | Enable this property to only show bookmarked rosters. |
| My Rosters | Enable this property to only show rosters that you created or uploaded. |
Schedule properties
You can find these properties when creating (or editing) a schedule for your roster.
| Property (* required) |
Description |
|---|---|
| Name* | The name of the schedule. Usually the name of the pilot or the crew member. |
| Rank | A label for indicating the rank of the pilot or the crew member. |
| Base Airport* | The homebase airport of the pilot or the crew member. Click on the airport name to view a text box. Type ICAO, IATA, or FAA airport codes in the text box and choose the airport from the drop down. |
| Preparation time | The time required to prepare after waking from a main sleep. |
| Crew Type* | The type of personnel. Choose between Pilot or Cabin crew. |
Schedule search properties
You can see these properties when you click the Advanced search icon at the end of the search bar in the Schedules screen.
| Property controls | Property | Description |
|---|---|---|
| Sorting | Schedule Name | Check this box to sort the schedules by their names. You can also see descending sort ( ) or ascending sort () icons next to the Schedule Name property. Click on these icons to toggle between ascending or descending sort. |
| Percentage Above Threshold | Check this box to sort the schedules by their percentage above threshold value. You can also see descending sort ( ) or ascending sort () icons next to the Percentage Above Threshold property. Click on these icons to toggle between ascending or descending sort. |
|
| Max Fatigue Score | Check this box to sort the schedules by their maximum fatigue scores. It is the default sorting option. You can also see descending sort ( ) or ascending sort () icons next to the Max Fatigue Score property. Click on these icons to toggle between ascending or descending sort. |
|
| Max Risk Score | Check this box to sort the schedules by their maximum risk scores. You can also see descending sort ( ) or ascending sort () icons next to the Max Risk Score property. Click on these icons to toggle between ascending or descending sort. |
|
| Schedule visibility | Bookmarked | Enable this property to only show bookmarked schedules. |
Duty properties
You can find these properties when creating (or editing) a duty in a schedule.
Cabin crew properties
Some of the properties shown below are exclusive to cabin crew i.e., the Create Duty form will not show some of the following properties for Pilots. Such properties will have the symbol - - next to the property name.
| Section | Property (* required) |
Description |
|---|---|---|
| General | Duty type* | Choose the type of duty from the dropdown. |
| Crew composition | Select the number of pilots in the flight from the dropdown or select 9 for cabin crew. | |
| On duty date and time* | The duty start date. Use the date time controls to set the date and time. | |
| Off duty date and time* | The duty end date. Use the date time controls to set the date and time. | |
| Time zone selector check boxes* | The time zone which the duty times are based on. Check the box that indicates the timezone. | |
| Time zone lock check boxes | Select this property if you want the web application to automatically convert your entered dates and times to match your time zone selection when swapping between UTC and local time zones. | |
| Start Airport* | The airport where the duty started. Default is the base airport. To change the airport, click on the airport name to view a text box. Then, type ICAO, IATA, or FAA airport codes and choose the airport from the drop down. | |
| End Airport* | The airport where the duty ended. Default is the base airport. To change the airport, click on the airport name to view a text box. Then, type ICAO, IATA, or FAA airport codes and choose the airport from the drop down. | |
| Commute Time | Select the time taken to commute to the duty. Default value is 1 hour. | |
| Fleet | A label you can use to indicate the aircraft being used. | |
| Sector Count | Select the number of flights in the duty. Default value is 1. | |
| Cabin Crew Sleep Pattern |
Select one of the following sleep patterns for the cabin crew.
See Cabin Crew Sleep Pattern to learn more. |
|
| Workload | Move the seeker bar horizontally to increase or decrease the workload in percentage increments (decrement) from the normal workload (workload=0) for the duty. Workload can be increased up to 100% of the normal workload (100= twice the normal workload level) or decreased by 50% of normal workload (-50 = half the normal workload) | |
| Rest Definition |
Select the method SAFE and CARE must use to calculate sleep periods. Depending on your selection additional properties will appear on this form.
|
|
| Sleep Details | Sleep Count |
The number of sleeps a cabin crew had during their duty. |
| Sleep Class |
The class where the cabin crew slept. Select:
|
|
| Sleep Order |
The rank, which the crew member slept in. | |
| Augmented Duty | On Duty Date Time |
The date and time the cabin crew started their augmented duty. See Partial Augmentation for more information on augmented duty. |
| Off Duty Date Time |
The date and time the cabin crew ended their augmented duty. See Partial Augmentation for more information on augmented duty. | |
| Time zone selector check boxes |
Select the time zones for the sleep start and end date times. You will see a separate set of time zone selector check boxes below Sleep Start Date Time and Sleep End Date Time. Selecting time zone for Sleep Start Date Time or Sleep End Date Time doesn't automatically select the time zone for corresponding Sleep End Date Time or Sleep Start Date Time.
|
|
| Time zone lock check boxes |
Select this property if you want the web application to automatically convert your entered dates and times to match your time zone selection when swapping between UTC and local time zones. | |
| Rest Period | Sleep Class |
The place where the cabin crew slept. |
| First rest start date time |
The date and time the cabin crew started their first rest. See In-duty rest for more information on rest period. | |
| First rest end date time |
The date and time the cabin crew ended their first rest. See In-duty rest for more information on rest period. | |
| Time zone selector check boxes |
Select the time zones for the duty start and end date times. You will see a separate set of time zone selector check boxes below On Duty Date Time and Off Duty Date Time. Selecting time zone for Sleep Start Date Time or Sleep End Date Time doesn't automatically select the time zone for corresponding Sleep End Date Time or Sleep Start Date Time.
|
|
| Time zone lock check boxes |
Select this property if you want the web application to automatically convert your entered dates and times to match your time zone selection when swapping between UTC and local time zones. | |
| Add second rest |
Click on this link if you want to add second rest date and times. A click on this link will produce additional properties for second rest. These properties and their selections are very similar to the first rest. See above for details. |
Duty file specification
This document shows you a list of columns that the duty file (CSV and XLSX formats) can contain. The file can contain duties (one per row) for multiple schedules. You can see the mandatory columns together with the optional columns in the table below. See Where to get formats to learn how to download an example duty file.
| ColumnName (+ required) |
Format | Description |
|---|---|---|
| Reference+ | Text | A free-text property usually used to indicate a pilot. Use pilot's name or ID. |
| OnDutyDate+ | Date (DD/MM/YYYY) | The duty start date. |
| OnDutyTime+ | Time (hh:mm) | The duty start time. |
| StartAirport+ | Text | The airport at which the duty started. Send ICAO, IATA, or FAA airport codes or a combination of these codes. |
| OffDutyDate+ | Date (DD/MM/YYYY) | The duty end date. |
| OffDutyTime+ | Time (hh:mm) | The duty end time. |
| EndAirport+ | Text | The airport at which the duty ended. Send ICAO, IATA, or FAA airport codes or a combination of these codes. |
| Sectors | Number | The number of flights in duty. Default value is 1. |
| CrewComposition | Number | Send
|
| SleepCount | Number (0-2) | The number of sleeps the pilot or the crew member slept on duty. |
| SleepOrder | Number (1-3) | The rank, which the pilot or the crew member slept in. Send
|
| SleepClass | Number (1-5) | Send
|
| HomeBase+ | Text | Send ICAO, IATA, or FAA airport codes or a combination of these codes. Default value is Start airport code. |
| TimeReference+ | Number (0-2) | The reference time zone. Send
|
| OnPartialAugmentDate | Date (DD/MM/YYYY) | The time at which the pilot or the crew member started their partial augmentation. |
| OnPartialAugmentTime | Time (hh:mm) | The time at which the pilot or the crew member started their partial augmentation. |
| OffPartialAugmentDate | Date (DD/MM/YYYY) | The date on which the pilot or the crew member ended their partial augmentation. |
| OffPartialAugmentTime | Time (hh:mm) | The time at which the pilot or the crew member ended their partial augmentation. |
| FirstRestStartDate | Date (DD/MM/YYYY) | The date on which the pilot or the crew member started their first rest. |
| FirstRestStartTime | Time (hh:mm) | The time at which the pilot or the crew member started their first rest. |
| FirstRestEndDate | Date (DD/MM/YYYY) | The date on which the pilot or the crew member ended their first rest. |
| FirstRestEndTime | Time (hh:mm) | The time at which the pilot or the crew member ended their first rest. |
| SecondRestStartDate | Date (DD/MM/YYYY) | The date on which the pilot or the crew member started their second rest. |
| SecondRestStartTime | Time (hh:mm) | The time at which the pilot or the crew member started their second rest. |
| SecondRestEndDate | Date (DD/MM/YYYY) | The date on which the pilot or the crew member ended their second rest. |
| SecondRestEndTime | Time (hh:mm) | The time at which the pilot or the crew member ended their second rest. |
| SplitShift | Number (0-1) | Indicates whether the pilot or crew member had rested in between flight. Send
|
| DutyType | Number (1-3) | The type of duty. Send
|
| Fleet | Text | A free-text property used to indicate fleet message. |
| Rank | Text | A free-text property used to indicate a pilot's rank. |
| Workload | Number | When the sector count is 0, send
|
| CrewPrepTime | Number | The time taken for crew to prepare. Value indicates minutes. Default value is 60 minutes. |
| DutyCommuteTime | Number | The time taken to commute to the duty. Value indicates minutes. Default value is 60 minutes. |
| CabinCrewSleepPattern | Number (0-3) | Send
Default value is 0. See Cabin Crew Sleep Pattern to learn more. |
Activity properties
You can find these properties when adding (or editing) an activity to a duty.
| Property (* required) |
Description |
|---|---|
| Activity type* | Choose the type of activity from the dropdown. Click here to see the available types. |
| Description | Add a short description about or comment on the activity. |
| Activity start date and time* | The activity start date. Use the date time controls to set the date and time. |
| Activity end date and time* | The activity end date. Use the date time controls to set the date and time. |
| Time zone selector check boxes* | The time zone which the activity times are based on. Check the box that indicates the timezone. |
| Time zone lock check boxes | Select this property if you want the web application to automatically convert your entered dates and times to match your time zone selection when swapping between UTC and local time zones. |
| Nearest airport* | The airport that is nearest to this activity. You can not change this property. The nearest airport for any activity is the departure airport of the duty it belongs to. |
Activity file specification
This document shows you a list of columns that the activity file (CSV and XLSX formats) can contain. The file can contain activities (one per row) for multiple schedules. You can see the mandatory columns together with the optional columns in the table below. See Where to get formats to learn how to download an example activity file.
| ColumnName (+ required) |
Format | Description |
|---|---|---|
| Reference+ | Text | A free-text field usually used to indicate a Activity. Use pilot's name or ID. Ensure that the name of the pilot matches the names in the duty file. |
| ActivityStartDate+ | Date (DD/MM/YYYY) | The activity start date. |
| ActivityStartTime+ | Time (hh:mm) | The activity start time. |
| ActivityEndDate+ | Date (DD/MM/YYYY) | The activity end date. |
| ActivityEndTime+ | Time (hh:mm) | The activity end time. |
| ActivityType+ | Text | Send one of the following
|
| Description+ | Text | A free text field to explain the activity. |
| TimeReference+ | Number (0-2) | Send
|
| StartAirport+ | Time (hh:mm) | The airport at which the activity started. Send ICAO, IATA, or FAA airport codes or a combination of these codes. |
| EndAirport+ | Text | The airport at which the activity ended. Send ICAO, IATA, or FAA airport codes or a combination of these codes. |
| Homebase+ | Text | The pilot's or the crew member's home airport. Send ICAO, IATA, or FAA airport codes or a combination of these codes. Default value is Start airport code. |
Sleep properties
You can find these properties when managing sleep to a duty.
| Property | Description |
|---|---|
| Sleep Start Date Time | The date and time the schedule started their sleep opportunity. |
| Sleep End Date Time | The date and time the schedule ended their sleep opportunity. |
| Time zone selector check boxes | Select the time zones for the sleep start and end date times. You will see a separate set of time zone selector check boxes below Sleep Start Date Time and Sleep End Date Time. Selecting time zone for Sleep Start Date Time or Sleep End Date Time doesn't automatically select the time zone for corresponding Sleep End Date Time or Sleep Start Date Time.
|
| Time zone lock check boxes | Select this property if you want the web application to automatically convert your entered dates and times to match your time zone selection when swapping between UTC and local time zones. |
| Nearest Airport | The start or end airport that is nearest to this sleep opportunity. You cannot change this property. The nearest airport is determined by the position of your cursor on the fatigue chart when you add a new sleep.
|
Airport properties
You can find these properties when adding or editing airports from the Airport screen.
| Property (* required) |
Description |
|---|---|
| Name* | The name of the airport |
| City* | The city where this airport is located |
| Country* | The country where this aiport is located |
| ICAO* | The ICAO code for this airport. If you have set this property, you can ignore IATA and FAA codes. |
| IATA* | The IATA code for this airport. If you have set this property, you can ignore ICAO and FAA codes. |
| FAA* | The FAA code for this aiport. If you have set this property, you can ignore IATA and ICAO codes. |
| Latitude | The latitude coordinate of this airport |
| Longitutde | The longitude coordinate of this airport |
| Timezone | The local timezone for this airport |
Preferences properties
You can find these properties under the Preferences tab in the Settings screen.
| Property | Description |
|---|---|
| Default Time References | This dropdown lets you choose the default time zone SAFE application must use to show time entries. Choose either UTC, Base time, or Local time. |
| Default Airport Code | This dropdown lets you choose the default format for the airport codes shown in the application. Choose either IATA, ICAO, or FAA. Not all airports have codes allocated to them. If the code is missing, no code will be displayed. |
| Default create roster visibility | This dropdown lets you choose the default visibility option that should be selected when you are creating a new roster. Choose either Public or Private.
|
| Show sleeps | This dropdown lets you choose whether to show the sleep data or hide it. Choose either Show sleeps or Hide sleeps. |
| Show fatigue | This dropdown lets you choose whether to show the fatigue data or hide it. Choose either Show fatigue or Hide fatigue. |
| Show risk | This dropdown lets you choose whether to show the Duty Risk Metric data or hide it. Choose either Show risk or Hide risk. |
| Email on Roster Upload Success | This dropdown lets you choose whether to send email notification to you after a roster is successfully uploaded to SAFE application. Choose either Send email or Do not send email. |
| Email on Roster Upload Failure | This dropdown lets you choose whether to send email notification to you if a roster could not be uploaded to SAFE application. Choose either Send email or Do not send email. |
| Email on Roster Shared | This dropdown lets you choose whether to send email notification to you when your roster is shared with anyone. Choose either Send email or Do not send email. |
General section properties
You can find these properties under the Administrator Settings tab in the Settings screen.
| Property | Description |
|---|---|
| Roster Visibility | Use this dropdown to set the visibility of the uploaded roster.
|
| Date Format | Use this dropdown to select the default date format for uploaded roster. Choose between:
If the uploaded roster has dates in a different format, SAFE application will see it as an upload error. |
| Base Airport | Use this property to set the base airport for your airline. If the control is showing an airport:
|
| Preferred Scale | Use this property to set the default scale that should be used to show alertness. See below for a video demonstration. Choose between:
|
| Pilot Threshold | Use this property to change the scale threshold for pilots. You can change the value of this property by adjusting the slider control left or right. We recommend that you use SP scale and set the Pilot Threshold to 5.0. |
| Cabin Crew Threshold | Use this property to change the scale threshold for cabin crew. You can change the value of this property by adjusting the slider control left or right. We recommend that you use SP scale and set the Cabin Crew Threshold to 5.5. |
| Insert rest into multi-sector augmented duty | Use this property to set automatic sleep value for aircrew flying multiple sectors. Choose:
|
| Default Schedule Preparation Time | Use this property to select the default preparation time for the crew. |
| Default Duty Commute Time | Use this property to select the default duty commute time for the crew. See below for a video demonstration. |
| Default Cabin Crew Sleep Pattern | Use this property to select the default cabin crew sleep pattern for normal long haul and ultra long haul (ULR) flights. Choose either:
See Cabin Crew Sleep Pattern to learn more. |
| Default Upload Format | Use this property to set the default format for the CSV or XLSX file you want to upload to the SAFE application. The file format of your choice will be translated to SAFE and CARE format automatically. Choose one option from the following to prescribe the upload format to the SAFE application:
If your Crew Management System is not included in this list, please email info@frmsc.com for assistance to create the connectivity option.
|
How to change alertness scale?
How to change commute times?
Upload section properties
You can find these properties under the Administrator Settings tab in the Settings screen.
| Property | Description |
|---|---|
| Basic Field Upload | Use this property to accept (or ignore) In-Duty Rest and Partial augmentation properties. If this property is checked, partial augmentation and in-duty rest values will be ignored. |
| Upload Error Handling | Use this dropdown to select the action SAFE application must take if the upload has errors. Choose either:
|
Auto-purge section properties
You can find these properties under the Administrator Settings tab in the Settings screen.
| Property | Description |
|---|---|
| Date Range to Purge | Use this dropdown to delete roster analysis that are past a certain age. You can choose from different time intervals, such as 1 day, 2 days, 30 days, 60 days, or 365 days. Analyses that are older than the selected value will be removed from the application by an automatic process that runs at night. You can turn this functionality off by choosing the Off option from the dropdown. |
| User's Data to Purge (Optional) | Use this property to delete only the uploads of specific user(s).
|
Duty limit section properties
You can find these properties under the Administrator Settings tab in the Settings screen.
| Property | Description |
|---|---|
| Duties in system | The total number of duties held by this instance of the application. |
| Limit | The total number of duties this instance of the application can hold. If you want to increase this limit, contact us at info@frmsc.com.
If the number of duties in this instance has reached the instance limit, you will not be able to process new duties. You could delete old duties or archive them as a workaround, if you would like to continue processing new duties without increasing the instance limit. However, archived duties can't be analysed or processed.
|
Preferred main sleep section properties
You can find these properties under the Administrator Settings tab in the Settings screen.
| Property | Description |
|---|---|
| Country | Use this dropdown to select the country, which you want to configure the sleep times for. There is no limit on the number of countries you can configure. However, if the sleep time is already configured for the selected country, you can't edit it. You must delete the configuration and add the configuration with new settings. |
| Sleep Start | Use this dropdown to select the default sleep start time for the selected country. |
| Sleep End | Use this dropdown to select the default sleep end time for the selected country. |
How to change preferred main sleep?
Company Settings properties
You can find these properties under the Company Settings tab in the Settings screen.
| Property | Description |
|---|---|
| Remember me enabled | Use this property to enable or disable the Remember me checkbox you will see in the login screen. If toggled on, the Remember me checkbox will appear in the login screen. |
| Log on warning message | Use this property to show a message to each user upon successful login. Type in the message you want show. If left blank, the warning message screen will not appear.
Use caution when enabling this message as it can disorient your users. Only enable this feature, if you are trying to share important information to the users.
|
| Account suspension active | Use this property to decide whether to suspend an account after a certain number of failed login attempts. Toggle this property on to enable suspension. You can set the threshold for failed attempts below. |
| Suspend user account days | Use this property to set the number of days a user can remain inactive before their account is automatically suspended. |
| Maximum login attempts | Use this property to specify the threshold for failed login attempts. This property works in conjunction with Account suspension active property. |
| Lockout suspension days | Use this property to set the number of days a suspended user will be locked out before they can attempt to login again. |
| Two Factor Enabled | Use this property to enable or disable two factor authentication (2FA). If enabled, users must use the code received in their email to validate their account before accessing the system. |
| Saml SSO Enabled | Use this property to enable or disable SAML Single Sign On feature. When you toggle this property on, you will see a list of the following additional properties you must set to start using SAML Single Sign On.
|
User properties
You can find these properties when editing a user from the User Management tab in the Settings screen.
| Property | Description |
|---|---|
| The email used to register the user | |
| Name | The name of the user |
| User Validity | The period until which the user details will be valid. If you choose Expires, User Expiry property will appear beneath this property. Use the User Expiry property to specify the date after which the user details will become invalid. |
| Password Validity | The interval for which the password associated with this user will be valid. If you choose Expires, Password Expiry property will appear beneath this property. Use the Password Expiry property to specify the interval as number of days after which the user must change their password. |
| External Share Enabled | The option that lets you control whether this user can share roster analysis externally. If you choose User can share externally, a share button will be available for this user on top of each roster analysis. |
| Permission | The dropdown that lets you control the role for this user. Use this property to assign appropriate role to this user. See Permissions in SAFE for more information. |
| Is Enabled | The option that lets you control whether (or not) this user details can be used to access this application. Uncheck the box to disable this user's access to the SAFE application. |
| Change Password Next Login | The option that lets you control whether (or not) this user must change their password next time they successfully login to this application. Check the box to force the user to change password on next login. |
| Two Factor Enabled | The option that lets you control whether (or not) two factor authentication (2FA) should be enabled for this user. If enabled, the user must use the code received in their email to validate their account before accessing the system. Check the box to force two factor authentication for this user. |
| Permission | A snapshot of this user's permissions/roles across all the instances of SAFE application they are invited to. |
| User Logins | A history of successful login by this user. |